CyanogenMod is the best and highly popular open-source Custom ROM for Android devices. CyanogenMod is designed to increase performance and reliability over Android-based ROMs released by vendors and carriers. It also offers a variety of features and enhancements that are currently not found in stock versions of Android.
The Stable CyanogenMod 7.1 build has been finally released after a long delay. CM 7.1 comes with a lot of new features, improvements, and support for 68 devices! This build is based on Android 2.3.7. While stable CM 7.1 is available for a majority of devices but still there are many devices still in beta status (Pyramid, HP Touchpad, Optimus 3D, etc.)

Official CyanogenMod support for Samsung Galaxy S II has been added in CyanogenMod 7.1. Here is our Guide to Install CM 7.1 on SGS2 (follow the below steps carefully). This tutorial can be used to install CM7 on other supported Android devices as well if your device is rooted with an appropriate tool.
Disclaimer: Please try this guide at your own risk. We will not be responsible in case you brick the device or its warranty gets void.
Before proceeding, Make a BACKUP – It’s recommended to backup entire phone data like contacts, messages, photos, etc. Use Titanium Backup to create a backup of all Applications installed on the phone (requires rooting). Also, backup everything stored on the SD card to a folder on your PC because it might be formatted too.
>> To Flash a custom ROM on your device, you first need to ROOT the Galaxy S II. Visit this thread posted at the XDA-Developers forum to see how to root your SGS2.
Prerequisite: A 100% battery and download the below files.
- Download CyanogenMod 7.1 (Stable Mod) for SGS2 I9100
- Download Google Apps for CM7
Installing ClockworkMod Recovery –
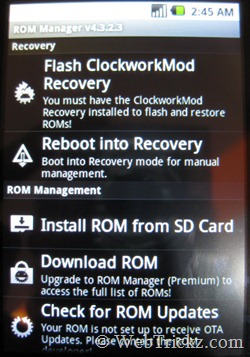
- Download and install the “ROM Manager” app from the Android market. Now open ROM Manager, a message will appear, select OK to continue.
- Select the first option “Flash ClockworkMod Recovery”.

- A confirm phone model window will appear, select ‘Samsung Galaxy S II’. A pop-up will open asking for Superuser access, instantly click Allow. A dialog box will appear saying ‘Successfully Flashed ClockworkMod Recovery!’.
- Re-open ROM Manager and select “Reboot into Recovery”.
Backup Current SGS2 Gingerbread Stock ROM –
In ClockworkMod Recovery, open ‘backup and restore’ and select the ‘Backup’ option. The recovery image of the current ROM will be backed up to a folder named ‘clockworkmod’ on your SD card. Then select ‘reboot system now’ to restart the phone. Next,
>> Make sure to copy the ‘clockworkmod’ folder from the SD card to your computer.
>> Transfer the update-cm-7.1.0-GalaxyS2-signed.zip and ‘Google Apps zip’ file (downloaded above) to the root directory of your SD card.
Reboot the phone into Recovery Mode – Launch ROM Manager on phone and select “Reboot into Recovery”.
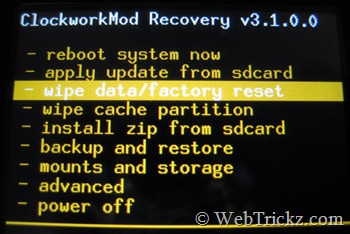
- In ClockworkMod Recovery, scroll down to the 3rd option “wipe data/factory reset” using the volume keys and select it. Select ‘Yes — delete all user data’ to confirm.

- After the Data Wipe is completed, select “wipe cache partition” and then select ‘Yes – Wipe Cache’ to confirm.
- Then open “advanced” and select “Wipe Dalvik Cache”, confirm to proceed. Next “Wipe Battery Stats” too.
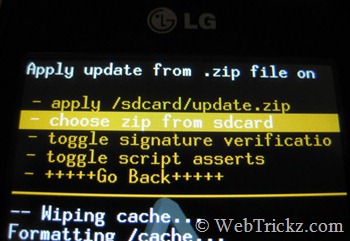
- Next, select “install zip from sdcard” from the main Recovery menu. Select “choose zip from sdcard” and then choose the update-cm-7.1.0-GalaxyS2-signed.zip file to apply, select ‘Yes..’ to confirm.

- Just wait for few minutes until the installation gets completed.
- Similarly, Flash the Google Apps zip file (gapps-gb-20110828-signed.zip).
- Once the installation has finished, select +++++Go Back+++++ to get back to the main menu, and select the Reboot system now option. The Samsung Galaxy S II should now boot into CyanogenMod.
That’s it! Enjoy the all-new, powerful, and customizable CyanogenMod 7.1 ROM. 🙂


Hey, have you tried it first hand?
Do all the Google Apps work?
I haven’t tried it but it’ll surely work as it’s a clear cut procedure inspired from my LG P500 custom ROM article. It’s stable CM 7.1, Google Apps would probably work fine with it.
How do I do it for my Galaxy R.? Galaxy R ROM came out.?