WebTrickz
TRENDING
  • Claude vs ChatGPT: Which Is Better in 2026?
No Result
View All Result
  • Reviews
  • Editorials
  • Social Media
    • Facebook
    • Twitter
    • YouTube
    • Messenger
    • Instagram
    • Snapchat
    • WhatsApp
    • TikTok
  • Apps
  • How To’s
  • Apple
  • iPhone
  • Google
  • Android
  • Mac
  • Security
  • About Us
    • About Us
    • Contact Us
    • Privacy Policy
  • Reviews
  • Editorials
  • Social Media
    • Facebook
    • Twitter
    • YouTube
    • Messenger
    • Instagram
    • Snapchat
    • WhatsApp
    • TikTok
  • Apps
  • How To’s
  • Apple
  • iPhone
  • Google
  • Android
  • Mac
  • Security
  • About Us
    • About Us
    • Contact Us
    • Privacy Policy
No Result
View All Result
WebTrickz
No Result
View All Result
Home iPhone

How to Add Screen Recording to Control Center on iPhone

Mayur Agarwal by Mayur Agarwal
September 23, 2026
in How To's, iPhone

Screen recording is a useful feature that lets you capture and share on-screen activities on your iPhone. You can use it to record gameplay, create tutorials, capture app demonstrations, or document troubleshooting steps.

The built-in Screen Recording tool lets you capture your iPhone’s screen with internal audio and, optionally, your microphone. If the Screen Recording button is missing from Control Center, you can add it manually on iOS 18, iOS 26, or iOS 27.

Can’t Find Screen Recording in Control Center on iPhone?

Screen Recording is accessed through Control Center on iPhone. If the button is missing, you can add it manually. The process is similar on iOS 18, iOS 26, and iOS 27.

Apple introduced a redesigned Control Center in iOS 18, allowing users to add, rearrange, and resize controls directly from Control Center. The same customization method is available in iOS 26 and iOS 27.

Here’s how to add the Screen Recording control to Control Center on your iPhone.

How to Add Screen Recording to Control Center on iPhone

Follow these steps to add Screen Recording to Control Center on an iPhone running iOS 18, iOS 26, or iOS 27:

  1. Swipe down from the top-right corner of the screen to open the Control Center.
  2. Tap and hold (long-press) an empty area in the Control Center.
  3. Tap the Add a control option at the bottom. Add Screen Recording to Control Center on iPhone
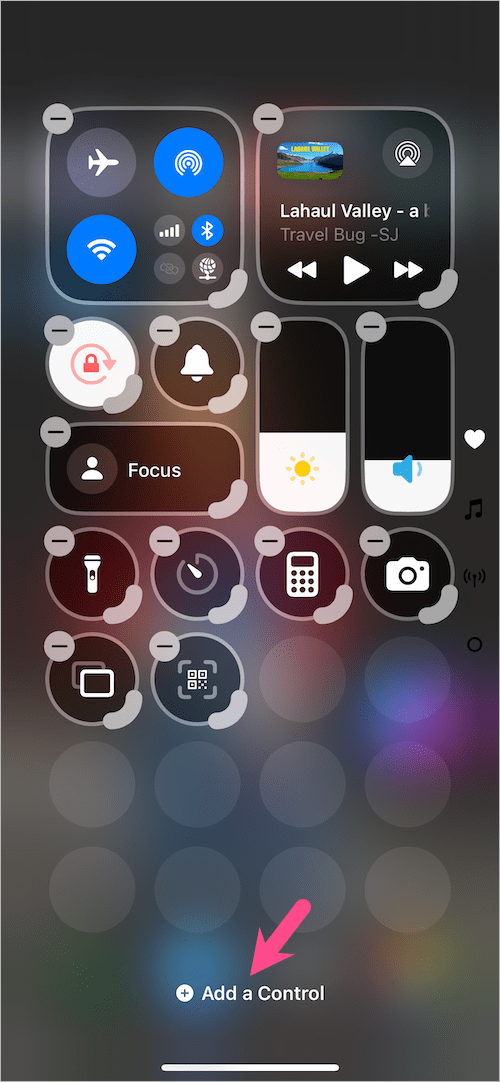
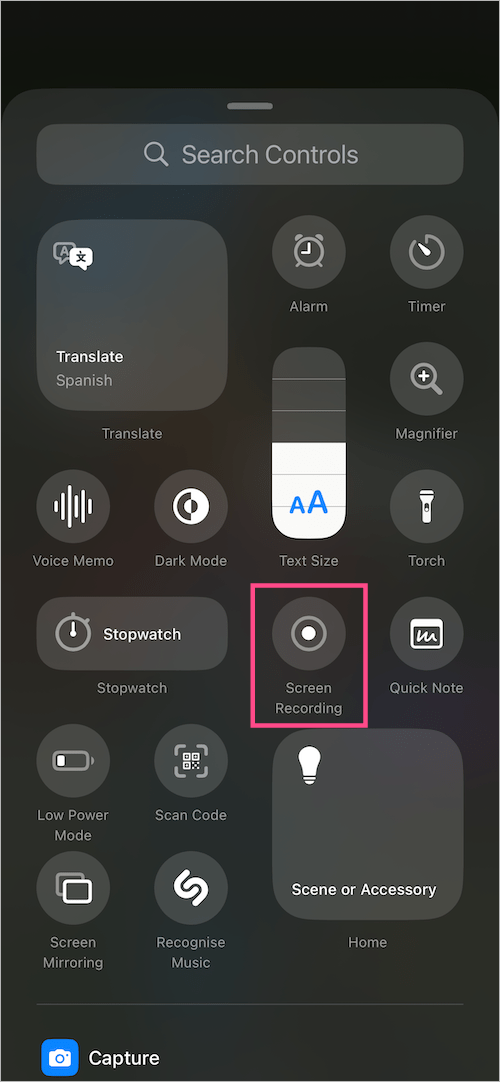
  4. On the Controls page, select Screen Recording to add it to your Control Center. Screen Recording control in the iPhone Control Center controls gallery
  5. (Optional) Hold and drag the control to rearrange its position. You can also expand the control icon to display its label. Screen Recording added to iPhone Control Center
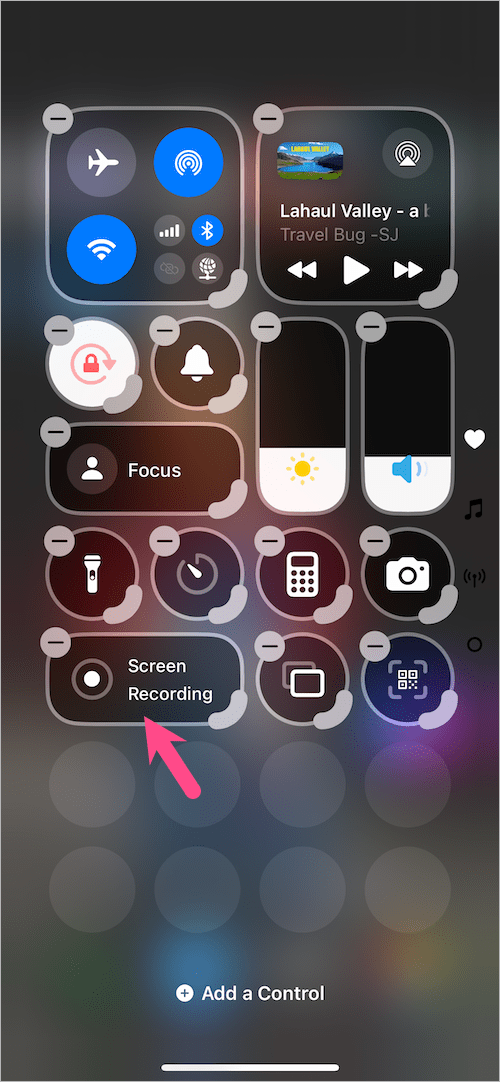
  6. Tap anywhere on the screen to return to the Control Center.

That’s it! The Screen Recording feature will now be available in the Control Center.

How to Use Screen Recording

  • To start recording, open the Control Center and tap the Screen Recording button. A 3-second countdown will begin before recording starts.
  • To stop recording, tap the red status bar at the top (or tap the recording icon in the Dynamic Island) and select Stop. You can also open the Control Center and tap the Screen Recording icon again.

TIP: To enable the microphone while recording, touch and hold the Screen Recording icon, then tap Microphone Off so it changes to Microphone On. Then start your recording.

turn on microphone for screen recordings on iphone

Screen recordings are automatically saved to the Photos app. To find all your recordings in one place, open Photos, scroll down to Media Types, tap Media Types, then select Screen Recordings.
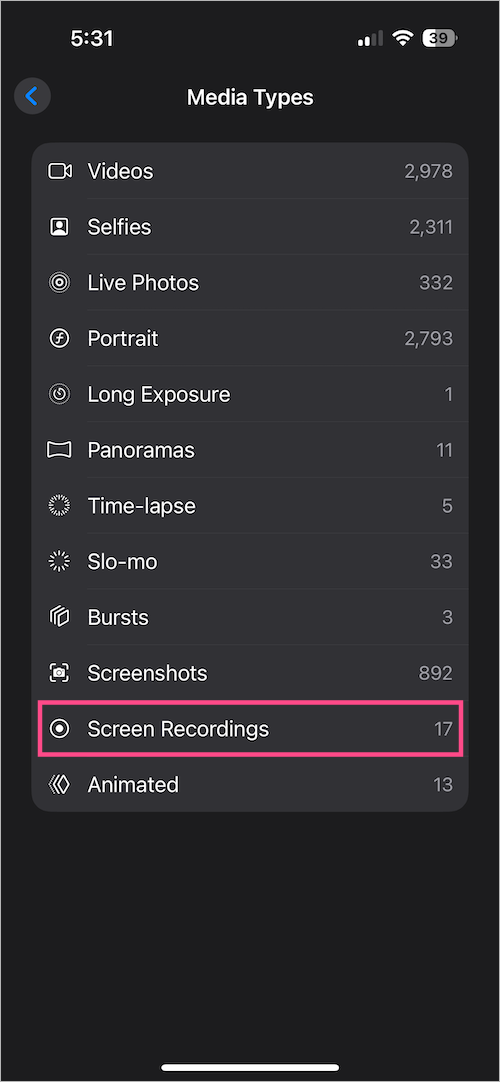
how to view screen recordings in ios 18, ios 26, and ios 27

RELATED TIPS:

  • How to Reset Control Center to Default on iPhone
  • How to Screen Record on iPhone 17 or iPhone Air
  • How to Screen Record on iPhone 18 Pro and 18 Pro Max

Add WebTrickz as a preferred source on Google
Tags: Control CenteriOS 18iOS 26iOS 27iPhoneScreen Recording
ShareTweetSend
Previous Post

iOS 18/iOS 26: How to Clear Recently Viewed Photos on iPhone

Next Post

iOS 26: How to Get AutoMix in Apple Music on iPhone

Mayur Agarwal

Mayur Agarwal

Mayur Agarwal, the founder and editor of WebTrickz, is a tech enthusiast with a Bachelor's degree in Computer Applications and over 15 years of experience in tech writing. His passion for technology and gadgets drives him to create insightful how-to articles and troubleshooting guides.

Next Post
ios 26 logo

iOS 26: How to Get AutoMix in Apple Music on iPhone

Comments 1

  1. Jacalyn says:
    1 year ago

    A million thanks!!! I was panicking for 2 whole weeks without this on my new pro max ?

    Reply

Leave a Reply Cancel reply

Your email address will not be published. Required fields are marked *

Latest Stories

Closing Apps on iPhone 18 Pro and 18 Pro Max

How to Close Apps on iPhone 18 Pro and 18 Pro Max

September 19, 2026

How to Screen Record on iPhone 18 Pro and 18 Pro Max

September 19, 2026
iPhone 18 Pro and 18 Pro Max

How to Take a Screenshot on iPhone 18 Pro or 18 Pro Max

September 23, 2026
silent mode popup in dynamic island

How to Put iPhone 18 Pro on Silent or Vibrate Mode

September 18, 2026
Closing Apps on iPhone 18 Pro and 18 Pro Max

How to Restart or Force Restart iPhone 18 Pro and 18 Pro Max

September 23, 2026
iPhone 18 Pro and 18 Pro Max

How to Turn Off iPhone 18 Pro or 18 Pro Max

September 23, 2026
instagram logo

How to Find Scheduled Posts on Instagram

July 29, 2026

Trending Stories

  • Photo by Jeff Hardi on Unsplash

    How to Turn Off Fn Lock on a Windows Laptop

  • Easiest Way to Change Galaxy Nexus from Yakjuxw (Non-Yakju) to Android 4.2 Yakju/Takju and Get future Updates from Google

  • How to Turn Off Microsoft Edge Game Assist in Windows 11

  • How to Turn Off Microsoft Family Safety on Windows 11 & 10

  • How to Put iPhone 18 Pro on Silent or Vibrate Mode

  • About Us
  • Contact Us
  • Privacy Policy
  • Advertise

© 2026 WebTrickz. All Rights Reserved.

No Result
View All Result
  • Reviews
  • Apps
  • How To’s
  • Android
  • Google
  • iPhone
  • Mac
  • About Us
  • Contact Us
  • Privacy Policy

© 2026 WebTrickz. All Rights Reserved.