WebTrickz
TRENDING
  • Claude vs ChatGPT: Which Is Better in 2026?
No Result
View All Result
  • Reviews
  • Editorials
  • Social Media
    • Facebook
    • Twitter
    • YouTube
    • Messenger
    • Instagram
    • Snapchat
    • WhatsApp
    • TikTok
  • Apps
  • How To’s
  • Apple
  • iPhone
  • Google
  • Android
  • Mac
  • Security
  • About Us
    • About Us
    • Contact Us
    • Privacy Policy
  • Reviews
  • Editorials
  • Social Media
    • Facebook
    • Twitter
    • YouTube
    • Messenger
    • Instagram
    • Snapchat
    • WhatsApp
    • TikTok
  • Apps
  • How To’s
  • Apple
  • iPhone
  • Google
  • Android
  • Mac
  • Security
  • About Us
    • About Us
    • Contact Us
    • Privacy Policy
No Result
View All Result
WebTrickz
No Result
View All Result
Home How To's

How to Erase Rewritable CD/DVD disc in Windows 7

Mayur Agarwal by Mayur Agarwal
January 29, 2021
in How To's, Windows 7

Windows 7 A CD burning software is required to erase or delete the data stored on rewritable discs, before burning a fresh image onto them. But that’s not the case with Windows 7, because it includes a handy feature to erase disc simply without using any external app.

To erase a rewritable disc in Windows 7, follow the steps below:

1. Open My Computer, right–click the CD/DVD-RW drive shown under ‘Devices with removable storage’. Select the ‘Erase this disc’ option. A dialog box will then appear asking for confirmation, click the Next button.
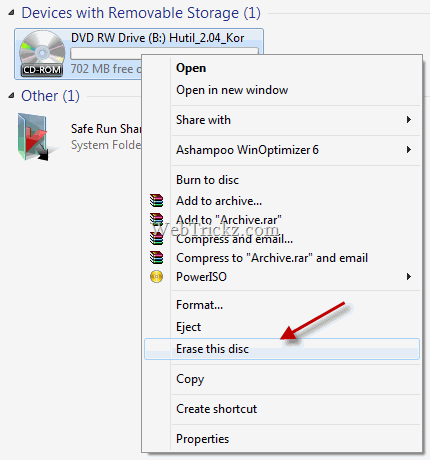
Erase this disc

2. Wait for the process to erase all the files on the rewritable disc.
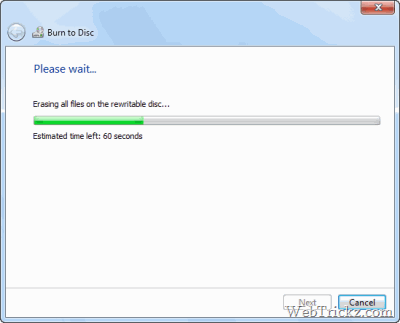
erasing files on RW disc

4. After the process is completed, you can burn new files to the disc.
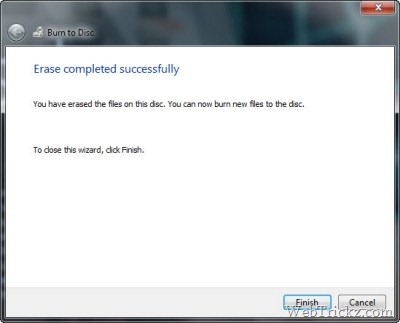
disc erased

This is a useful tip that many Windows 7 users might not know.

Add WebTrickz as a preferred source on Google
Tags: TipsTricksTutorials
ShareTweetSend
Previous Post

Hardware comparison – iPhone 3GS vs Nexus One

Next Post

Kaspersky Internet Security & Antivirus 2011 Beta released!

Mayur Agarwal

Mayur Agarwal

Mayur Agarwal, the founder and editor of WebTrickz, is a tech enthusiast with a Bachelor's degree in Computer Applications and over 15 years of experience in tech writing. His passion for technology and gadgets drives him to create insightful how-to articles and troubleshooting guides.

Next Post

Kaspersky Internet Security & Antivirus 2011 Beta released!

Comments 1

  1. nagarjuna says:
    16 years ago

    nice explanation

    Reply

Leave a Reply Cancel reply

Your email address will not be published. Required fields are marked *

Latest Stories

Closing Apps on iPhone 18 Pro and 18 Pro Max

How to Close Apps on iPhone 18 Pro and 18 Pro Max

September 19, 2026

How to Screen Record on iPhone 18 Pro and 18 Pro Max

September 19, 2026
iPhone 18 Pro and 18 Pro Max

How to Take a Screenshot on iPhone 18 Pro or 18 Pro Max

September 23, 2026
silent mode popup in dynamic island

How to Put iPhone 18 Pro on Silent or Vibrate Mode

September 18, 2026
Closing Apps on iPhone 18 Pro and 18 Pro Max

How to Restart or Force Restart iPhone 18 Pro and 18 Pro Max

September 23, 2026
iPhone 18 Pro and 18 Pro Max

How to Turn Off iPhone 18 Pro or 18 Pro Max

September 23, 2026
instagram logo

How to Find Scheduled Posts on Instagram

July 29, 2026

Trending Stories

  • Photo by Jeff Hardi on Unsplash

    How to Turn Off Fn Lock on a Windows Laptop

  • Easiest Way to Change Galaxy Nexus from Yakjuxw (Non-Yakju) to Android 4.2 Yakju/Takju and Get future Updates from Google

  • How to Turn Off Microsoft Edge Game Assist in Windows 11

  • How to Turn Off Microsoft Family Safety on Windows 11 & 10

  • How to Put iPhone 18 Pro on Silent or Vibrate Mode

  • About Us
  • Contact Us
  • Privacy Policy
  • Advertise

© 2026 WebTrickz. All Rights Reserved.

No Result
View All Result
  • Reviews
  • Apps
  • How To’s
  • Android
  • Google
  • iPhone
  • Mac
  • About Us
  • Contact Us
  • Privacy Policy

© 2026 WebTrickz. All Rights Reserved.