WebTrickz
TRENDING
  • How to Turn Off and Restart iPhone 15
No Result
View All Result
  • Reviews
  • Editorials
  • Social Media
    • Facebook
    • Twitter
    • YouTube
    • Messenger
    • Instagram
    • Snapchat
    • WhatsApp
    • TikTok
  • Apps
  • How To’s
  • Apple
  • iPhone
  • Google
  • Android
  • Mac
  • Security
  • About Us
    • About Us
    • Contact Us
    • Privacy Policy
No Result
View All Result
WebTrickz
No Result
View All Result
Home Android

How to Root HTC One & Install Custom Recovery using Mac

Mayur Agarwal by Mayur Agarwal
February 21, 2024
in Android, How To's

Want to root the HTC One on Mac OS and make it more awesome by enabling access to root applications or custom ROM? Well, you can easily root all variants of HTC One (AT&T, Sprint, T-Mobile, International, Unlocked) if you have an unlocked bootloader and have a custom recovery (CWM or TWRP) installed. The process of rooting HTC One involves unlocking the device bootloader and then booting into custom recovery to flash the root files. Follow the procedure below to root HTC One (M7) on Mac!

How to Root & Install CWM Custom Recovery on HTC One using Mac

Step 1 – Unlock the HTC One Bootloader (using a Mac). Note: This will WIPE the entire data on your device. So, take a backup of all your personal and important data.

Step 2 – Download the required files:

  • ClockworkMod (CWM) Custom Recovery – Available for HTC One International, AT&T, Sprint, T-Mobile, Unlocked (non-US GSM). Link: clockworkmod.com/rommanager
  • Download UPDATE-SuperSU-v1.34.zip
  • Download htcone-fastboot.zip and extract it to a folder.

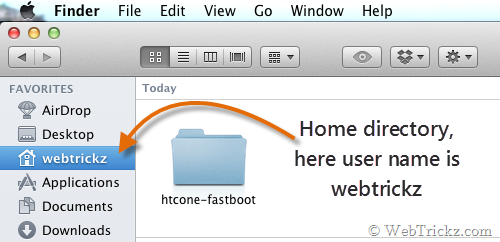
Step 3 – Copy the ‘htcone-fastboot’ folder to the Home directory in Finder. Also, copy the downloaded custom recovery .img file for your model to the htcone-fastboot folder.
Screen Shot 2013-07-03 at 12.42.40 AM

Step 4 – Transfer the ‘UPDATE-SuperSU-v1.34.zip’ file to your phone’s root storage.

  • ‘Enable USB Debugging’ on your phone. (Settings > Developer options)
  • Now “Power off” the device. Then press the Volume Down + Power button simultaneously to start the device into Bootloader mode (HBOOT).
  • Highlight Fastboot using the volume buttons and press the Power button to enter into Fastboot mode.
  • Connect the device to the computer via a USB cable.

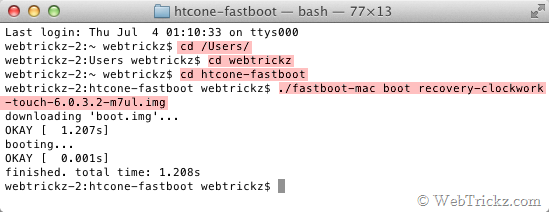
Step 5 – Open Terminal on Mac (Applications > Utilities). In the Terminal, type the following lines of code after the $, and hit return (enter) after each line. In the second line, type your user name as seen in Finder, and without the brackets. Refer to the below image:

cd /Users/
cd [your username]
cd htcone-fastboot
./fastboot-mac flash recovery [name of recovery .img file]
./fastboot-mac erase cache
Screen Shot 2013-07-04 at 1.13.22 AM

Note: If you don’t want to flash custom recovery, then use the below command instead (in the 4th line). This will rather temporarily boot the device into custom recovery, letting you root the phone without installing CWM recovery.

./fastboot-mac boot [name of recovery .img file]

Rooting: While you’re in fastboot, highlight the “Bootloader” option and press the power button. Now select and open ‘Recovery’ from bootloader mode. In CWM, choose ‘install zip from sdcard’ (use the volume keys to navigate and the Power key to select on non-touch recovery), select ‘choose zip from sdcard’, then select the file ‘UPDATE-SuperSU-v1.34.zip’ to flash. Upon completion, select ‘Go Back’ and ‘Reboot system now’.

Voila! After the device reboots, you should see the SuperSU app installed and root privileges on your HTC One.

Tags: AndroidBootloaderGuideHTCMacROMRooting
ShareTweetSend
Previous Post

How to Unlock HTC One Bootloader using a Mac [Step-by-step Guide]

Next Post

Stop WhatsApp Images & Videos from Appearing in Android Gallery

Mayur Agarwal

Mayur Agarwal

Mayur Agarwal, the founder and editor of WebTrickz, is a tech enthusiast with a Bachelor's degree in Computer Applications and over a decade of writing experience. His passion for technology and gadgets inspires him to create insightful How To's and troubleshooting guides.

Next Post

Stop WhatsApp Images & Videos from Appearing in Android Gallery

Comments 1

  1. cansu says:
    10 years ago

    thank you!! even in February 2015 your info is highly appreciated 🙂

    Reply

Leave a Reply Cancel reply

Your email address will not be published. Required fields are marked *

Latest Stories

ios 18

iOS 18: How to Add Screen Record to Control Center on iPhone

March 30, 2025
ios photos logo

iOS 18: How to Clear Recently Viewed Photos on iPhone

December 27, 2024
ios photos logo

How to Find Your Favorite Photos in iOS 18 on iPhone

December 30, 2024
ios 18

How to Reset Control Center to Default in iOS 18.1 on iPhone

April 2, 2025
iphone 16 pro max always-on display

How to Turn Off Always-On Display on iPhone 16 Pro & 16 Pro Max

November 11, 2024
ios 18

How to Find Recently Deleted Photos in iOS 18 on iPhone

December 30, 2024
apple iphone 16 pro

How to Close Apps on iPhone 16, 16 Pro, and 16 Pro Max

October 22, 2024

Trending Stories

  • Apple iphone 16

    How to Turn Off and Restart iPhone 16, 16 Pro, and 16 Pro Max

  • How to Put Your iPhone 16 on Vibrate or Silent Mode

  • How to Turn Off & Restart iPhone 15, 15 Pro, and 15 Pro Max

  • How to Turn Off Most Relevant Comments on Facebook

  • 4 Ways to Remove the Floating Home Button on iPhone

  • About Us
  • Contact Us
  • Privacy Policy
  • Advertise

© 2025 WebTrickz. All Rights Reserved.

No Result
View All Result
  • Reviews
  • Apps
  • How To’s
  • Android
  • Google
  • iPhone
  • Mac
  • About Us
  • Contact Us
  • Privacy Policy

© 2025 WebTrickz. All Rights Reserved.