The Samsung Galaxy Note 4 isn’t available yet except in certain regions of Asia. Despite the limited availability of Note 4, the infamous Android developer ‘Chainfire’ has already managed to root the Note 4 with his popular and easiest rooting tool “CF-Auto-Root”. The tool currently supports 3 Asian variants of the Galaxy Note 4 – SM-N910C, SM-N910U, and SM-N9106W. The SM-N910C model will be sold in Thailand (based on Exynos), SM-N910U in Hong Kong (based on Exynos), and SM-N9106W is meant for China (powered by Snapdragon 805 chip). Chainfire will be releasing Root for more models of Note 4 as soon as he receives the stock firmware for currently unsupported models. Well, that wouldn’t take long for the master!

In case you have a supported Note 4 model that you want to root, then you can use “CF-Root” that keeps your device as close to stock as possible and is a pretty easy way to root. The tool requires ODIN and will install SuperSU binary & APK and Stock recovery to your Note 4. Follow the below step-by-step procedure carefully to root Galaxy Note 4 using CF-Auto-Root.
Supported Note 4 Models – (Don’t even try it on a different model)
Update – Chainfire has now released root for various other models of Galaxy Note 4.
SM-N910F (International, Qualcomm): CF-Auto-Root-trlte-trltexx-smn910f.zip
SM-N910G (Asia, Qualcomm): CF-Auto-Root-trlte-trltedt-smn910g.zip
SM-N910H (Asia, Exynos): CF-Auto-Root-tre3g-tre3gxx-smn910h.zip
SM-N910T (T-Mobile USA, Qualcomm): CF-Auto-Root-trltetmo-trltetmo-smn910t.zip
SM-N910P (Sprint, Qualcomm): CF-Auto-Root-trltespr-trltespr-smn910p.zip
SM-N910R4 (US Cellular, Qualcomm): CF-Auto-Root-trlteusc-trlteusc-smn910r4.zip
SM-N910W8 (Canadia, Qualcomm): CF-Auto-Root-trltecan-trltecan-smn910w8.zip
SM-N910C (Thailand, Exynos): CF-Auto-Root-trelte-treltexx-smn910c.zip
SM-N910U (Hong Kong, Exynos): CF-Auto-Root-trhplte-trhpltexx-smn910u.zip
SM-N910K (Korea, Exynos): CF-Auto-Root-treltektt-treltektt-smn910k.zip
SM-N910L (Korea, Exynos): CF-Auto-Root-treltelgt-treltelgt-smn910l.zip
SM-N910S (Korea, Exynos): CF-Auto-Root-trelteskt-trelteskt-smn910s.zip
SM-N9100 (China, Qualcomm): CF-Auto-Root-trltechn-trlteduoszc-smn9100.zip
SM-N9106W (China, Qualcomm): CF-Auto-Root-trltechn-trlteduoszn-smn9106w.zip
SM-N9108V (China, Qualcomm): CF-Auto-Root-trltechn-trltezm-smn9108v.zip
SM-N9109W (China, Qualcomm): CF-Auto-Root-trltechn-trlteduosctc-smn9109w.zip
Before proceeding, note that:
- Using this root increases your flash counter and trips the KNOX warranty flag!
- Rooting will void your device warranty. Try this guide at your own risk!
- This guide is meant only for the listed Galaxy Note 4 models.
Guide to Root Samsung Galaxy Note 4
1. Check your device model under Settings > About device > Model number. Make sure the device model number is supported.
2. Install Samsung USB drivers on your Windows system. (Download v1.5.40.0)
3. Download the appropriate CF-Auto-Root .zip file from the links given above. Extract it to a folder and you should end up with a .tar.md5 file along with ODIN setup.
4. Disconnect the phone from your computer.
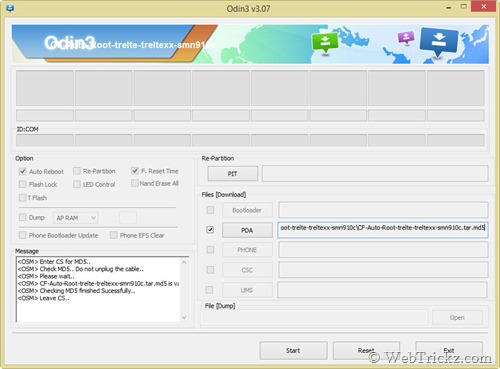
5. Start Odin3-v3.07.exe. Click the PDA button, and select CF-Auto-Root-….tar.md5 file.

~ Make sure Repartition is NOT checked. Do not touch any other buttons or checkboxes.
6. Boot your device into ODIN Download mode: To do so, power off the phone. Now hold down the ‘Volume Down + Home button’ and while holding both of them simultaneously, press the ‘Power’ button until you see a warning screen. Then let go of all the buttons and press ‘Volume Up’ to enter into Download mode.
7. Then connect the phone to your computer via USB cable. (ODIN should show a port number in the ID:COM box which depicts that the device is connected successfully).
8. Click on Start and let the process complete, the phone will reboot itself. You should see a PASS message in ODIN.
That’s it! After the device reboots, you should see the SuperSU app installed. You can confirm root privileges using the ‘Root Checker’ app. 🙂
Note: If you see the red Android logo during rooting but SuperSU does not appear. Then install SuperSU from Google Play at this stage and it’ll just work.
Source: XDA Developers [Official Thread @XDA Forum]


My device kind of crashed when I tried this – had to reset it back
gave you five bro …. euro that is from my pay pay
worked on my hong kong note 4
happy
rob