WebTrickz
TRENDING
  • How to Turn Off and Restart iPhone 15
No Result
View All Result
  • Reviews
  • Editorials
  • Social Media
    • Facebook
    • Twitter
    • YouTube
    • Messenger
    • Instagram
    • Snapchat
    • WhatsApp
    • TikTok
  • Apps
  • How To’s
  • Apple
  • iPhone
  • Google
  • Android
  • Mac
  • Security
  • About Us
    • About Us
    • Contact Us
    • Privacy Policy
No Result
View All Result
WebTrickz
No Result
View All Result
Home Android

How to Unlock YU Yureka Bootloader on Windows

Mayur Agarwal by Mayur Agarwal
February 27, 2024
in Android, How To's

Micromax YU Yureka first sale began few days back on Jan 13th, where the smartphone was sold out in just 3 seconds on Amazon India. The Yu Yureka is a 4G enabled phone running CyanogenMod 11, features decent specs and is available at an affordable price of Rs. 8,999. As you may know, rooting and unlocking bootloader doesn’t voids the warranty of Yureka. So, you shouldn’t be concerned about warranty in case you choose to flash a custom recovery or install custom ROMs/Kernels on your phone. YU Yureka comes with an unlockable bootloader, that one can easily unlock without difficulty. As unlocking bootloader wipes the entire device data for security purposes, thus it’s advisable to unlock the bootloader in starting itself.

NOTE: Unlocking the bootloader will Wipe/ factory reset your device, and will delete all data from your device such as apps, photos, messages, and settings.

Tutorial – Unlocking Micromax Yureka Bootloader on Windows

1. Make sure to take a backup of entire device data. (SD card will NOT be wiped)

2. Download the file ADB _Fastboot.zip and extract it to a folder on your desktop.

3. Put Yureka in Fastboot mode – To do so, power off the phone. While pressing the Volume UP key, connect the phone to PC via USB cable.

4. The phone should now show “Fastboot Mode” screen as shown below.

IMG_20150118_1617392

Windows will now automatically start installing the fastboot drivers for Yureka. Wait for the driver installation to complete. Note: Windows 8 was able to install the drivers whereas Windows 7 couldn’t. (Make sure your computer is connected to Internet)

18-01-2015 15-12-39
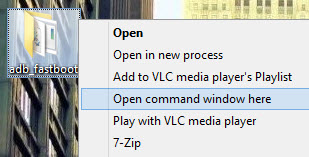
5. Now right-click on the ‘ADB_Fastboot’ folder while holding down the ‘Shift’ key in Windows. Click on the option ‘Open command window here’.

18-01-2015 16-09-406. In the Command Prompt (CMD) window, type: fastboot -i 0x1ebf devices to check if the device is connected. Tip – Copy-paste the commands in CMD.

Then type: fastboot -i 0x1ebf oem unlock to unlock the device. (You won’t see any confirmation message on device screen).

7. Reboot the device. Type: fastboot -i 0x1ebf reboot

18-01-2015 15-15-29

That’s it! Yureka bootloader should now be unlocked. You can then proceed with installing CWM or TWRP recovery, and rooting the phone.

Tags: AndroidBootloaderGuideRootingTutorials
ShareTweetSend
Previous Post

Kingston DT microDuo Review & Speed Comparison with Sandisk Ultra Dual USB OTG PenDrive

Next Post

Guide to Root YU Yureka & Install Official TWRP 2.8 Recovery

Mayur Agarwal

Mayur Agarwal

Mayur Agarwal, the founder and editor of WebTrickz, is a tech enthusiast with a Bachelor's degree in Computer Applications and over a decade of writing experience. His passion for technology and gadgets inspires him to create insightful How To's and troubleshooting guides.

Next Post

Guide to Root YU Yureka & Install Official TWRP 2.8 Recovery

Comments 1

  1. Dilip says:
    10 years ago

    But I am getting a error while trying to unlock the device bootloader..
    When I type fastboot -i 0x1ebf oem unlock ,
    I get the below message,
    ….
    Failed <coomand write failed>

    Pls help…

    Reply

Leave a Reply Cancel reply

Your email address will not be published. Required fields are marked *

Latest Stories

ios 18

iOS 18: How to Add Screen Record to Control Center on iPhone

March 30, 2025
ios photos logo

iOS 18: How to Clear Recently Viewed Photos on iPhone

December 27, 2024
ios photos logo

How to Find Your Favorite Photos in iOS 18 on iPhone

December 30, 2024
ios 18

How to Reset Control Center to Default in iOS 18.1 on iPhone

April 2, 2025
iphone 16 pro max always-on display

How to Turn Off Always-On Display on iPhone 16 Pro & 16 Pro Max

November 11, 2024
ios 18

How to Find Recently Deleted Photos in iOS 18 on iPhone

December 30, 2024
apple iphone 16 pro

How to Close Apps on iPhone 16, 16 Pro, and 16 Pro Max

October 22, 2024

Trending Stories

  • Apple iphone 16

    How to Turn Off and Restart iPhone 16, 16 Pro, and 16 Pro Max

  • How to Put Your iPhone 16 on Vibrate or Silent Mode

  • How to Turn Off & Restart iPhone 15, 15 Pro, and 15 Pro Max

  • How to Turn Off Most Relevant Comments on Facebook

  • 4 Ways to Remove the Floating Home Button on iPhone

  • About Us
  • Contact Us
  • Privacy Policy
  • Advertise

© 2025 WebTrickz. All Rights Reserved.

No Result
View All Result
  • Reviews
  • Apps
  • How To’s
  • Android
  • Google
  • iPhone
  • Mac
  • About Us
  • Contact Us
  • Privacy Policy

© 2025 WebTrickz. All Rights Reserved.