Great news for all Samsung Galaxy Nexus users! Until now, there was no possible way to root Galaxy Nexus without unlocking the device bootloader. Even though unlocking the Galaxy Nexus bootloader is not a tricky task as it’s a matter of running one command, what is cumbersome is that unlocking completely wipes the device data.
Fortunately, one can easily backup apps & data without rooting in ICS and Jelly Bean and restore the backup later, but still, you need to manually back up all the internal storage data like documents, photos, media, etc. which is certainly not so convenient for everyone. Now, you No More need to worry about unlocking the device just to get root privileges!
efrant, moderator at XDA-Developers forum has posted a step-by-step procedure to root Android devices running ICS and Jelly Bean without unlocking the bootloader. (Root any version of ICS and JB released to date).
The main credit goes to Bin4ry, who has managed to find a way to exploit a timing difference in the “adb restore” command that makes it possible. But the 1-click root batch script by Bin4ry doesn’t seem to work on Galaxy Nexus, so we will do it via the command line following efrant’s guide.
Note: This does not wipe any data on your device but still it’s recommended to Backup your important data before proceeding. We won’t be responsible for any data loss.
Tutorial – Rooting Galaxy Nexus without unlocking the bootloader
This has to be done over ADB, so download and install the USB drivers first for Galaxy Nexus. You can skip this step if ADB drivers are already set up for your Nexus.
1. Download ‘Root-without-unlock.zip’ and extract it to a folder on your desktop.
2. Turn on USB Debugging on your device (Settings > Developer Options > Enable USB Debugging) and connect it to the computer via a USB cable.
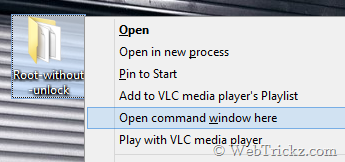
3. Right-click the folder ‘Root-without-unlock’ while holding down the Shift key, and select ‘Open command window here’.

4. The command prompt will open up. Enter the command adb devices to confirm that your phone is properly connected over the ADB interface.
5. Now enter the below commands individually to copy the root files (use copy-paste).
adb push su /data/local/tmp/su
adb push Superuser.apk /data/local/tmp/Superuser.apk
6. Enter adb restore fakebackup.ab to restore the fake “backup”.
Note: Do Not Click restore on your device. Just enter the command into the command prompt on your PC and press the enter key.
7. Enter the below command to run the “exploit”.
adb shell “while ! ln -s /data/local.prop /data/data/com.android.settings/a/file99; do :; done”
8. Now that the “exploit” is running, click ‘Restore my data’ on your device. (At this time, CMD will probably show multiple lines saying ‘link failed file exists’).
Important – As you click restore, you should see the restoring notification on your phone screen, and once finished it’ll say ‘restore ended’. If you don’t see this then try again from step #3.
9. Once it finishes, enter adb reboot to reboot your device.
Note: Do Not try and use your device on you reboot. Running this exploit will reboot your device into emulator mode, so it will be laggy and the screen will flicker — this is normal.
10. Once the phone is rebooted, enter adb shell to open a shell.
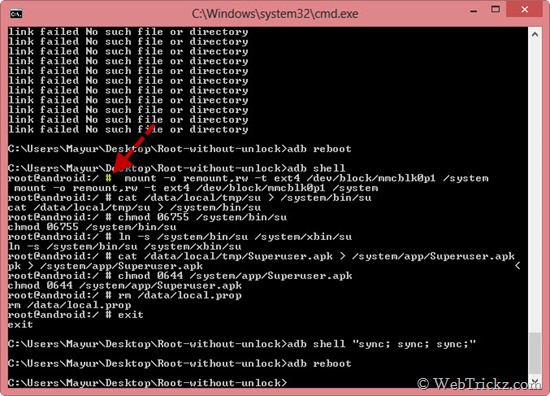
Note: Now you should have a root shell, i.e. your prompt should be #, not $. If not, it did not work. (Refer to the image above)
11. Now enter mount -o remount,rw -t ext4 /dev/block/mmcblk0p1 /system to mount the system partition as r/w.
12. Enter cat /data/local/tmp/su > /system/bin/su to copy su to /system.
13. Enter chmod 06755 /system/bin/su to change permissions on su.
14. Enter ln -s /system/bin/su /system/xbin/su to symlink su to /xbin/su.
15. Enter cat /data/local/tmp/Superuser.apk > /system/app/Superuser.apk to copy Superuser.apk to /system.
16. Enter chmod 0644 /system/app/Superuser.apk to change permissions on Superuser.apk.
17. Enter rm /data/local.prop to delete the file that the exploit created.
18. Enter exit to exit the ADB shell.
19. Type adb shell “sync; sync; sync;”
20. Reboot device using adb reboot
Voila! Your Galaxy Nexus should now be rooted without requiring you to unlock the bootloader. Confirm root access by installing the Root Checker app from Google Play.
>> We’ve tried the above procedure on GSM Galaxy Nexus running Android 4.1.1 JB. This guide probably works with Google Nexus 7 as well, haven’t tried though.
Google may patch this exploit in future updates. Let’s see how long it lasts. 🙂
Source: XDA, Special Thanks to Bin4ry and efrant.
Update: As expected Google has patched this hole starting with JZO54K. So, it will not work for Android 4.1.2 JZO54K or newer.


I tried this on a Chinese Clone Tinji Mobile i9220 MT6575 Chipset..
Each step executed as shown; but phone remains unrooted.
Android Version is 4.0.6
It says: “error: Device offline” what do i do?
error Device offline!!!