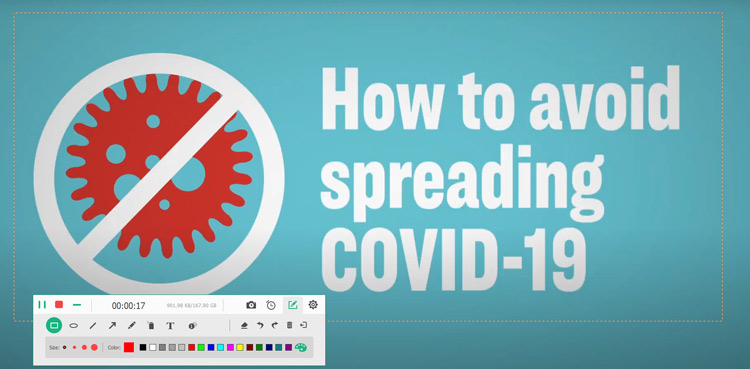
COVID-19 affects different people in different ways and online teaching course is one of them. Due to this, online learning at home has seen a sudden rise between teachers and students.
Here’s a detailed guide to help you record online courses on a computer. This helps in making the information widely accessible and easier to grasp for students.
This guide can be helpful for teachers who want to record online classes for students as well as those who want to make a video presentation for their customers, partners, and more.
How to Record Online Courses on a PC or Mac
Tools required to capture online classes or lectures for students: A laptop or computer (camera is optional), Apeaksoft Screen Recorder, and a microphone.
Now, let’s break down the complete process.
Step 1 – Install a Screen Recording software
Download and install Apeaksoft Screen Recorder, an online class recording program on your computer. It supports both Windows and Mac computers.
Step 2 – Make Recording Settings
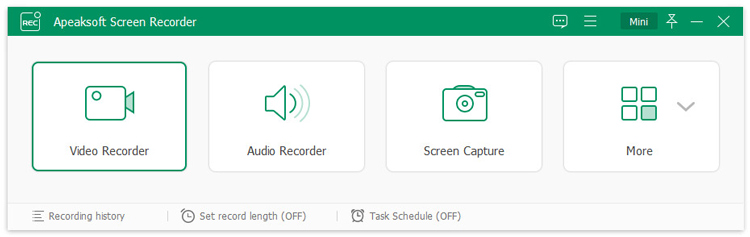
Open the software and you will see four main functions on the main screen – Video Recorder, Audio Recorder, Screen Capture, and More.
To record online video lectures, select the “Video Recorder” option.
Then in the Video Recorder window, you can configure the recording settings as per your preference.
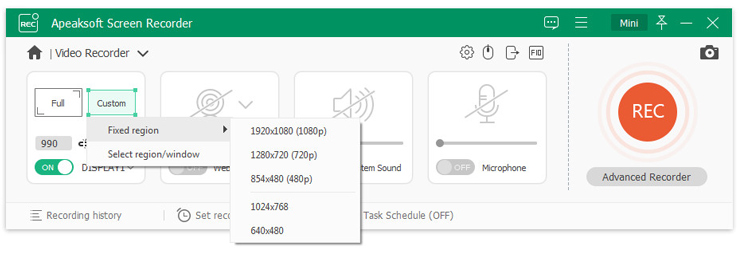
- Select recording area
Click “Full” or “Custom” to choose the area you want to record on your computer. In case you select “Full”, it will record the entire screen on your PC.
Otherwise, click “Custom” to pick up a fixed region (one of the predefined screen resolutions such as 1080p, 720p, 480p) or a customized region using your mouse.
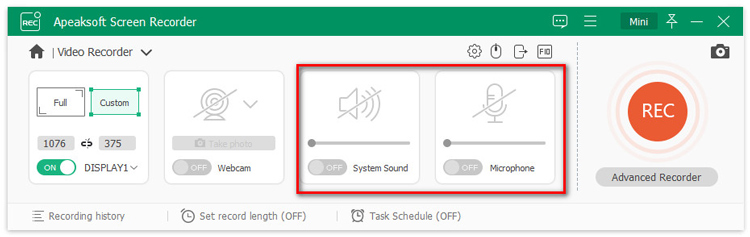
- Choose recording audio
For recording an online class with audio, toggle on the setting for “Microphone” and/or “System Sound”.
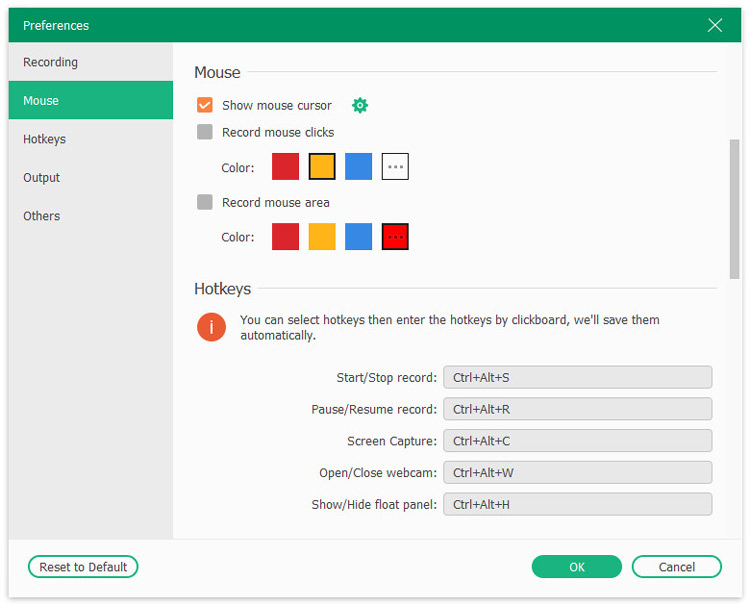
- Make recording preferences
One can further customize the preferences for this online class recording software by clicking the menu in the toolbar and then clicking “Preferences”. Here you can set the output parameters, set recording hotkeys, mouse highlights, and more.
Tips to consider:
- Connect a good-quality microphone that can record your clear voice.
- If you want to show whiteboards and markers in the recording, just toggle on “Webcam” to create a picture-in-picture recording.
- When you have multi-display, do not forget to choose the display you want to record the presentation for by clicking the “Display” drop-down option.
Step 3 – Start Recording Classes
Once you’re done with configuring recording settings, simply click the “REC” button to start recording all the actions on your computer. It supports pause and resume recording features that you can use in case of an interruption.
While recording, a floating bar allows you to edit the recording in real time. For example, you can add text, draw a shape, add a callout for tutorial videos, and more.
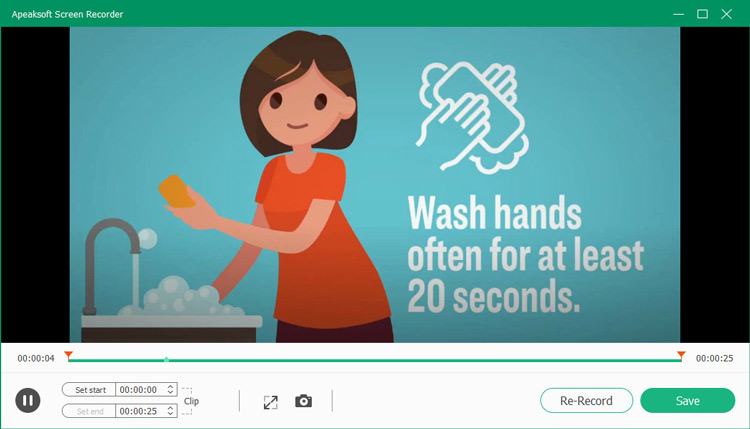
Step 4 – Save and Share Online Classes Recording
The stop button will direct you to the preview window. The preview feature allows you to check the recording, so you can see what your class recording will look like prior to encoding.
In addition, the clip feature will let you cut down the video into multiple clips.
Once everything is done, click the “Save” button to export the course recording on your computer. Alternatively, you can directly share the video lecture recording online.
That’s it with the recording process.
Key Features of Apeaksoft Screen Recorder
It can be pretty easy to start an online course recording on your laptop. Whether you’re a tech pro or one of the not-so-tech-savvy types, Apeaksoft Screen Recorder can help you complete the task smoothly.
Why choose Apeaksoft Screen Recorder?
- Record anything that is happening on the computer
It can record any actions that are happening on your computer. Whether you want to save online videos from YouTube, TED, Facebook, Twitter, Dailymotion, etc., or wish to make a video recording of tutorials, presentations, gameplay, meetings, lectures, and more, it can come in handy.
- Fetch any audio from the microphone and system sound
Supporting audio recording from built-in system sound, it can easily grasp the music from videos, radio channels, music sites, and anything that is playing audio. Besides, it lets you record your own narration via microphone to record anything that you want to say.
- Supports a wide range of recording modes
“Advanced Recorder” features recording window options, where it can lock a window for recording, or exclude some or a certain window recording, and even follow or around the mouse for recording to meet all your demands.
- Set timer task to record automatically
Timer recording is enabled on this recording application. It lets you set the timer settings to choose when and how long the program will record. After that, even if you are not sitting in front of the computer, the recording task will be done successfully. You will not miss any live or streaming content.
- Take screenshots
To take notes quickly, the screenshot tool is what you will need. The built-in screenshot feature allows you to capture the screenshot from the video and edit the screenshot further with available tools.
- Real-time editing while recording
While recording, this software supports real-time editing. With this one of a kind feature, you do not need further editing to create your own online lecture recording.
- User-friendly interface
A variety of customizable settings offer you more controls to use this software according to your needs. Moreover, it is an easy-to-use screen recording software to capture anything with simple steps.
Tips for Recording an Online Course
To make a high-quality recording of an online course, the following tips may help you.
- Maintain a quiet environment – Make sure the classes recording in your room is quiet because you also need to record your own voice via microphone.
- Choose MP4 as the output – To make sure the recording video file plays smoothly on the student’s device, better choose MP4, the universal video format.
- Exit other unnecessary programs – Other applications on your computer using your sound card can conflict with the audio recording in this software. Moreover, the running programs may slow down your computer, which may freeze the recording. Hence, it is recommended to turn off unnecessary applications.
- Practice makes perfect – You can outline the script on the paper and then practice it. Then you can smoothly run your teaching course online and record it with ease.
Our Thoughts
The recording of online classes for students can be done easily with recording software. Apeaksoft Screen Recorder is our preferred choice for entry-level users looking for a simple yet efficient online course recording software. It offers great ease of use and packs a host of interesting features. So make sure to try it out!
Pricing – This program costs $48 after a 20 percent discount and it comes with a 30-day money-back guarantee. You can also opt for a free trial before making a purchase.


