WebTrickz
TRENDING
  • How to Turn Off and Restart iPhone 15
No Result
View All Result
  • Reviews
  • Editorials
  • Social Media
    • Facebook
    • Twitter
    • YouTube
    • Messenger
    • Instagram
    • Snapchat
    • WhatsApp
    • TikTok
  • Apps
  • How To’s
  • Apple
  • iPhone
  • Google
  • Android
  • Mac
  • Security
  • About Us
    • About Us
    • Contact Us
    • Privacy Policy
No Result
View All Result
WebTrickz
No Result
View All Result
Home How To's

How to Move Steam Games to a Different Drive or Disk

Mayur Agarwal by Mayur Agarwal
February 27, 2024
in How To's

Steam by Valve is the world’s largest online gaming platform for PC and Mac that offers an incredible gaming experience. Steam has a huge library of popular games from many major publishers and has been connecting gamers worldwide since its inception. Certainly, Steam is immensely popular with over 30 million active user accounts. Hence, here is a handy tip for those serious gamers using Steam.

steam_logo

Steam client from Windows and Mac allows users to browse, purchase, and download their favorite games. Steam installs itself in the C:\Program Files\Steam directory by default and games installed on Steam are stored in the ..\Steam\steamapps\ folder. Perhaps, if your system partition (i.e. C drive) is running out of space or you need to do a clean installation of Windows or you’re moving to a new computer, then it is advisable to Move Steam Installation and Games to a different location on your PC.

This can be easily done and helps you prevent the risk of losing all your large-sized games downloaded via Steam if the worst were to happen. Carefully follow the steps described below to Transfer Steam entirely to a different partition or hard drive. The following instructions will move your Steam installation along with your games:

Important: It is highly recommended that you create a backup of your SteamApps folder before attempting this process.

1. Log out and Exit the Steam client from the system tray in Windows.

2. Navigate to the folder where Steam is installed (by default: C:\Program Files\Steam\)

3. Just cut and paste the mentioned file and folders (steamapps folder, userdata folder and steam.exe file) to the newly specified location, for example D:\Steam\
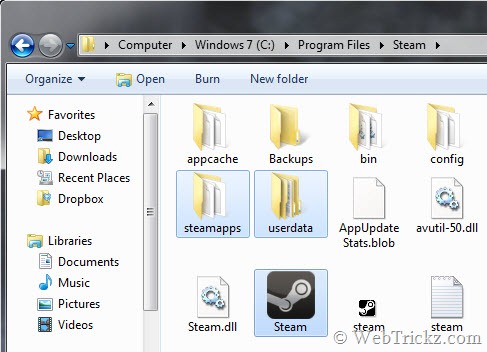
steam-directory_Windows-C-drive

4. After the transferring of files is completed, delete the Steam folder from C: drive.

5. Launch Steam.exe, it will update to re-download just the steam files (around 30MB).

steam-updating

Now log into your account and continue using Steam from the new location. Also, all the future game content will be downloaded to the new folder D:\Steam\Steamapps\.

Note: For installed games, you may need to verify your game cache files. To do so,

1. Open the Steam client, go to the Library section, right-click on the game, and select Properties from the menu.
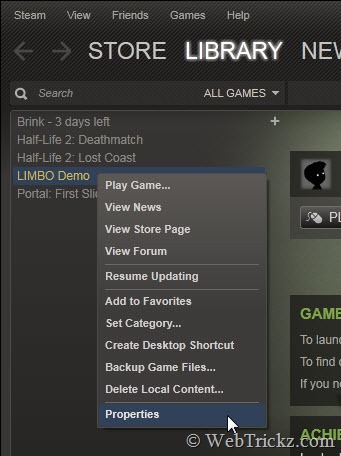
steam_library_game-properties

2. Select the ‘Local files’ tab and click the Verify integrity of game cache… button.
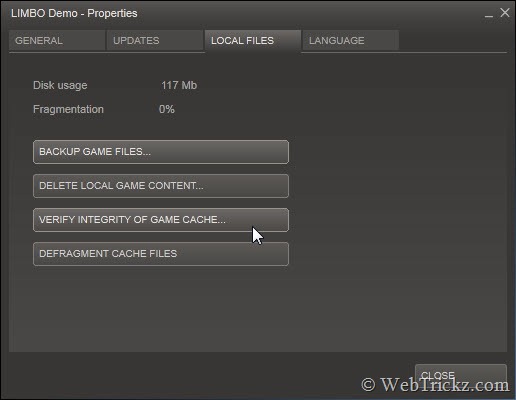
Local files_Verify-game-cache

3. Steam will verify the game’s files – this process may take several minutes. Once the process is completed, the Check window will automatically exit. That’s it!

>> Similarly, you can move Steam to any other computer running Windows OS. (You can only be logged into Steam on one computer at a time.)

Tip: “During the installation of Steam, you have the option to install Steam to a location other than the default. Since Steam relies on the game files residing in the SteamApps folder, your game files will go to whatever folder you have Steam installed in.”

Tags: GamesTipsTricksTutorials
ShareTweetSend
Previous Post

Add a Google Plus Customizable Widget to your Site or Blog

Next Post

How to Cancel Amazon Prime Membership to Save $79

Mayur Agarwal

Mayur Agarwal

Mayur Agarwal, the founder and editor of WebTrickz, is a tech enthusiast with a Bachelor's degree in Computer Applications and over a decade of writing experience. His passion for technology and gadgets inspires him to create insightful How To's and troubleshooting guides.

Next Post

How to Cancel Amazon Prime Membership to Save $79

Leave a Reply Cancel reply

Your email address will not be published. Required fields are marked *

Latest Stories

ios 18

iOS 18: How to Add Screen Record to Control Center on iPhone

March 30, 2025
ios photos logo

iOS 18: How to Clear Recently Viewed Photos on iPhone

December 27, 2024
ios photos logo

How to Find Your Favorite Photos in iOS 18 on iPhone

December 30, 2024
ios 18

How to Reset Control Center to Default in iOS 18.1 on iPhone

April 2, 2025
iphone 16 pro max always-on display

How to Turn Off Always-On Display on iPhone 16 Pro & 16 Pro Max

November 11, 2024
ios 18

How to Find Recently Deleted Photos in iOS 18 on iPhone

December 30, 2024
apple iphone 16 pro

How to Close Apps on iPhone 16, 16 Pro, and 16 Pro Max

October 22, 2024

Trending Stories

  • Apple iphone 16

    How to Turn Off and Restart iPhone 16, 16 Pro, and 16 Pro Max

  • How to Put Your iPhone 16 on Vibrate or Silent Mode

  • How to Turn Off & Restart iPhone 15, 15 Pro, and 15 Pro Max

  • How to Turn Off Most Relevant Comments on Facebook

  • 4 Ways to Remove the Floating Home Button on iPhone

  • About Us
  • Contact Us
  • Privacy Policy
  • Advertise

© 2025 WebTrickz. All Rights Reserved.

No Result
View All Result
  • Reviews
  • Apps
  • How To’s
  • Android
  • Google
  • iPhone
  • Mac
  • About Us
  • Contact Us
  • Privacy Policy

© 2025 WebTrickz. All Rights Reserved.