Overuse and addiction to social media platforms like Facebook can severely impact your productivity and disturb your life. Thankfully, you can temporarily deactivate your Facebook account to take a break from Facebook. Doing so will help you reduce your screen time and get rid of unwanted distractions while studying or during work.
Another option is to delete your Facebook account if you want to permanently get rid of Facebook. However, it is better to deactivate Facebook as you can connect with your friends and family again after reactivating your account.
How do I deactivate Facebook after Meta’s new update?
Following new updates to the Facebook website and app, the Deactivation and Deletion option seems to be missing. Worry not, you can still delete or deactivate Facebook in a few simple steps.
It’s just that the relevant app settings are now located in the Accounts Center – a centralized place to manage your account settings across Meta-owned apps. Meta has introduced this unified settings menu for Facebook, Messenger, and Instagram to make managing app preferences easier.
Now let’s see how to deactivate Facebook Meta through the Accounts Center.
How to Deactivate Your Facebook Account Temporarily
On iPhone and Android
- Make sure you are running the latest version of the Facebook app.
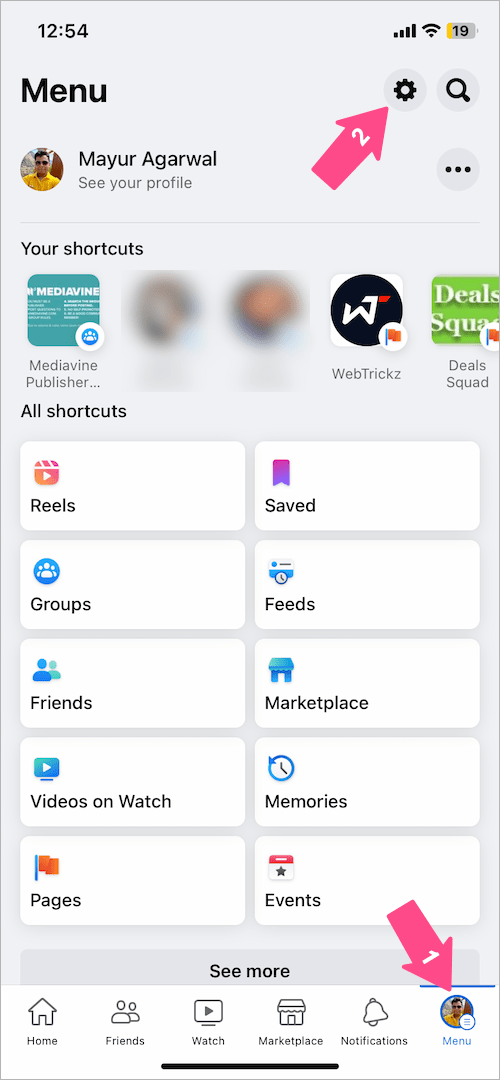
- Tap the “Menu” tab at the bottom right corner (on iPhone) or top right (on Android) of the screen.
- Tap the gear icon at the top-right corner.
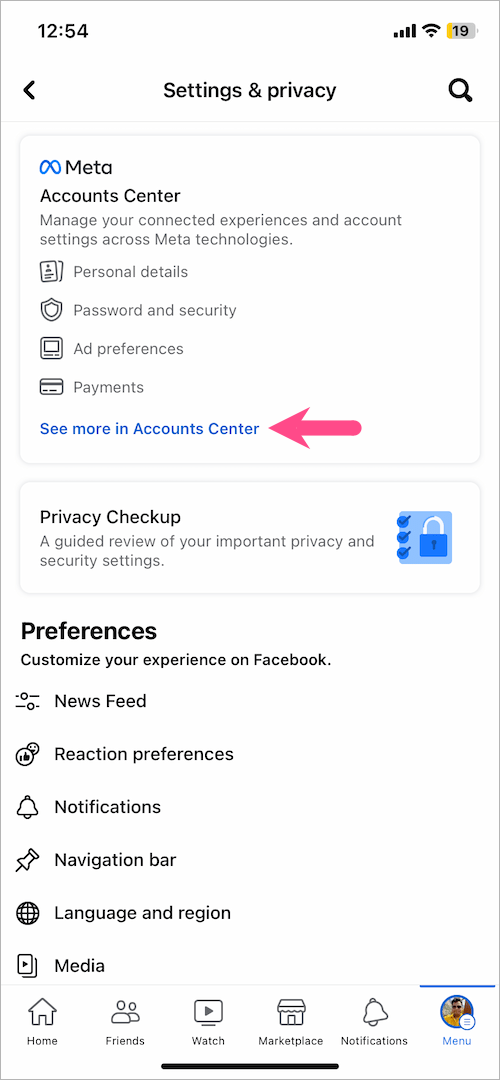
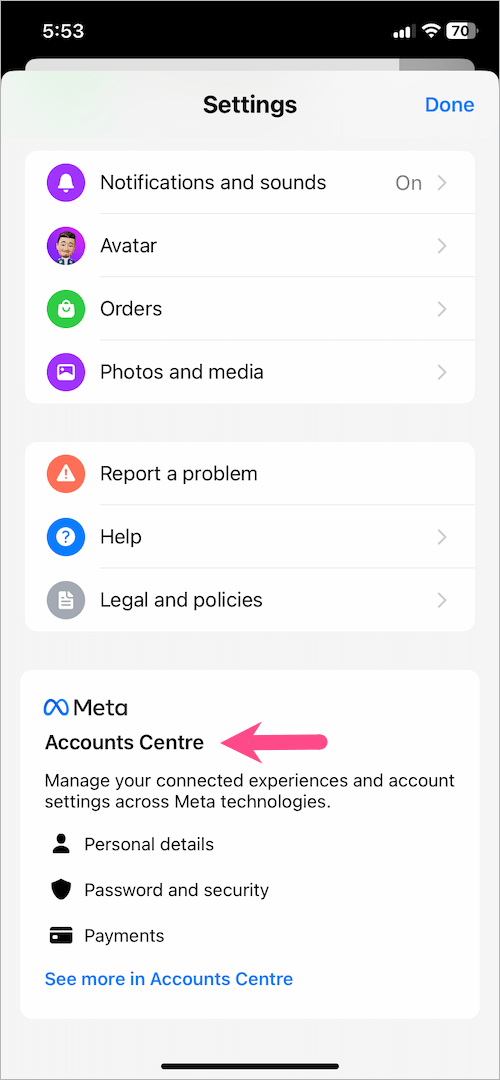
- On the ‘Settings & privacy’ screen, tap “See more in Accounts Center” under Accounts Center.
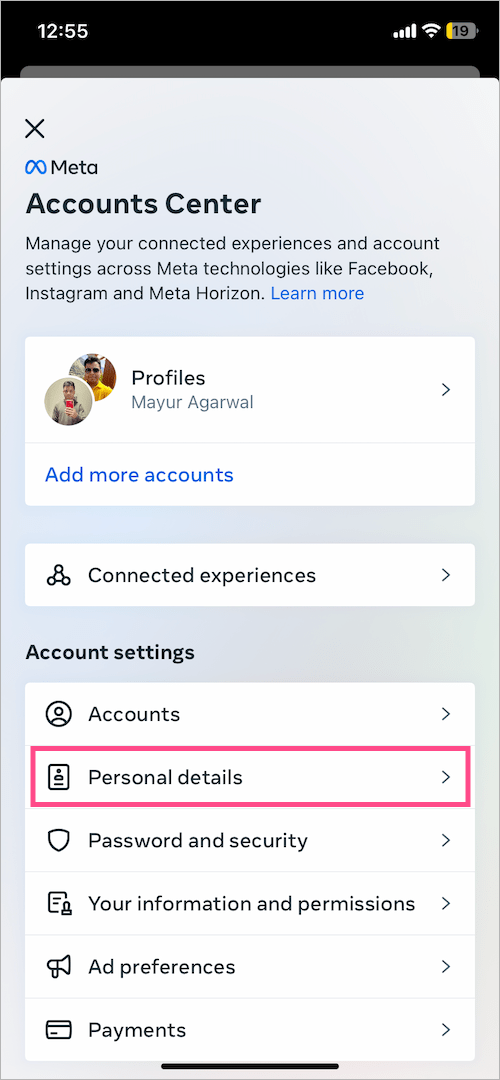
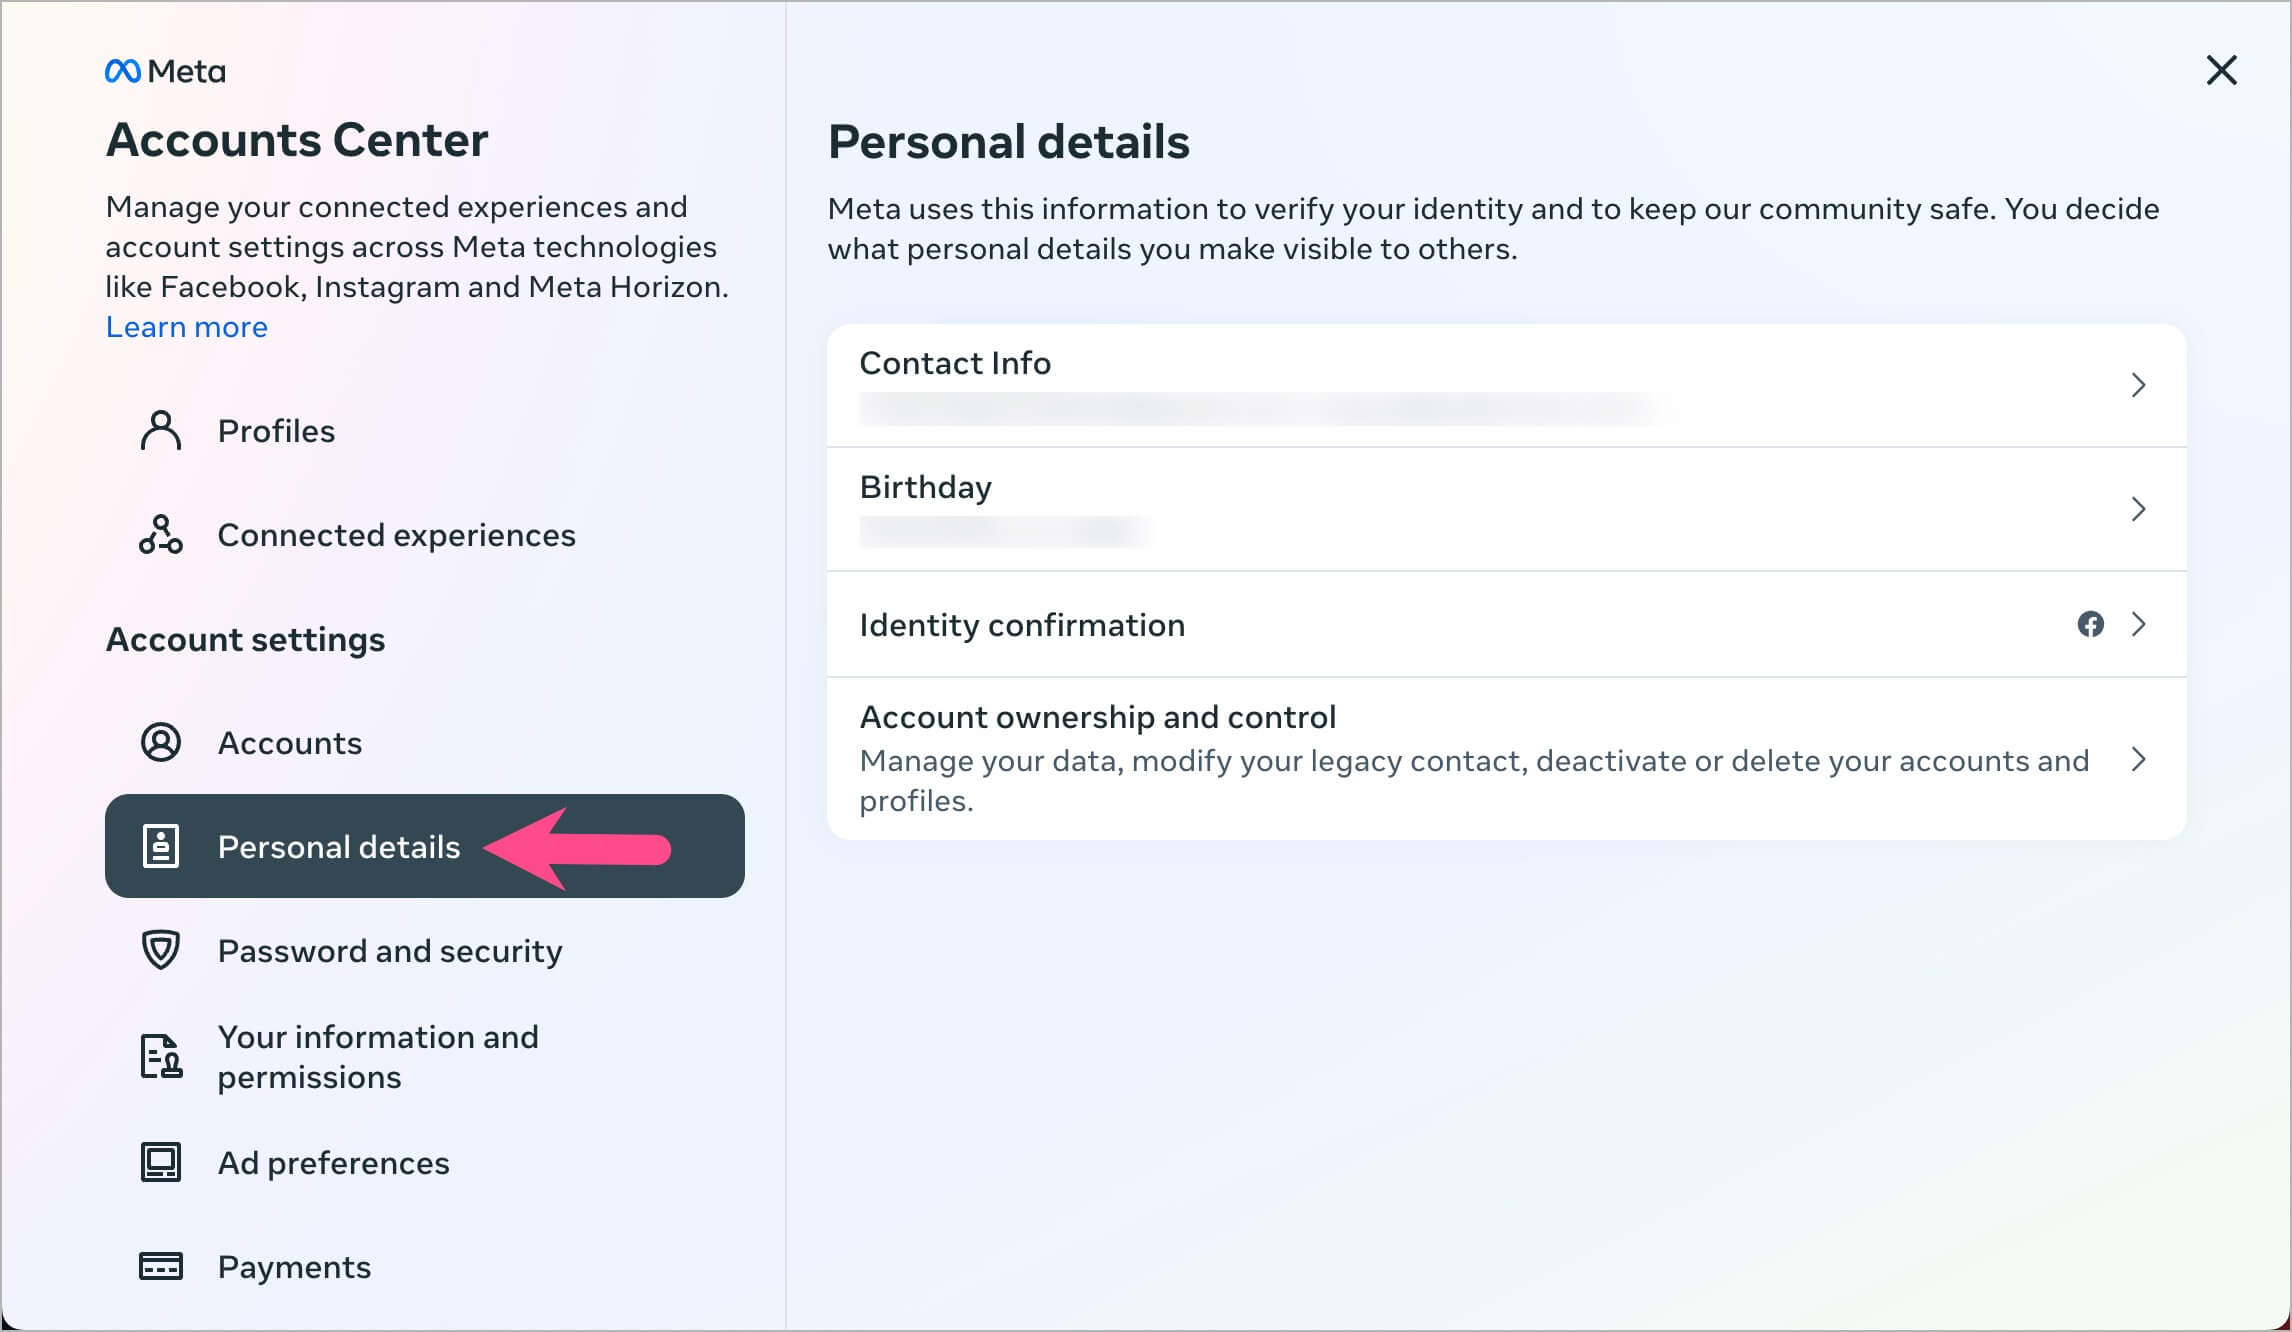
- Under Account settings, tap on ‘Personal details‘.
- Tap on ‘Account ownership and control‘.

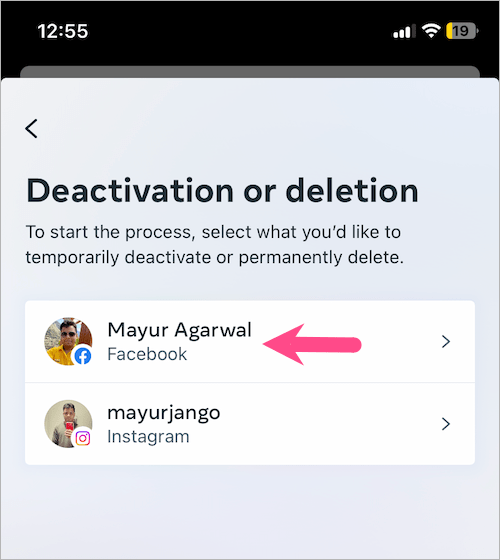
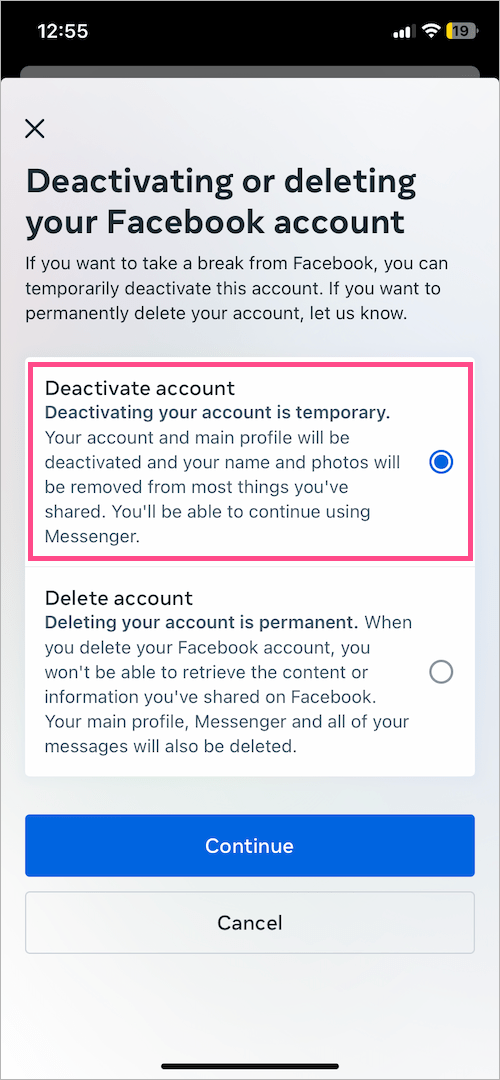
- Select “Deactivation or deletion“.

- Select the account or profile you want to temporarily deactivate or permanently delete.
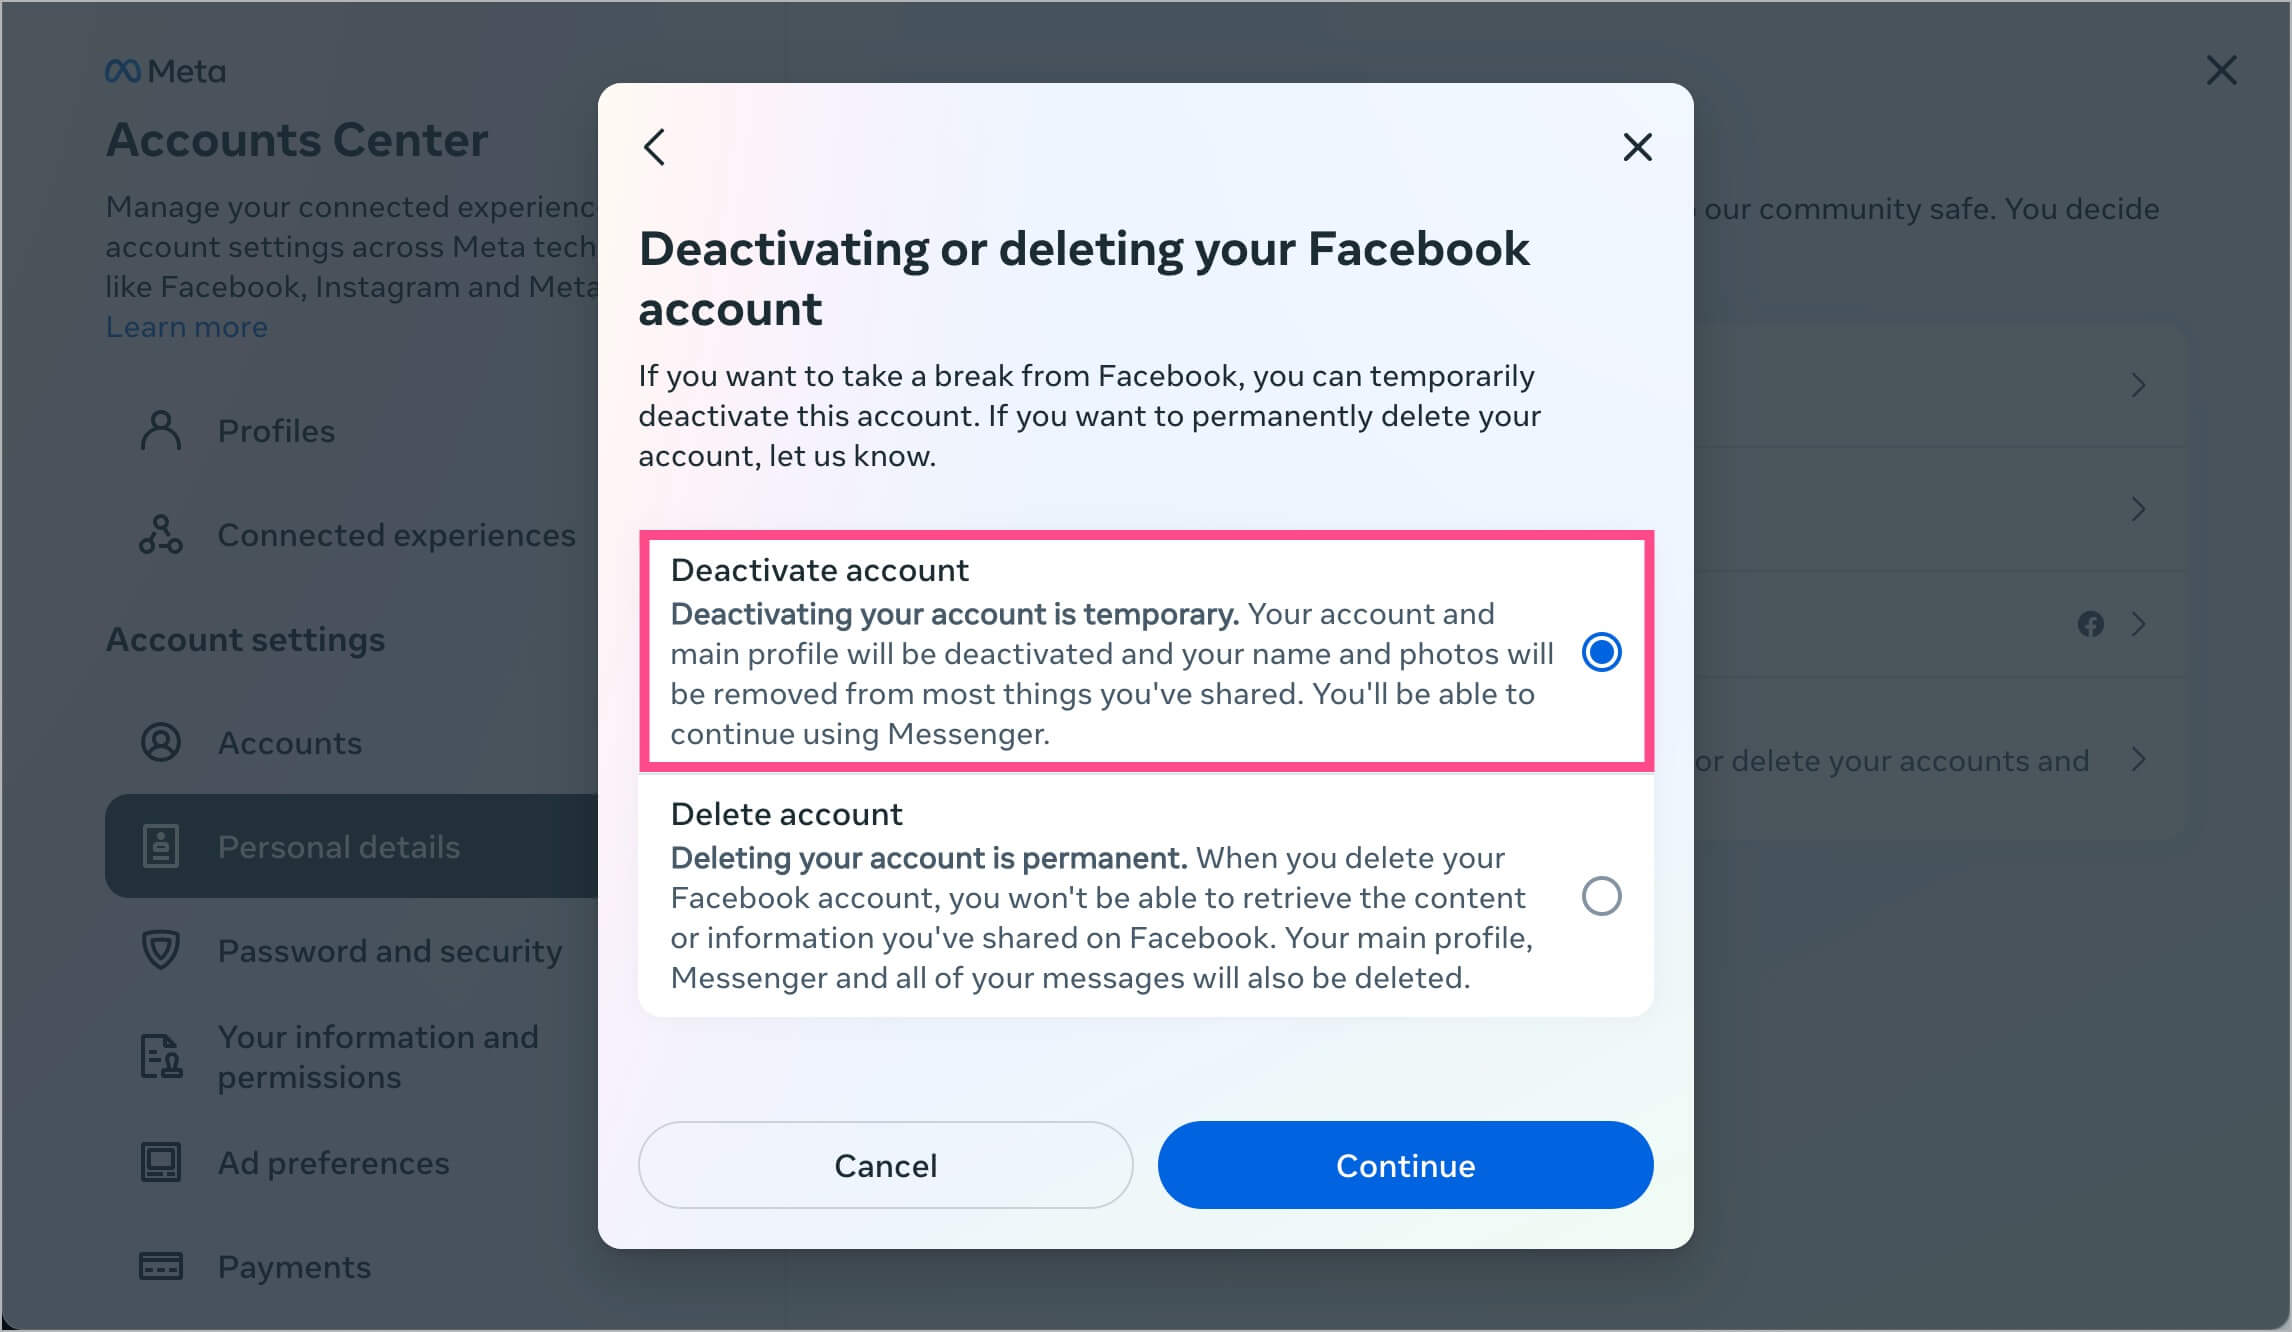
- Important: Choose the ‘Deactivate account‘ option and tap Continue.
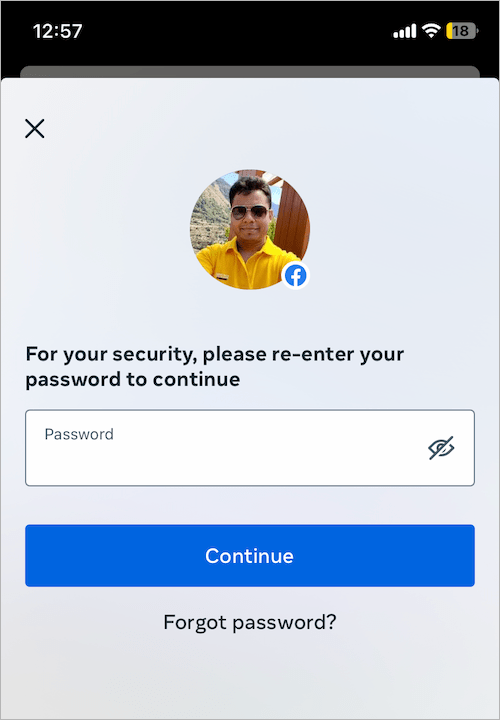
- Enter your Facebook password and tap Continue.
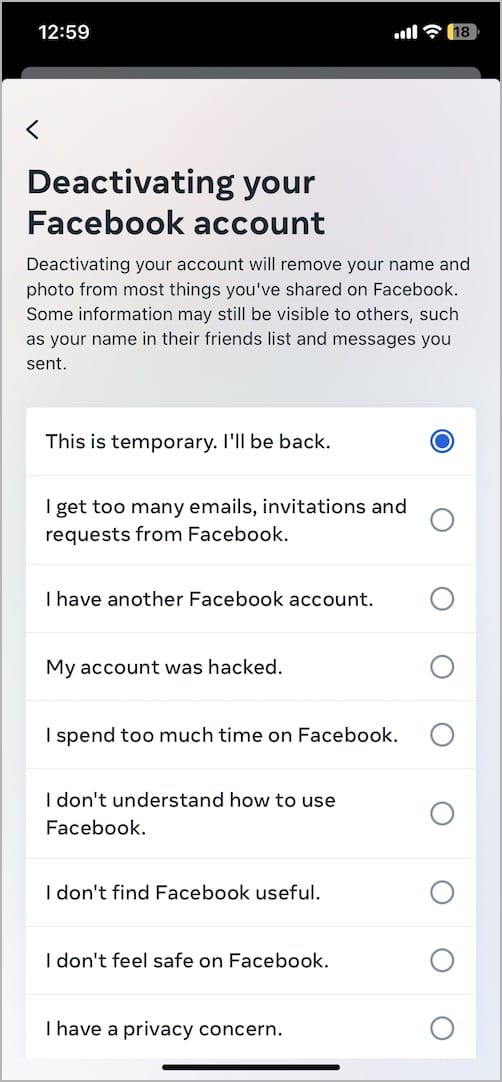
- Select a reason, scroll down, and tap ‘Continue’ to proceed.
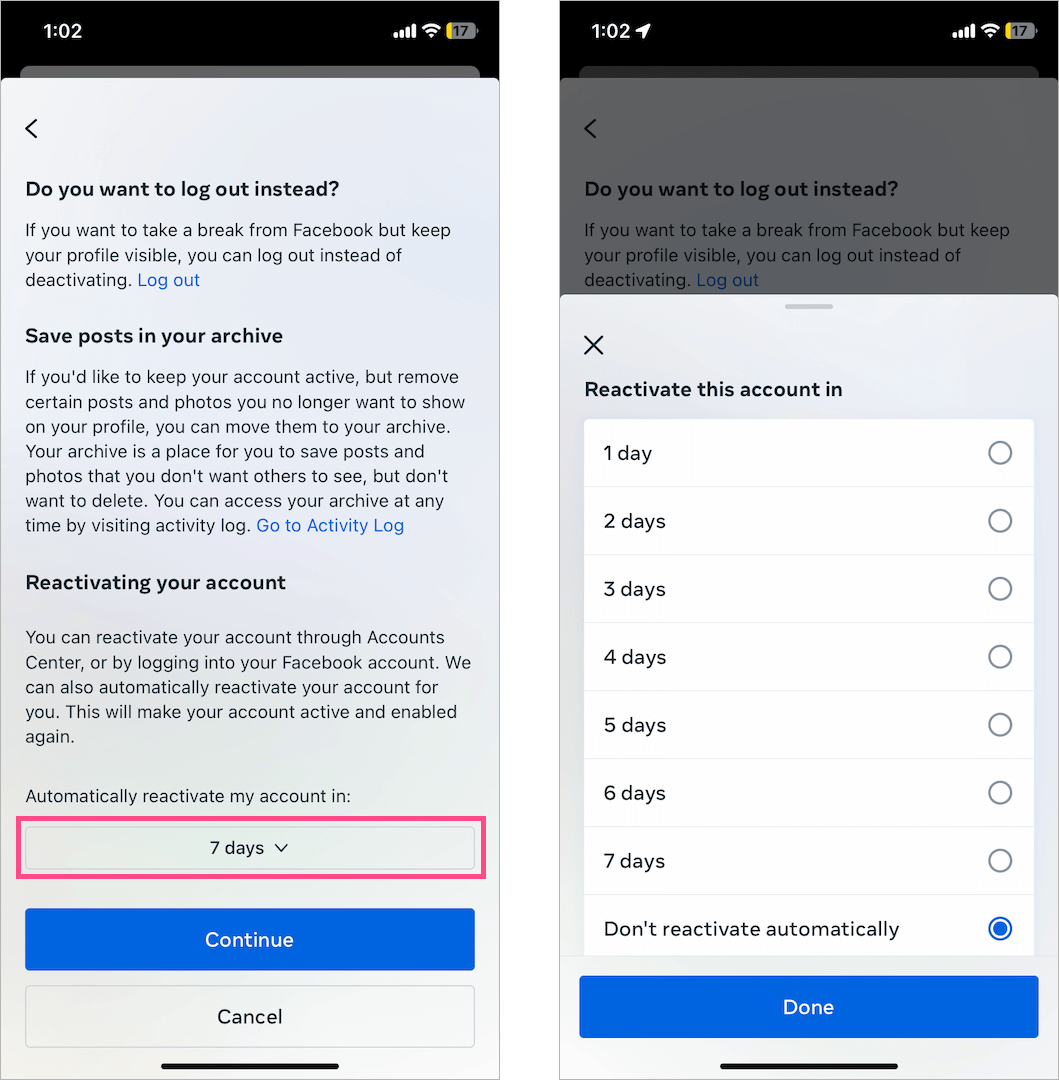
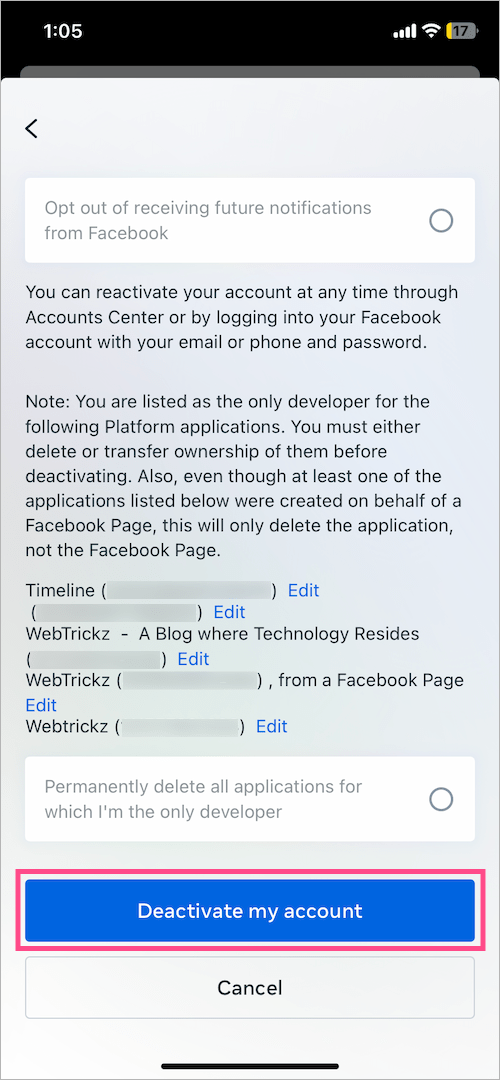
- By default, Facebook automatically reactivates your account in 7 days. Under ‘Reactivating your account’, select “Don’t reactivate automatically” if you don’t want your account to reactivate on its own.
- Scroll down the ‘Confirm temporary account deactivation’ screen and tap “Deactivate my account‘ to confirm.
That’s it. Now you can uninstall Facebook from your device to prevent yourself from logging back again.
TIP: Since you can access the Accounts Center from the Settings menu of Facebook, Instagram, and Messenger, you can deactivate Facebook on Meta through the Instagram or Messenger app as well.
On Desktop (Computer)
- Visit accountscenter.facebook.com/profiles in a web browser on your computer.
- In the sidebar, click on ‘Personal details’ under Account settings.
- Go to ‘Account ownership and control’.
- Click on “Deactivation or deletion”.
- Select your Facebook account.
- Important: Select ‘Deactivate account’ and click the ‘Continue’ button.
- Re-enter your password and hit ‘Continue’ to proceed.
- Choose a reason for deactivating your Facebook account and click Continue.
- Under ‘Reactivating your account’, choose a pre-defined time interval after which your account should reactivate automatically.
- Scroll down the ‘Confirm temporary account deactivation’ page and click “Deactivate my account‘.
What happens when you deactivate your Facebook account?
Once your Facebook account is deactivated,
- You can reactivate your account and come back whenever you want.
- No one can see your profile or search for you.
- All your posts, photos, and videos on Facebook won’t be deleted.
- Your other additional Facebook profiles and Pages where you are the only admin with full control will also be deactivated. To keep your Pages active, you can assign another admin or give someone else full control of your Page’s settings.
- You can still use Messenger.
- You can use Facebook Login to log in to other apps like Spotify and Pinterest.
- Group admins may still be able to see your posts and comments.
Can I reactivate my Facebook account after deactivating it?
Yes, you can reactivate your Facebook account and be active on Facebook again at any time. By default, Facebook automatically reactivates your account after 7 days unless you’ve chosen the ‘Don’t reactivate automatically” option.
To reactivate Facebook after deactivating, simply log back again into Facebook or use your Facebook account to log in somewhere else. Note that you will need to have your email or mobile number and the password of your account to reactivate it.
You can also reactivate your deactivated Page after reactivating your Facebook account.
How to deactivate your Messenger Account
Messenger remains active after you deactivate your Facebook account (but you will lose access to Messenger for your additional Facebook profiles and Pages). Your profile picture will also be visible in your conversations and people can still search for you by name and send you a message.
Perhaps, if you want to deactivate Messenger then you first need to deactivate your Facebook account. Unfortunately, you cannot deactivate Messenger without deactivating Facebook first.
NOTE: To deactivate Facebook Messenger temporarily, you will need a mobile device such as an iPhone, iPad, or Android.
Here’s how you can deactivate your Messenger account.
- Deactivate your Facebook account first following the above-stated steps.
- Open the Messenger app.
- Tap the Menu button at the top left and then tap the Settings button (gear icon).
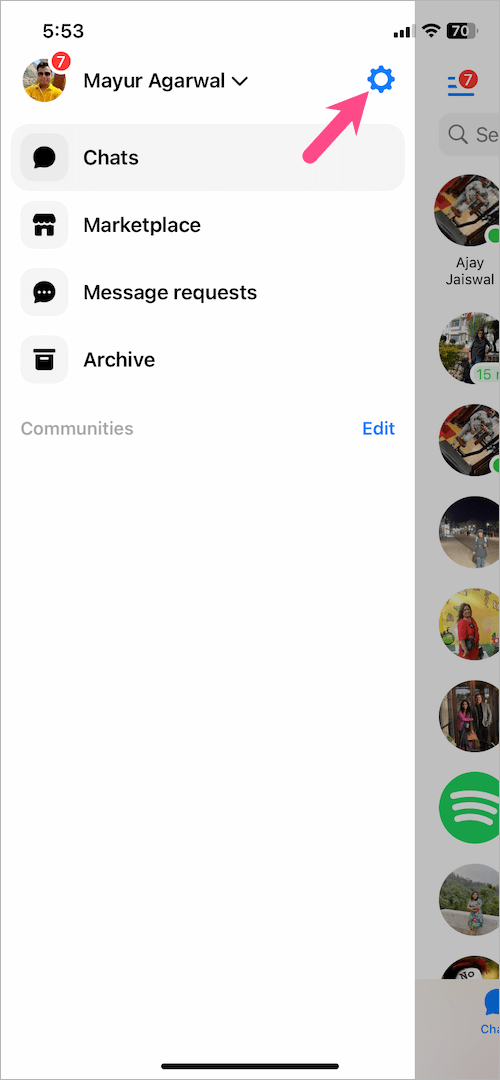
- Scroll down to the bottom and tap on “Accounts Centre”.
- Go to Personal details > Account ownership and control > Deactivation or deletion.
- Select your account and follow the instructions to deactivate your account on Messenger.
We hope you found this article helpful. 🙂


Thank u!!!!!!! I couldn’t find it and searched forever!