We’ve covered a lot of guides in the past that offer a 100% working way to update your Galaxy Nexus (YAKJUXW) to YAKJU or TAKJU firmware to get future updates directly from Google, which in the case of Non-Yakju variants are offered by Samsung and apparently delayed by several weeks.
All our earlier tutorials to install Android 4.2.2 Takju/Yakju firmware on GSM Galaxy Nexus, have been available for Windows users only. Anyways, here is our easy guide for Mac OS X users to accomplish the same task on Mac, which is rather easier on Mac than Windows system because on Mac you don’t need to install and configure ADB or Fastboot drivers which itself is a crucial step on Windows.
Note: This procedure supports all Non-Yakju GSM devices (yakjuxw, yakjuux, yakjusc, yakjuzs, yakjudv, yakjukr and yakjujp) provided they’re factory unlocked.
Install Yakju or Takju? Takju, the firmware that ships with the Google Play Store version of Galaxy Nexus (in the US) apparently receives updates faster than the Yakju variant. So, it’s better to choose Takju over Yakju.
~ Besides installing Android 4.2.2 Yakju or Takju on Galaxy Nexus, the below tutorial comes in handy in other situations as well. This may include:
- When your Galaxy Nexus gets stuck in the boot loop or can’t get past the Google logo (“soft brick”).
- When you prefer to Restore Stock Android from a custom ROM. Relock to fully return to factory settings. (Required when you need to return the device to store).
Disclaimer: Try this guide at your own risk! We wont be responsible in case your device gets bricked. This may also void your warranty.
NOTE:
1. This process requires unlocking the bootloader which Completely Wipes your device including /sdcard. So make a backup first.
2. Your Galaxy Nexus device name should be maguro (See how to check that)
3. This procedure is meant only for GSM/HSPA+ Galaxy Nexus.
Tutorial – Changing Galaxy Nexus from Yakjuxw (Non-Yakju) to Android 4.2.2 Yakju/Takju on Mac OS X
1. Download the required files –
- Download 4.2.2 (JDQ39) Official “Takju” factory Image (Direct Link) or Yakju image for Galaxy Nexus “maguro” (GSM/HSPA+).
- Download Fastboot-Mac
2. Extract the above downloaded .tgz file using an archive program. Then open the folder ‘takju-jdq39’ and extract the file ‘image-takju-jdq39.zip’ to the same folder. Now you should see 6 files with a .img extension.
3. Create a new folder named ‘galaxynexus-fastboot’ in your Home directory in Finder. Then copy all the extracted 6 .img files and fastboot-mac file to this folder.
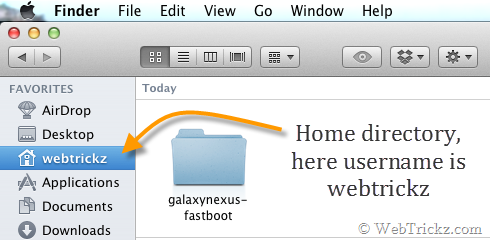
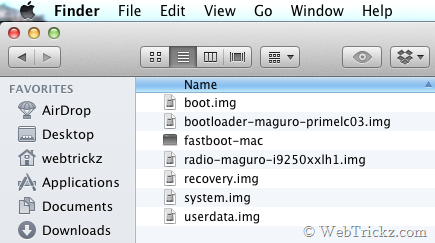
4. Turn off your phone. Then boot it into bootloader/ fastboot mode by holding the ‘Volume Up + Volume Down key and Power key’ simultaneously.
5. Connect the phone to the Mac using a USB cable.
6. Open Terminal on Mac (Applications > Utilities). In the terminal, type the following lines of code after the $, and hit return (enter) after each line. In the second line, type your user name as seen in Finder, and without the brackets.
cd /Users/
cd [your username]
cd galaxynexus-fastboot
./fastboot-mac oem unlock
A screen titled ‘Unlock Bootloader’ will appear on your phone. Select ‘Yes’ to unlock (use the volume keys to navigate and the power key to make your selection). The lock state should say Unlocked.
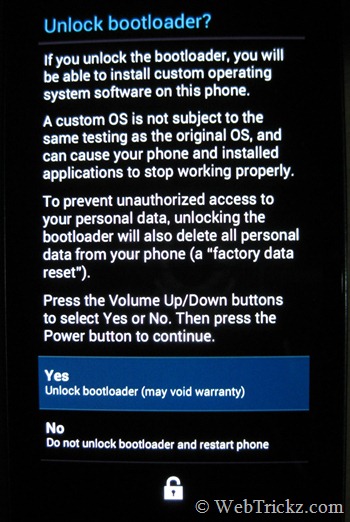
Flashing Android 4.2.2 Takju/Yakju Manually using Terminal on Mac –
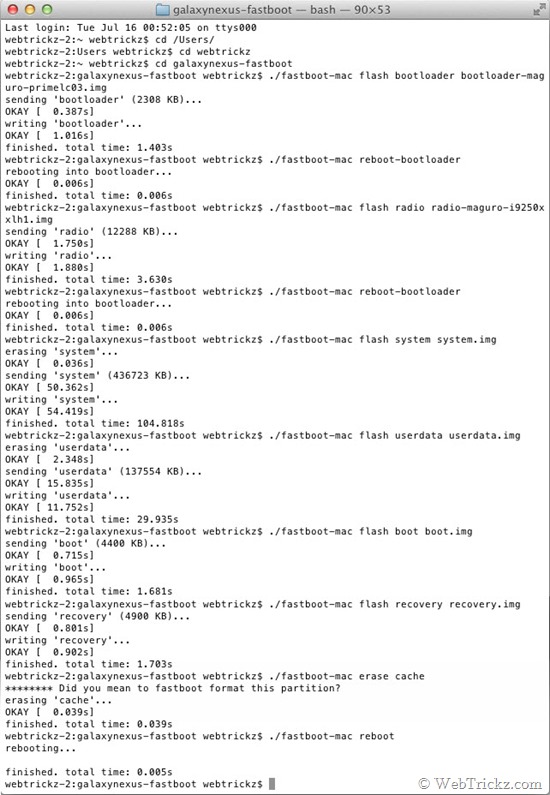
When your device is in fastboot mode, enter all the below commands step-by-step in the stated order (use copy-paste in the terminal to input the command). Refer to the below image:
Note: Make sure to wait for the “finished.” notification in Terminal before entering the next command. The system.img and userdata.img file takes a bit longer to flash.
./fastboot-mac flash bootloader bootloader-maguro-primelc03.img
./fastboot-mac reboot-bootloader
./fastboot-mac flash radio radio-maguro-i9250xxlj1.img
./fastboot-mac reboot-bootloader
./fastboot-mac flash system system.img
./fastboot-mac flash userdata userdata.img
./fastboot-mac flash boot boot.img
./fastboot-mac flash recovery recovery.img
./fastboot-mac erase cache
./fastboot-mac reboot
That’s it! Your device should now boot up normally with the latest Android 4.2.2 update and ‘Takju/Yakju’ firmware that will offer prompt updates directly from Google.
To re-lock the bootloader, in the terminal, type: ./fastboot-mac oem lock




I get a message “-bash: ./fastboot-mac: Permission denied” when I try to unlock the bootloader per above. Any idea why?
This thread should come handy.