Google has finally started rolling out the Over-The-Air (OTA) update of its latest Android OS ‘Android 5.0 Lollipop’ on most Nexus devices. The major OTA update for Lollipop is now starting for Nexus 5, Nexus 7 Wi-Fi (2012 & 2013), and Nexus 10; upgrading them from KitKat to Lollipop. There is also a minor update for Nexus 6 and Nexus 9 to address bugs. The OTA update for 3G/LTE versions of the Nexus 7 2012 & 2013 and Nexus 4 have not started yet. Motorola has also started to roll out Android 5.0 Lollipop for some of their devices in the US, namely Moto X (2nd Gen.), Moto G (2nd Gen.) US GSM and Global GSM retail versions.

Certainly, the Lollipop OTA update will be rolled out in phases and would be available on your device over the next few days or possibly weeks. Do you have a Nexus device and couldn’t wait anymore to try out the latest and redefined Android desert “Lollipop”? Well, you can have Android 5.0 on your compatible Nexus device right now! That’s possible as Google has released factory images for Nexus 5, Wi-Fi Nexus 7 (2012/2013), and Nexus 10; just in time.
Interested users can manually flash the Android 5.0 update on their Nexus devices. All you need is a device with an unlocked bootloader, and make sure that you have a backup of all your important data because unlocking wipes the entire device data.
NOTE: This step-by-step tutorial shows how to completely flash a factory image on a Nexus device. Though the below procedure is described for Nexus 7 Wi-Fi (2012) but the process is almost similar for Nexus 7 2013, Nexus 5, and Nexus 10 as well. You can simply download the image applicable for your device, then use the below guide as a reference to flash it.
Caution – This process will completely wipe all your device data. So, take a backup!

Guide to Update Nexus 7, Nexus 5, Nexus 10 to Android 5.0 Lollipop –
Step 1 – This is an important step. You need to install and configure Fastboot drivers on your Windows system. Refer to our guide: How to Install ADB and Fastboot Drivers for Nexus 7 on Windows 7 & Windows 8
Step 2 – Take a backup of your device data as everything will be wiped. Make sure to take a backup even if your device bootloader is already unlocked.
Step 3 – Download and Extract all the required files.
– Download 5.0 (LRX21P) “nakasi” factory image for Nexus 7 (Wi-Fi) – (Direct Link)
Note: If you have a different Nexus device, then download its suitable image from here.
– Extract the above .tar file to your desktop using an archive program like WinRAR. Then rename the file and add a .rar extension to it. Extract the .rar file to a folder on your desktop. Then open the folder and extract the file (image-nakasi-lrx21p.zip) within the same folder. Now you should see 5 files with a .img extension as shown in the image below:

– Download Fastboot & ADB – Extract the zip, then copy and paste all the extracted files to the folder where all the 5 .img files are present, such that all the required files are placed in one single directory. Refer to image:

Step 4 – Unlocking Bootloader and Flashing Android 5.0 factory image
- Turn off your phone. Then boot it into bootloader/fastboot mode by holding the Volume Up + Volume Down key and power key simultaneously.
- Connect the phone to the computer using a USB cable.
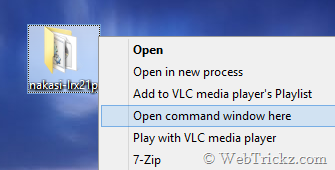
- Now Right-click the folder ‘nakasi-lrx21p’ while holding down the Shift key and click on ‘Open command window here’.
- The command prompt window will open up. Type fastboot devices to confirm that your device is recognized while it’s in fastboot mode.
Unlock Bootloader – Unlocking the bootloader will wipe the entire data on your device including the SD card. So, make sure you’ve taken a backup of your important files. (Skip this step if you already have an unlocked bootloader and the lock state says unlocked).
In CMD, enter the command fastboot oem unlock . Then a screen titled ‘Unlock bootloader?’ will appear on your phone. Select ‘Yes’ to unlock (use volume keys to navigate and power key to make your selection.) The lock state should say Unlocked.

Flashing Android 5.0 Lollipop Manually on Nexus 7 2012 (Wi-Fi) –
When your device is in fastboot mode, enter all the below commands step-by-step in stated order (use copy-paste in CMD to input the command).
Note: Make sure to wait for the “finished.” notification in CMD before entering the next command. The system.img and userdata.img file takes a bit longer to flash.
fastboot erase boot
fastboot erase recovery
fastboot flash bootloader bootloader-grouper-4.23.img
fastboot reboot-bootloader
fastboot flash radio radio-xxxxxx.img (Nexus 7 Wi-Fi users, skip this command)
fastboot reboot-bootloader (Nexus 7 Wi-Fi users, skip this command)
fastboot flash system system.img
fastboot flash userdata userdata.img
fastboot flash boot boot.img
fastboot flash recovery recovery.img
fastboot erase cache
fastboot reboot

That’s it! Your device should now boot up with all new Android 5.0 Lollipop update installed, able to receive OTA updates from Google.
Disclaimer: Try this guide at your own risk! We won’t be responsible in case your device gets bricked. This may also void your warranty.

