Following the availability of Nexus 4 and Nexus 10, Google has begun the rollout of Android 4.2 Jelly Bean OTA update for Galaxy Nexus and Nexus 7 as well. Android 4.2 is currently available only for the Takju variant of GSM/HSPA+ Galaxy Nexus and luckily Google has also released the Android 4.2 factory image for Takju Galaxy Nexus. Apparently, Non-Yakju Galaxy Nexus users won’t receive this new update anytime soon as their phone is updated by Samsung whereas Yakju & Takju firmware are updated directly by Google. However, users with adequate technical know-how can easily convert their non-yakju (yakjuxw, yakjuux, yakjusc, yakjuzs, yakjudv, yakjukr and yakjujp) device to Takju to receive prompt future OTA updates from Google.
Install Yakju or Takju? Takju, the firmware that ships with the Google Play Store version of Galaxy Nexus (in the US) receives updates faster than the Yakju variant. So, it’s better to choose Takju over Yakju.
NOTE:
1. This process requires unlocking the bootloader which Completely Wipes your device including /sdcard. So make a backup first.
2. Your Galaxy Nexus device name should be maguro (See how to check that)
3. This procedure is meant only for GSM/HSPA+ Galaxy Nexus.
Tutorial – Converting Yakjuxw (Non-Yakju/Yakju) Galaxy Nexus to Takju and updating to Official Android 4.2
Step 1 – This is an important step. You need to install and configure the ADB and Fastboot drivers on your Windows system. Refer to our guide: New Method – Installing ADB and Fastboot Drivers for Galaxy Nexus on Windows 7 & Windows 8.
Step 2 – Take a backup of your installed apps (with data) and SD card contents. Check our article, [How to Backup Galaxy Nexus Apps & Data without Rooting]. Taking a backup of apps is optional but it’s recommended to manually backup your SD card data.
Step 3 – Download and Extract all the required files.
– Download 4.2.1 (JOP40D) Official “Takju” factory Image (Direct Link)
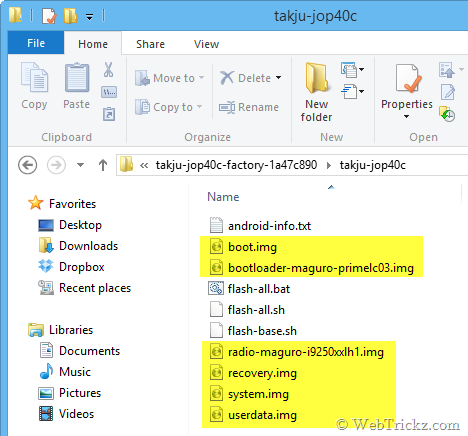
– Extract the above .tar file to your desktop using an archive program like WinRAR. Then rename the file and add a .zip extension to it. Extract the file to a folder on your desktop. Then open the folder and extract the file (image-takju-jop40c.zip) to the same folder. Now you should see 6 files with a .img extension as shown in the image below:
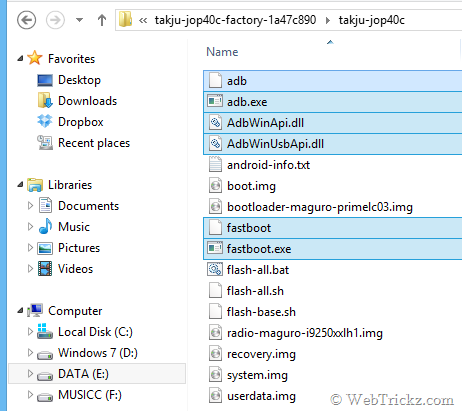
– Download Fastboot & ADB – Extract the zip, then copy and paste all the extracted files to the folder where all the 6 .img files are present, such that all the required files are placed in one single directory. Refer to image:
Video tutorial for Step 3 –
Step 4 – Proceed with Unlocking Bootloader and Flashing Android 4.2
- Turn off your phone. Then boot it into bootloader/fastboot mode by holding the Volume Up + Volume Down key and power key simultaneously.
- Connect the phone to the computer using a USB cable.
- Now Right-click the folder ‘takju-jop40c’ while holding down the Shift key and click on ‘Open command window here’.
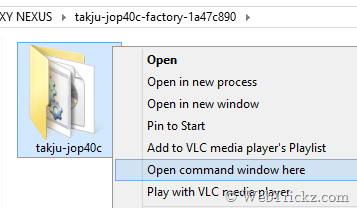
- A command prompt window will open up. Type fastboot devices to confirm that your device is recognized while it’s in fastboot mode.
Unlock Bootloader – Unlocking the bootloader will wipe the entire data on your device including SD card. So, make sure you’ve taken a backup of your important files.
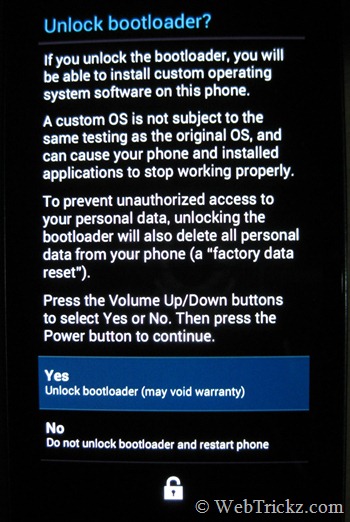
In CMD, enter the command fastboot oem unlock . Then a screen titled ‘Unlock bootloader?’ will appear on your phone. Select ‘Yes’ to unlock (use the volume keys to navigate and the power key to make your selection.) The lock state should say Unlocked.
Flashing Android 4.2 Takju Manually –
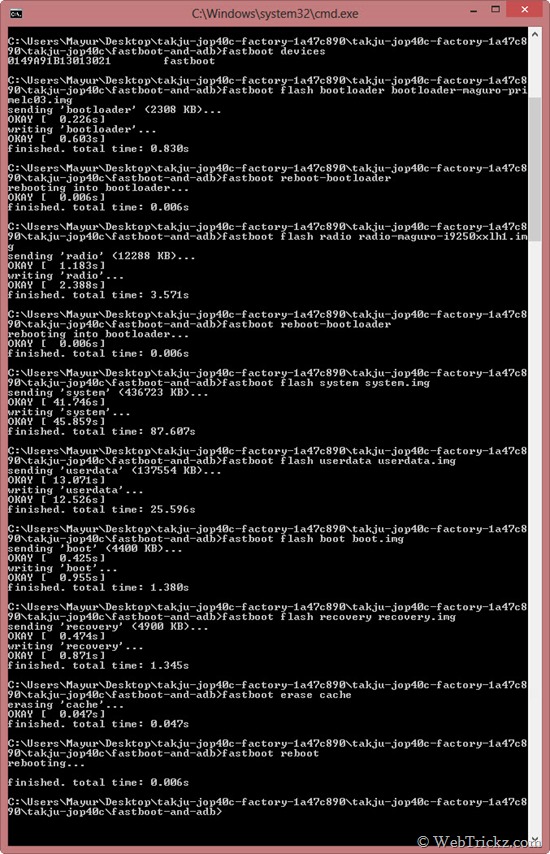
When your device is in fastboot mode, enter all the below commands step-by-step in the stated order (use copy-paste in CMD to input the command).
Note: Make sure to wait for the “finished.” notification in CMD before entering the next command. The system.img and userdata.img file takes a bit longer to flash.
fastboot flash bootloader bootloader-maguro-primelc03.img
fastboot reboot-bootloader
fastboot flash radio radio-maguro-i9250xxlh1.img
fastboot reboot-bootloader
fastboot flash system system.img
fastboot flash userdata userdata.img
fastboot flash boot boot.img
fastboot flash recovery recovery.img
fastboot erase cache
fastboot reboot
That’s it! Your device should now boot up normally with the new Android 4.2 update and ‘Takju’ firmware that will offer faster updates directly from Google.
Disclaimer: Try this guide at your own risk! We wont be responsible in case your device gets bricked. This may also void your warranty.




Thank you for your tutorial. My Yakju GNex is now Takju and it is currently updating to 4.2!!!!!!!
Worked wonderfully! Thanks for the tutorial!
Thank you for the ttutorial ! Its running awesum…………..
It works nice 🙂 Thanks
Awesome…. super easy and worked great!!!! 4.2 on my yakjuux 😛
Hello, can you please tell me if this will root my device or not?
Secondly, is it better to do this manually or use the earlier method(toolkit), which is easier?(total noob)
This doesn’t root your device. This manual way works 100% and is pretty easier too, just do everything as said.
XDA link for the fastboot files no longer works. Tried to find them on the HTC site, no luck..
Got a new link that works?
Cheers
Updated the link.
You. Are. Amazing.
!!!!!!!!!!!!!!!!!!!!!!!!!!!!!!!!!!!!!!!!!!!!!!!!!!!!!!!!!!!!!!!
These instruction rock! I had a bit of trouble figuring out the .tar / .tgz files but google helped. I am now rockin takju ha ha
Thanks though
how did you figure it out the .tar / .tgz files??/ and can you tell me how you put the cmd manually?? m stuck over there. plz help me someone. m dying to have 4.2 in my galaxy nexus
Hey Mayur, worked perfectly :), thanks you made my day….:):)
I’m stuck at the CMD prompt. When I type fastboot oem unlock, I get a message saying . I never receive any message on my phone confirming I want to unlock the bootloader.
my android version:4.1.1
Product: yakujuxw
Display: JR003CI9250XWLH2
Device: maguro
can I do the above said thing to convert my yakujuxw to Takju.
Also let me know the easiest way to change. I am not a mobile geek.
Yes, this is also an easy way if done as stated.
Thank you sooo much man! Very easy even for a total noob.
But I have two problems now, please help.
Firstly I can’t receive any files through Bluetooth, my phone goes crazy and starts turning Bluetooth on and off, and a message appears saying it has stopped.
Secondly when I connect my phone to my laptop(the one on which I updated my phone), it starts finding the drivers but doesn’t work. So I can’t connect my nexus to my laptop.
Hope you can help me because its 5 am and I can’t sleep 🙁
Try rebooting your phone into safe mode and see if that solves the problem. To to so, tap the ‘Power off’ option for a while and press Ok.
Some help please Mayur!!!!!
Hi all,
Can someone just compile all of this?
I have a Yakju GN (rooted with CWM)
I tried to follow this guide but I’m getting stuck on step 4
I’ve used RootKit to check my drivers and they all seem to be OK, but it still won’t pick it up on bootloader.
Any ideas?
Does the step:1 (installing ADB drivers) is the same for Windows Vista also??
Should possibly work but we haven’t tried it on Vista.
how about the performance???any bugs or glitches???
Awesome ! works like a charm !!
thnx working perfectly…
Hey Mayur,
I have one more phone htc wildfire a3333(unrooted)
I want to update it….
Plz help me…
Hi, i followed your step and guess what i updated my nexus to Jellybean 4.2 with Takju. now i need your help to locked my nexus. I booted my device with Fastboot and check it shows “UNLOCKED”. how to lock to get phone warranty back. I have download Nexus toolkit 1.5.5
Similarly run the command
fastboot oem lockin CMD to lock the bootloader.Hi, I have Tablet from Bharti Beetel Magiq with Android 2.3 build, i want it rooted with Android 4.1 or 4.2, can you please help in this matter and my GN is working perfectly fine after following your above steps.
while i’m stuck in this stage:
Flashing Android 4.2 Takju Manually –
When your device is in fastboot mode, enter all the below commands step-by-step in stated order (use copy-paste in CMD to input the command).
Note: Make sure to wait for the “finished.” notification in CMD before entering the next command. The system.img and userdata.img file takes a big longer to flash.
how to use copy-paste in cmd to input the command?? i m confuse over here. i put “fastboot flash bootloader bootloader-maguro-primelc03.img” and hit enter it say no path. if you have video to do this plz send me the link as soon as possible. i have also tried to do it by using “Easiest Way to Change Galaxy Nexus from Yakjuxw (Non-Yakju) to Android 4.2 Yakju/Takju and Get future Updates from Google” but i couldn’t download nexus root toolkit, when it reach to 240MB error came up. i have yakjuxw and i want to convert it into takju
Hey, i am a complete noob.I have a galaxy nexus yakjuxw 4.1.1. my bootloader is already unocked. shall i proceed with the above step. Moreover can you explain the first few steps about the unzipping part more clearly. Please help!
Moreover when i unlocked the bootloader the data didn’t get wiped
Will be uploading a video about the extraction part soon. 🙂
I did it. now my galaxy nexus is running on 4.2. everything is going smooth and well but there is one problem I.e. now in setting menu there is no developer option. how can I get that option? is it fine with out developer option or not? bcoz it contains many useful features like USB debugging and others.
dear mayur! its been like 8 hrs that I installed 4.2 takju in my GNx and now I m facing some problem. while I don’t know whether its problem with my phone or is it real that 4.2 have seriously bug issues.
1. now while dailing the number the response of touch is slow which is really annoying me.
2. now there is no more effect in camera setting like it used to be in the past ex. squeeze head, big nose, big mouth etc. also there is some problem with camera apps too.
3. phone is now some what slower than before.
Simplest tutorial on how to get Android 4.2 that actually works. No problems!
Cheers!
Hi Mayur, I bought a galaxy nexus on eBay india. I am having trouble in connecting to 2g/3g (E/G/H). It appears after every restart but then dis-appears. I am hoping it is due to some radio issues. It is a Maguro/yakjuxw version. Will updating to Yakju/Takju solve the radio problem ?? I am in desperate search for a solution after spending so much money on the phone. I guess this phone is originally from UK/Europe. I would be extremely grateful for any help.
Mayur….. You rock man…. Nice guide. Looking forward for some more tips and tricks from you
Dear Mr. Mayur,
The upgrade is working fine along with changing product (i.e. takju).
//- Download 4.2 (JOP40C) Official “Takju” factory Image (Direct Link)//
FYI,
Google replaced 4.2.1 (JOP40D) instead of 4.2 (JOP40C). So, update the direct download link.
Yeehee, THanks Mayur. You made my day!
will this work on my samsung galaxy nexus
running Android – 4.1.1
Device – Maguro
Brand – Samsung
ID – JRO03C
Product – Yakjuxw
Yes, on any GSM Galaxy Nexus running any Android version regardless of yakjuxw, yakju or takju.
Hey, very good post. I was able to do it easily. But i don’t like this update. My phone is no more snappy as it was earlier. I like the features of 4.2.1 but wish to roll it back to 4.1.2. Can the same procedure as above be used for the 4.1.2 binary. Please help!
Yes, just flash 4.1.2 image using the toolkit.
No i meant installing manually, just as above. I don’t know how to use the toolkit
Yes, just download and extract the image. Then flash it manually, make sure to change the .img file name in command.
project butter don’t seem to exist and battery is draining out very quickly
Out of all the To-Dos I have come across in my life, I think this is the most beneficial one ever. Thank you so much. God bless.
I have vista on my computer….anyone tried running the above procedure on vista?
plz reply asap….
Awaiting reply on this…plzzzz..
Hi. The direct link to download the Takju factory image doesn’t seem to work. Please help!!
Link fixed.
Thanks a lot Mayur!! My GN is now running 4.2.1 🙂
Dear Mayur
My nexus build is JRO03C.I9250XWLH2. CAN I APPLY THIS METHOD.
KINDLY REPLY ME .
hermano ese tutorial me sirve para mi nexus jakjuux? gracias
Hello… i already extract the takju factory image .. but there is just 4 file which is boot , recovery, system, userdata.. so after paste the command which is ”fastboot flash bootloader bootloader-maguro-primelc03.img”.. i got failed message..
thank youuuu……worked like charm……very useful
Thank you very much for this excellent guide !
I had maguro Yakjuxw 4.1.1, and used this guide to install Takju 4.1.2, from Google:
https://developers.google.com/android/nexus/images
I chose the 4.1.2 just to see how long it would take to get OTA for 4.2. Which was a couple of minutes. And after having done that upgrade, the 4.2.1 arrived.
Again – great guide and instructions 🙂
-jo2
Jo2, im planning to convert my yakjuxw to takju and i would like to know if you are happy with the choice you made ? Did you recieve the 4.2.2 update? Any regrets ?
i tried this procedure.
failed to recognise my phone in fastboot for first time
then in device manager i again updated drivers and it start WORKING
Hey.. That was awesome.. Worked perfect… I am on Takju right now..
Thanks…
Excellent article. I used this to upgrade my wifes phone to 4.1.2. And the moment I connected to Wifi started receiving the 4.2.2 update from Google OTA 🙂
Hi mayur….can you please tell whether this procedue would work on vista….
Also, I found another guide from you: http://webtrickz.com/easiest-way-to-change-galaxy-nexus-from-yakjuxw-non-yakju-to-android-4-0-4-yakjutakju/…
which one should i use…
Awaiting reply eagerly…..TIA.
Pratik
Can i relock my bootloader after converting GNEX yakju to Takju..??
hey brother my galaxy nexus bricked …now to fix it plz tell me..