Windows 10 is arguably the best operating system Microsoft has ever released. I say “arguably” because a lot of Win 7 users might disagree. Nevertheless, Windows 10 has a far more robust feature set and is designed to deeply integrate technologies of the future, such as Augmented Reality (AR) and Artificial Intelligence (AI).
The only problem with Windows 10 is that it is still not secure enough. It might not be accurate to say that, actually. The truth is, since Windows is the most used desktop OS in the world, it naturally forms the biggest target for threat actors, the same as Android does in the mobile space. And that’s why it’s important for users to take their security and privacy into their own hands where Windows 10 is concerned.
Here are five useful security tips for Windows 10 that you can review and implement as you see fit. Each of these methods addresses a different aspect of security and privacy, but all of them will help keep your data and your system more secure and more private.
Privacy and Data Gathering
The first step is to secure your personal information by tweaking your privacy settings to control how much data goes back to Microsoft from your system. You can do this in the Privacy menu within Settings.
Using this method, you can control what data your hardware sends to Microsoft. This includes feedback and diagnostics information about your system.
Browser Activity on Microsoft Edge
Microsoft Edge is a pretty cool browser, but because of Cortana integration on Windows 10, there’s a lot of data that gets sent back to Microsoft. The purpose is to enhance the user experience, but if you’re not comfortable with that you can change the settings.
To do this, you’ll need to click on the ellipsis symbol and go to Settings >> Advanced Settings >> View Advanced Settings >> Privacy and Services. Once you’re on this page, disable both the following:
“Have Cortana Assist me in Microsoft Edge”
“Use page prediction to…”
Curbing Cortana
Cortana is a great virtual assistant, but for it to be a great assistant, your voice commands and other data need to be shared with Microsoft on the cloud so the information can be processed and sent back to you as a result. Unfortunately, that leaves you vulnerable.
So, if you don’t want your searches, speech, handwritten text, location and other information going to Microsoft’s cloud servers, you can minimize that by tweaking the settings for Search within Settings >> Cortana.
Do You Really Need a Microsoft Account?
Windows 10 has a default feature to prompt you to create a Microsoft account irrespective of what services you plan to use. If it’s important to you, then, by all means, keep using the account. But also remember that there’s a tremendous amount of data that’s being transferred behind the scenes. Call it the cost of convenience, but if your privacy and security are more important to you, then sign into your Microsoft account, go to Security >> More Security Settings >> Close My Account and follow the instructions.
Note that once you close your account, you won’t be able to access any of the services, so make sure you don’t have any active subscriptions, valid gift cards with money, emails in Outlook.com and so on. It’s a tedious process, but worth it if you value your privacy.
Access Backup
By this, we mean: do you have a way to get into your Windows 10 computer if you forget the user or admin password? Ideally, you should, and there’s a perfect premium utility to get that setup.
TunesBro WinGeeker is designed to keep your data safe when you get locked out of your system. It will easily reset your password when you’ve forgotten it, and the best part is that you don’t have to reinstall Windows 10, and your data will not be touched.
If you’re the proactive type, you can use the software to create a password reset disk or USB drive for when you forget your password. Alternatively, you can use it to reset the password after you’ve forgotten it.
To create the password reset disk, follow these steps:
Step 1: Download and install the software on your Windows 10 PC, and register your email and the code you received by email to activate the product.
Step 2: Launch the application, then insert a disk or USB drive. On the interface, select the appropriate destination and burn the bootable media using an existing ISO file. The disk or drive can now be used to reset your password if you forget it.
If you don’t create the password reset disk or drive, you can still get in using this software. In the second scenario, do the following:
Step 1: Load the software on another PC and create the password reset disk there.
Step 2: Remove the bootable media and insert it into your locked Windows 10 machine. Boot up normally, but go to the boot menu to change the boot order so the bootable media is the first option.
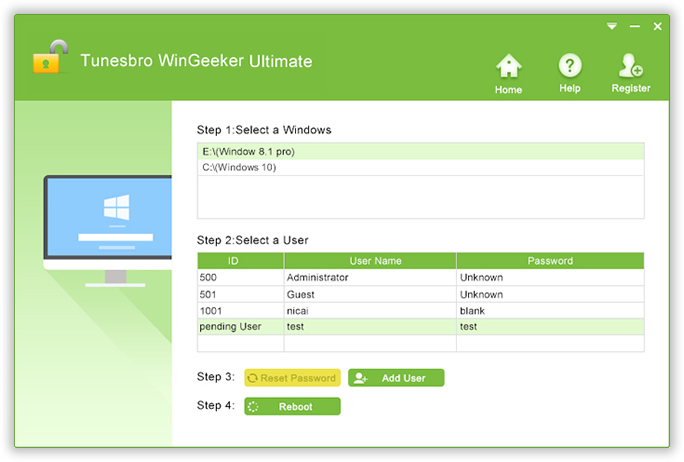
Step 3: Once it boots up, you should now be able to see the software interface, where you need to select the OS and the locked user account. Then click on “Reset Password”.
Step 4: Once this process is complete, click on “Reboot” and enter your system without a problem.
These five security tips for Windows 10 should cover most eventualities as well as preserve your privacy and data.


