Android 4.0 Ice Cream Sandwich includes a smart feature that allows you to take a full backup of your device and restore it when needed using Android SDK tools. Wug’s Galaxy Nexus Root Toolkit for Samsung Galaxy Nexus makes this task much easier, and surprisingly, you don’t need to root or unlock the bootloader to perform a backup. Additionally, this toolkit doesn’t require you to have Android SDK installed when on Windows.
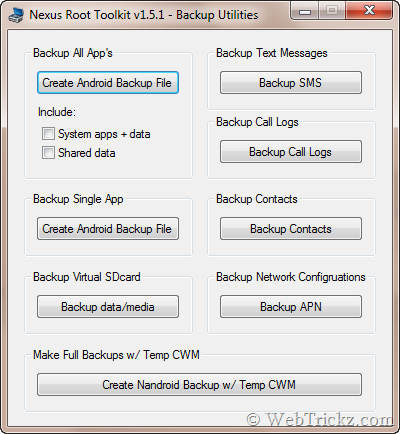
NOTE: This does not back up all of your SD card data, such as pictures, music, files, etc. It’s recommended to manually copy the entire SD card contents to your computer. The new version of the toolkit offers new backup utilities, letting you back up your SMS, call logs, contacts, and APN. It does this by installing the applicable 3rd-party app on your device to accomplish the task if chosen.
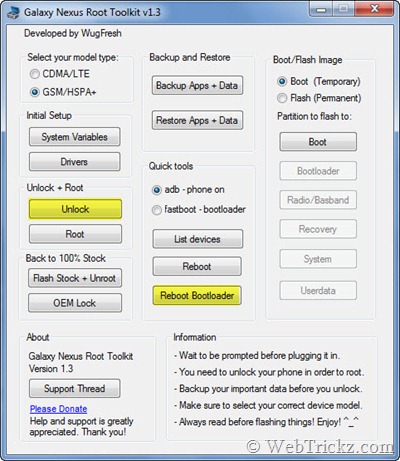
Guide to Backup All Installed Apps and Apps Data on Galaxy Nexus
- Download Nexus Root Toolkit v1.5.2 and install it on your Windows system.
- Important: Configure ADB Drivers for your device using the toolkit. Refer to this detailed tutorial and make sure the drivers are set up properly before proceeding.
- Next, enable USB Debugging on your device and connect it to the computer via USB.
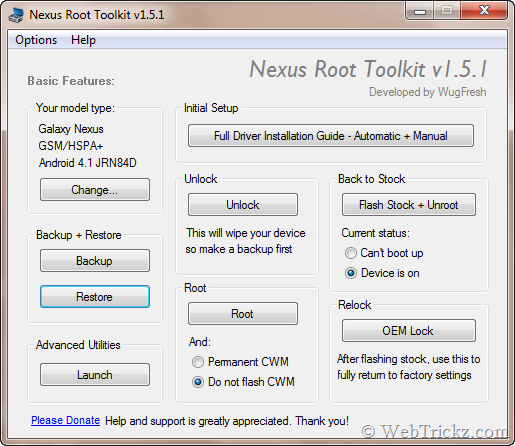
- Open the toolkit. Ensure your device is connected by selecting ‘ADB-Device On’ and clicking the ‘List devices’ option.
- Click on the ‘Backup’ listed under Backup + Restore in the toolkit.
- Click on the ‘Create Android Backup File’ option to back up all the user-installed apps.
NOTE: It’s recommended to NOT include System apps + data, as it will only back up all user-installed apps and their data. This is preferred as you can restore the backup after installing the latest firmware (when updated manually) or after flashing a custom ROM.
A create an android backup (.ab) file window will pop up. Select OK. Next, specify the location on your computer to save the backup file. The device will be rebooted.
A new window will pop up. Now unlock the screen and hold the device in your hand. Press OK if you’re ready to initiate the backup.
As you confirm, a Backup interface will appear on your phone.
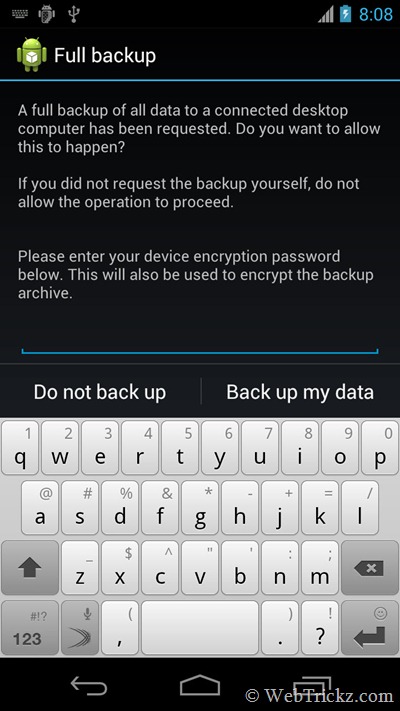
Enter a password if you prefer to password protect your backup (optional). Make sure to remember the set password as it is required to restore the backup file.
Click the ‘Back up my data’ button. The backup process will start automatically, you can notice the activity on the phone. (Please be patient and do not operate the device.)
Once the backup is complete, it will be stored on your computer in the specified directory. You’ll also get a confirmation message as shown.

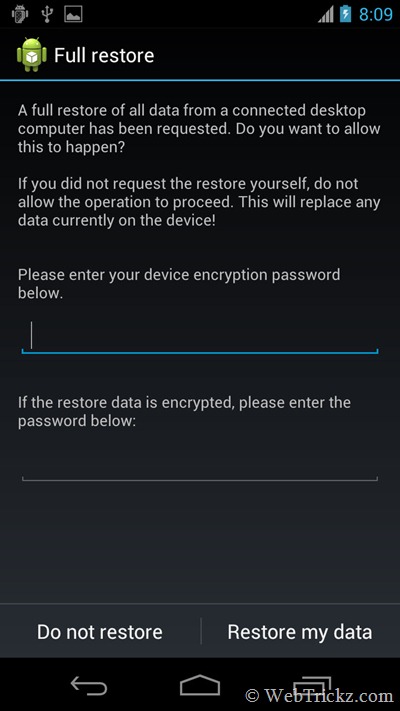
Similarly, you can restore the backup using Nexus Root Toolkit. Upon restoration, all apps and their data, such as passwords and settings, would be restored.
~ We tried this procedure on Galaxy Nexus running Android 4.0.2, and it worked perfectly. The restore process went flawlessly, and all the user apps were intact with data.
We hope you found this guide useful.


I can’t install this Nexus Root Toolkit on my Windows 7 Ultimate 64bit. Try to disable windows UAC but still not work. Is this application not support in Windows 64bit?
I’m not sure if it works with win64 or not because I have not tried it yet. I remember there was also a problem with win64 when I was rooting my Incredible but there was some sort of workaround. If it was me and I couldn’t get it to run, I would try using the XP Virtual Machine that you can install with Win7 Ultimate. Just an idea…
brilliant…thank you
first of all,Thank you so much,ur guide helped me lot to manually update my phone to android 4.2.1…Everything works perfectly well…While backing up my data i followed ur instruction , i was able to restore during installation ..All of my apps were restored properly ,but all my media files(songs ,pictures) were missing
:(..need ur help please
This guide clearly describes that it backups only your apps and apps data. It’s explicitly mentioned that you need to manually backup the SD card data prior to flashing.
Hello, thanks for the article. All work perfectly. I have change my 4.2.1 YAKJUXW become 4.3 TAKJU JWR66Y.
The problem occurs when I try to restore my backup data using NRT V.1.5.2. which is no option for TAKJU JWR66Y on the list of model type, so when I checked connection (by clicking List devices) I got “No ADB Devices found” message. Should I download the latest NRT app? Please advice.
Thanks in advance
Not a problem if device is not listed there. It clearly states that ADB drivers aren’t working, you can try either with the latest NRT or manually configure the drivers (refer our other posts).