New Method – Installing ADB and Fastboot Drivers for Galaxy Nexus on Windows 7 & Windows 8
If you own a Samsung Galaxy Nexus and wish to intensely configure your device by rooting and installing custom ROM, then here is an amazing tool specifically for Galaxy Nexus that you must check out!
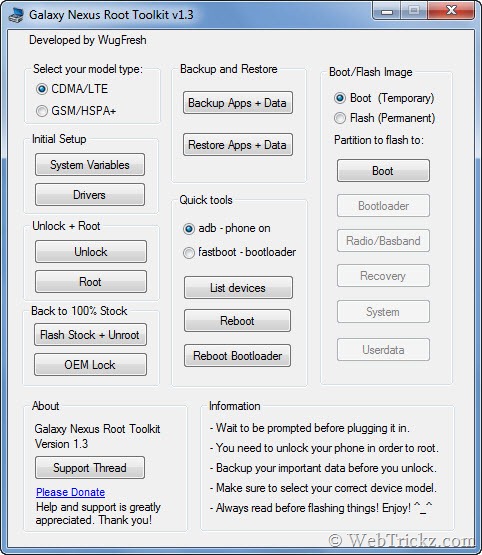
Galaxy Nexus Root Toolkit (by WugFresh) is a free, powerful, and feature-packed program that makes everything easier. The program works for both Verizon (CDMA) and GSM models. Functionalities include: Unlocking, rooting, relocking, unrooting, Flash/Boot img files, Backup and Restore Apps, Flash Stock firmware, and many other options. It has a nice GUI which is great for novice users as they can perform several tasks easily without going through the uneasy command-line process. Moreover, it doesn’t require Android SDK to be installed.
Galaxy Nexus Root Toolkit includes the relevant USB drivers within the package and has automated driver installation with devcon and pnputil. But you still need to configure the drivers manually which is the most crucial and bit of a difficult task in the entire process. Though the program indicates step-by-step instructions to install the drivers, we’re sharing this tutorial to make it more convenient. Follow the steps carefully.
STEP 1 – Install Samsung USB Drivers using Galaxy Nexus Root Toolkit

Open Galaxy Nexus Root Toolkit (Run as Administrator), select device model type (CDMA or GSM), and click on the ‘Drivers’ option (Device should be unplugged). The driver installation process will start instantly and will be completed automatically. Note: Be patient and let the process finish on its own.
STEP 2 – Driver configuration, a two-step manual process:
- Your device has to be configured once when it is ON and again when it’s in BOOTLOADER
- You have to manually configure these drivers through the device manager.
Part 1: Configuring your adb drivers
1. Turn your device completely on, enable USB debugging, and connect your device via USB. To enable USB debugging: on your phone, open settings > developer options > check USB debugging.
2. Open device manager: Start > type devmgmt.msc
3. Look for anything that resembles your device: it could say Galaxy or Android device.
- If you can’t figure out which one is your device: Unplug your phone and then replug it while watching Device Manager.
4. Uninstall this device! Right-click the device > Uninstall
5. Now refresh your devices by hitting the “Scan for hardware changes” button.
6. You will now see a new device with a yellow exclamation mark next to it.
7. Now you’ve to install the correct drivers for it.
- Right-click the device and choose “Update Driver Software…”
- Now select “Browse my computer for driver software”
- Now in the “Search for driver software in this location:” enter:
C:\Wugs_GnexRootToolkit\data\drivers
- Now Hit enter, agree to the security warning, and wait for the driver to configure.
- It could take a few minutes… then tada!
Alternatively, you can do this (this method only works on some computers).
- “Let me pick from a list of device drivers on my computer”
- Browse for “Samsung Devices” and select Next
- Then choose “SAMSUNG Mobile ADB Device”
- Then select next, wait for it to configure, and tada!
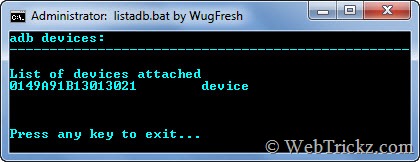
Now Test to make sure the adb drivers are working correctly – Firstly, connect your device via USB and confirm that ‘USB debugging’ is enabled. Then open Galaxy Nexus Root Toolkit (Run as Administrator), select ‘adb-phone on’ option in Quick tools, and click on ‘List devices’. A command prompt window will appear stating the list of devices attached. If you see an adb device listed as shown below then you’re half done.

Part 2: Configuring your Fastboot drivers
1. Boot your phone into bootloader mode. This can be done directly from within the toolkit, select ‘adb–phone on’ and click on the ‘Reboot Bootloader’ option.
OR
When your phone is in a completely powered-off state, turn it back on by: “Holding both up and down volumes buttons and the power button”.
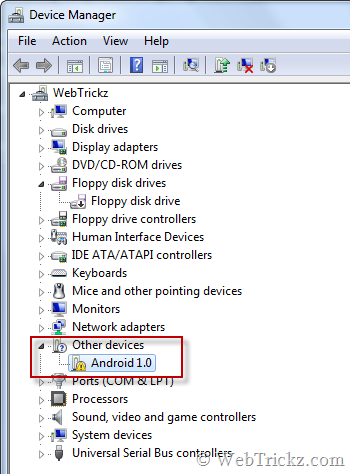
2. Go to Device Manager. You will now see a device listed as Android 1.0 with a yellow exclamation mark next to it.

3. Install the correct drivers for it.
- Right-click the device and choose “Update Driver Software…”
- Now select “Browse my computer for driver software”
- Now in the “Search for driver software in this location:” enter:
C:\Wugs_GnexRootToolkit\data\drivers
- Now Hit enter, agree to the security warning, and wait for the driver to configure.
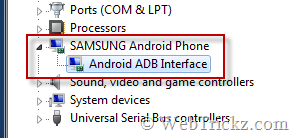
4. You should now see a new device listed in the device manager as ‘Samsung Android Phone’ with a sub-category as ‘Android ADB Interface’.

5. Now test it – Select ‘fastboot–bootloader’ under Quick tools and click on the ‘Reboot Bootloader’ option. If the device boots into Fastboot mode, then you’re done.
Your drive configuration is complete. This is quite lengthy but is a one-time task. Once drivers are set up properly, you can manage your device entirely with this toolkit. 🙂
Source: GalaxyNexusForum


Thanks a lot for the update Mayur.
Thanks for the useful tutorial! There is a newer version of the Galaxy Nexus Root Toolkit. The user interface and some other things have changed. Could you please update this tutorial, or release a new one, to match the changes in the newer version?
I’m aware of the new version. Would it be okay if I upload v1.3 of the toolkit for you guys?
can you upload it sir…
What about v1.5.2?
Hi Mayur,
I have a problem.
I did the steps and the phone is stuck in the boot loader screen.
Can you please please help me.
Me too .I did the first step ok, then when configurating the fastboot driver it give me a error and now im stuck at bootloader
resolved
how did u resolve this?
I had exactly that too, but my phone is still stuck at bootloader. How did you fix it!? How can I fix it?!
I couldn’t install Samsung drivers (step 3).
Windows says the current driver is better, and trying to do use the “Have disk” option and going to C:\Wugs_NexusRootToolkit.v1.5.1\data\drivers I find 4 .inf files, but none of them is compatible with x64-base system.
I’m running Windows 7 64 bits.
Any hints on how to install the ADB drivers in my computer?
Tks!
mine conputer gets stuck on checking adb screen
Pleaae help.me in changing to yakju i can pay anything for it
i am having the same problem. my computer gets stuck at the adb screen. did you fix it? have you been successful in installing jb?
guys for version 1.5 ,things are little different for setting up drivers . rest of the steps 2 and 3 are just as described .there is a video on YouTube showing” how to manually set up drivers on nexus 7 using wugfresh” the samething works for galaxy nexus too.very clearly explained ,sure u will find it super easy .
guys here is the youtube link showing how to set up drivers with wugfresh1.5.2 version,though for win7 wugfresh has automatic config option,people had troubles with it,so iam posting manual method which will surely work.
http://www.youtube.com/watch?feature=player_detailpage&v=Mmw9iaC9hiU#t=0s
i have problems with adb drivers. i thought this was supposed to be easy. the drivers are extremely flaky. when i run in fastboot mode, sometimes it recognises it when i test it with nexus root toolkit, other times it doesn’t. i keep uninstalling and reinstalling driers but there has to be something wrong every time. i have already unlocked the bootloader of my galaxy nexus but i need to flash stock + unroot, and with these drivers, i am not confident yet
please send transparent details on how to install the adb drivers
I’ll soon update the post with a much easier way to install the drivers on Windows 7 & 8.
Guys, check out the new and easier tutorial. http://webtrickz.com/new-method-installing-adb-and-fastboot-drivers-for-galaxy-nexus-on-windows-7-windows-8 🙂
Hi Mayur i have did exactly what you mentioned in “new method installing adb ….” everything perfectly fine but when i check with Android System info > Buildinfo my device product still ‘YAKJUJP”. help me please