Recently, I moved this website to HTTPS / SSL which is hosted on WordPress CMS. The migration from HTTP to HTTPS went smoothly and the permanent redirection to HTTPS was successful too. Soon after propagation, the HTTP pages were redirecting to their HTTPS equivalents and were showing a green padlock sign. The only issue was that most of the HTTPS pages were showing mixed content warnings.

Due to such warnings, the pages don’t show a Secure tag aka padlock, and instead say “Your connection to this site is not fully secure” or “This connection is not Private”.
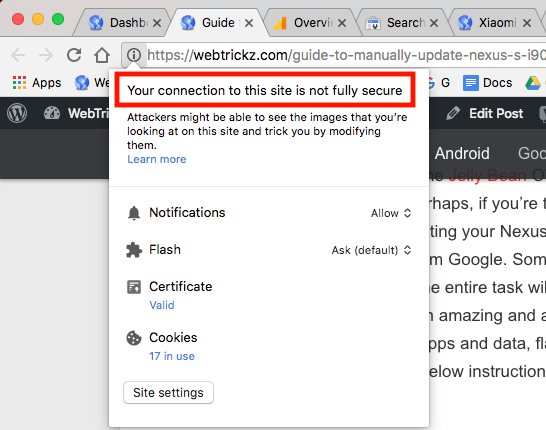
This problem arises when the page resources link to HTTP URLs instead of HTTPS, thus labeling them as an insecure element. The mixed content warning is usually caused by images added on pages that are still loading with the HTTP URL. This issue doesn’t stem from the SSL setup itself and needs to be fixed as a part of the migration process to HTTPS.
I intensely searched through a lot of sources to find a precise way to update image links from HTTP to HTTPS after SSL migration in WordPress. However, I couldn’t find a single guide that could help a first-timer to accomplish this technical task with ease. After much brainstorming and going through a lot of articles, I finally figured out a simple solution to fix not secure error on HTTPS pages.
Guide to Update Images to HTTPS in WordPress
I’ll keep this guide simple and straight to the point so that newbies don’t get confused like me.
We will be using the “Better Search Replace” plugin for WordPress that packs the best features found in similar plugins. You can perform this entire task without logging into phpMyAdmin to run any SQL queries which could mess up your site in case anything goes wrong.
Before proceeding, note that this tutorial is applicable for WordPress users who have set a 301 redirection and are using only the HTTPS protocol on their website or blog. Although this would work in most scenarios, one needs to consider other factors too if the problem persists.
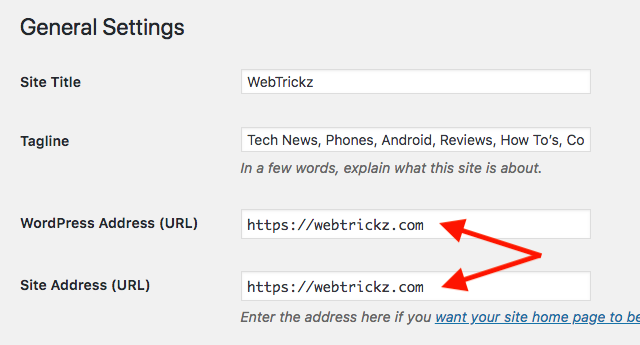
1. Change WordPress Home and Site URL to HTTPS
Go to your WordPress dashboard > Settings > General. Now change the WordPress Address and Site Address URL to HTTPS instead of HTTP. (Refer image)
This makes WordPress itself handle the redirect. Additionally, all internal links within the WordPress app and website will be set to their HTTPS equivalents. This would state that every bit of the website is, and leads to, encrypted content. Just to be sure, you can add the below rule to your .htaccess file.
RewriteEngine On
RewriteCond %{HTTP:X-Forwarded-SSL} !on
RewriteRule ^(.*)$ https://%{HTTP_HOST}%{REQUEST_URI} [R=301,L]
This 301 redirect will make sure to redirect any HTTP request to HTTPS.
2. Change Media Assets (Images, Internal links) from HTTP to HTTPS
Coming to the main step. You now need to replace all the old HTTP URLs in the WordPress database with HTTPS. This means updating all the image file links and internal links added manually (in posts or pages) to HTTPS to prevent any insecure image warning and fix the mixed content error. However, there is no need to update external links pointing to other websites to HTTPS.
Replace HTTP to HTTPS with Beter Search Replace Plugin
To proceed, install the “Better Search Replace” WordPress plugin and activate it.
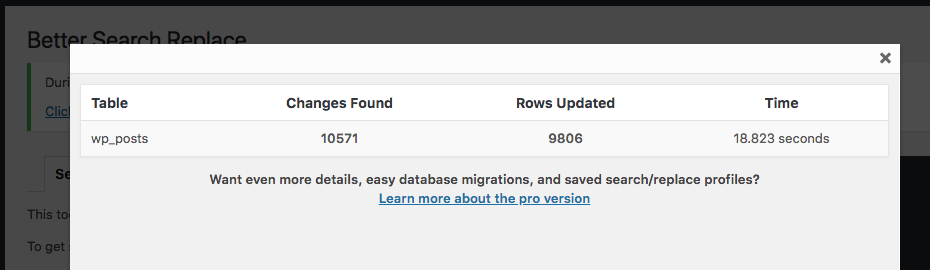
Now head over to the plugin page located under the Tools section. In the “Search for” field enter the HTTP version of your website URL and the HTTPS version in the “Replace with” field. Under select tables, scroll down and select the “wp_posts” table which contains image URLs, and URLs embedded inside posts and pages. Then uncheck the “Run as dry run?” option and hit the Run Search/Replace button.

Wait for the processing to take place. You can later view details such as the number of changes found and rows updated for the particular table.
NOTE: If you get an error during processing, go to the Settings tab and try decreasing the “Max Page Size” value to anywhere around 8000 to 10000.
That’s it! The HTTP version of your website’s embedded links and image URLs should now be updated with the HTTPS version.
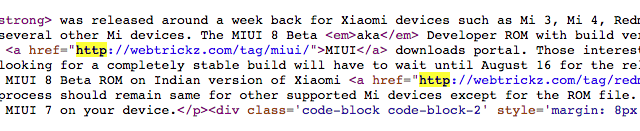
To confirm, simply open a blog post and copy the image address within a post or view the page source. The image URLs should now show the HTTPS version and you should now see a Secure padlock next to the address bar.


Bonus Tip: After replacing HTTP with HTTPS successfully, you can remove the plugin.
Find why HTTPS site is not showing a green padlock
Do note that some pages with broken or unavailable links such as expired CDN might still result in mixed content. You can identify the insecure elements on such pages by using the Inspect Element feature in Chrome or just use whynopadlock.com to easily find insecure items on your SSL-enabled pages.
Reference: Check this detailed article by Michael Bely


Thanks for this simple but most useful tips 🙂
I also made the switch to https yesterday! The installation of SSL was done smoothly by the hosting provider as I bought SSL from them. But I also faced the same issue with Padlock. I requested the hosting provider to look in to this. In the mean time I found your article and tried the plugin my self.
The plugin was really amazing. It solved my issue with deep linking and images. I only required to manually change one header logo.
For your Info, I used a different code for 301 redirect.
Glad to hear that this post helped you. I wrote it for the sole purpose to help everyone who is stuck with this problem and can’t figure out an easy fix to it.
Thanks very much for this article. I just migrated my https site to a new host and had to purchase a new certificate. Had errors concerning my site. I searched the web and as you mentioned there was nothing that was easy for newbies.
Carried out the instructions laid out here and my site is up and running.
Looking at the previous comment, I too had one image that didn\’t get updated. It was the header logo, which I easily fixed by removing it then adding it gain.
Thank you so much!!
Glad you found this guide useful. Happy to help 🙂
Great instruction Mayur. Migrating from HTTP to HTTPS is really pain in the a*s.
Thank you very much. This article saved me some time! 🙂
Thank you for this simple and great help.
Brother, you just helped a fellow newbie with his image files. And all it took was step #1 and no further. Thank you.
wow thanks for this news very helpful
Thank you so much for this simple solution!!!! Yoohoo!
This was super helpful – thank you!
This Article Very Helpful Because I dont know how to replace http images to https then i found you article its save my life .. Thank You
Thanks Big Brother, you saved a lot of time of mine. all my old images URL was starting with http. i was quite worried of this http thing for past few days. you made me resolve it in one go. Thanks Again.
You are AWESOME for posting this! Thank you!
It has solved some problems, plus, now I know such a tool exists!
The WordPress community is really amazing!…
Your blog always delivers quality content. Much appreciated!