WebTrickz
TRENDING
  • How to Turn Off and Restart iPhone 15
No Result
View All Result
  • Reviews
  • Editorials
  • Social Media
    • Facebook
    • Twitter
    • YouTube
    • Messenger
    • Instagram
    • Snapchat
    • WhatsApp
    • TikTok
  • Apps
  • How To’s
  • Apple
  • iPhone
  • Google
  • Android
  • Mac
  • Security
  • About Us
    • About Us
    • Contact Us
    • Privacy Policy
No Result
View All Result
WebTrickz
No Result
View All Result
Home Android

Guide to Unlock Samsung Galaxy Nexus Bootloader

Mayur Agarwal by Mayur Agarwal
February 21, 2024
in Android, How To's

Google’s Galaxy Nexus (GT-I9250) ships with a locked bootloader, thus posing a big restriction on the modification of device software. It’s impossible to root your device or install any custom ROM on it unless the device bootloader is unlocked. So, let’s see how you can unlock your Galaxy Nexus with ease using Wug’s Galaxy Nexus Root Toolkit.

NEW – How to Root Galaxy Nexus without unlocking the Bootloader

NEW – How to Unlock Galaxy Nexus Bootloader without wiping any data

Note: Unlocking will wipe your entire device data, apps, settings, SD card contents, etc. It’ll factory reset your device, so it’s recommended to take a proper backup first. [See: How to Backup Galaxy Nexus Apps & Data without Rooting]

– Unlocking may also void your device warranty. Be sure before proceeding.

Tutorial – Unlocking Galaxy Nexus Bootloader

1. Make sure you’ve taken a backup of your entire device data.

2. Download the Galaxy Nexus Root Toolkit and install it on your computer.

3. Important – You now need to configure ADB and Fastboot drivers for your Galaxy Nexus using the toolkit. Follow this detailed tutorial carefully to set up the drivers.

4. Now enable USB Debugging on your device and connect it to the computer via USB. Then open the toolkit (Run as Administrator).

5. In Galaxy Nexus Root Toolkit, select your device model (CDMA or GSM) and click the ‘Unlock’ option. A command prompt window will open up, press any key to continue.
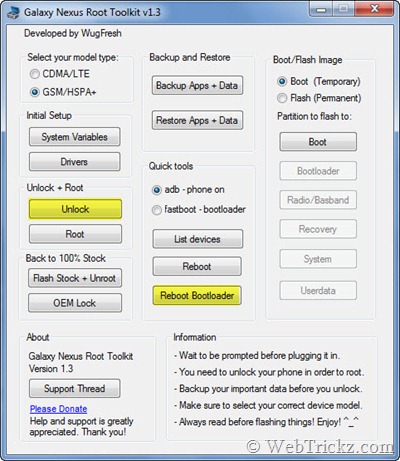
Galaxy Nexus Root Toolkit

6. The device should now reboot into the bootloader. A screen titled ‘Unlock Bootloader’ will appear on your phone. Select ‘Yes’ to unlock (use the volume keys to navigate and the power key to make your selection.)
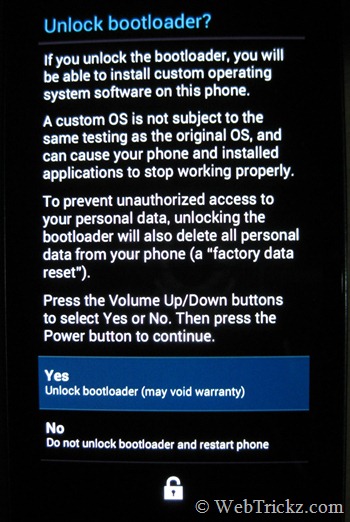
unlock-bootloader_galaxy-nexus

7. The unlocking process will start and the device will soon boot up.

fastboot-mode_galaxy-nexus

Voila, GN should be unlocked now! You can confirm that by rebooting the bootloader and checking the device lock state. More easier way to determine it is by rebooting your device normally and looking for a small lock image on the initial boot screen.

You can now flash the latest stock Android release without rooting the device.

Tags: AndroidBackupBootloaderGalaxy NexusGoogleMobileRootingTipsUnlocking
ShareTweetSend
Previous Post

How to Backup Galaxy Nexus Apps and Data without Rooting

Next Post

Powerful Control – Enhanced Power Control Android Widget [Brings Notification Widgets to Ice Cream Sandwich]

Mayur Agarwal

Mayur Agarwal

Mayur Agarwal, the founder and editor of WebTrickz, is a tech enthusiast with a Bachelor's degree in Computer Applications and over a decade of writing experience. His passion for technology and gadgets inspires him to create insightful How To's and troubleshooting guides.

Next Post

Powerful Control – Enhanced Power Control Android Widget [Brings Notification Widgets to Ice Cream Sandwich]

Comments 11

  1. Jessica says:
    13 years ago

    6. The device should now reboot into bootloader. A screen titled ‘Unlock Bootloader’ will appear on your phone. Select ‘Yes’ to unlock (use volume keys to navigate and power key to make your selection.)

    Im stuck there ! :(.

    I did the step 5, but it didnt reboot into bootloader o-o
    What should i do?

    Reply
  2. Jessica says:
    13 years ago

    I reboot it and says “Lock Status: UNLOCKED”

    But i dont have that thing that says “FASTBOOT STATUS: DOWNLOAD 128378123”

    I mean, plus, my phone didnt got a factory reset o_o

    What should i do ?

    Reply
  3. hamidhst says:
    13 years ago

    Is there an option to close the bootloader after opening it?

    Reply
  4. Pingback: Guide to Update Samsung Galaxy Nexus (YAKJUXW) to Android 4.0.4 and Get future Updates from Google
  5. Pingback: Updating Galaxy Nexus to Android 4.1.1 Final (JRO03C) from 4.0.4/4.1 Takju
  6. Shaaz says:
    13 years ago

    DONE!!!! THANKS MAYUR!!!!

    This guide is BRILLIANT!!!!!

    Reply
  7. ten says:
    13 years ago

    i’m now on jb! thanks a bunch! u made it so easy!

    Reply
  8. Ally says:
    13 years ago

    THANKS ALOT FOR YOUR SUPPORT. I HAVE CHANGED TO GOOGLE SERVERS DIRECTLY FOR UPDATES….I HOPE THIS WAY I WILL GET ALL FIRST AND FAST UPDATES WITHOUT WAITING FOR SAMSUNG TO RELEASE UPDATE FOR MY GALAXY NEXUS(I9250).

    THANKS AGAIN.

    Reply
  9. Ron says:
    12 years ago

    Woo Hooo! So long Samsung Servers!!!!

    Reply
  10. riyad says:
    12 years ago

    i’m using Galaxy Nexus Root Toolkit 1.6.2 but when i press unlock it get stuck in fastboot menu and shows fastboot device not found. what to tdo? i’ve already installed ADB and fastboot drivers. When it goes into fastboot menu it searches for Android 1.0 driver. Please help.

    Reply
    • Mayur says:
      12 years ago

      That means Fastboot drivers are not working, try installing them manually. http://webtrickz.com/new-method-installing-adb-and-fastboot-drivers-for-galaxy-nexus-on-windows-7-windows-8/

      Reply

Leave a Reply Cancel reply

Your email address will not be published. Required fields are marked *

Latest Stories

ios 18

iOS 18: How to Add Screen Record to Control Center on iPhone

March 30, 2025
ios photos logo

iOS 18: How to Clear Recently Viewed Photos on iPhone

December 27, 2024
ios photos logo

How to Find Your Favorite Photos in iOS 18 on iPhone

December 30, 2024
ios 18

How to Reset Control Center to Default in iOS 18.1 on iPhone

April 2, 2025
iphone 16 pro max always-on display

How to Turn Off Always-On Display on iPhone 16 Pro & 16 Pro Max

November 11, 2024
ios 18

How to Find Recently Deleted Photos in iOS 18 on iPhone

December 30, 2024
apple iphone 16 pro

How to Close Apps on iPhone 16, 16 Pro, and 16 Pro Max

October 22, 2024

Trending Stories

  • Apple iphone 16

    How to Turn Off and Restart iPhone 16, 16 Pro, and 16 Pro Max

  • How to Put Your iPhone 16 on Vibrate or Silent Mode

  • How to Turn Off & Restart iPhone 15, 15 Pro, and 15 Pro Max

  • How to Turn Off Most Relevant Comments on Facebook

  • 4 Ways to Remove the Floating Home Button on iPhone

  • About Us
  • Contact Us
  • Privacy Policy
  • Advertise

© 2025 WebTrickz. All Rights Reserved.

No Result
View All Result
  • Reviews
  • Apps
  • How To’s
  • Android
  • Google
  • iPhone
  • Mac
  • About Us
  • Contact Us
  • Privacy Policy

© 2025 WebTrickz. All Rights Reserved.