With iOS 26, Apple has redesigned the Camera app to make it cleaner and more intuitive. The new layout only shows the Photo and Video modes by default, while additional capture options such as the camera timer, Live Photo toggle, aspect ratio, and filters are now tucked away in a sub-menu.
If you recently updated your iPhone to iOS 26, you may be wondering: Where is the timer option in the camera app? Don’t worry, this guide shows you how to set a camera timer in iOS 26 on iPhone 17, iPhone Air, iPhone 16, iPhone 15, and other supported devices.
Where is the Timer in iOS 26 Camera App?
Can’t find the timer option after updating to iOS 26? You’re not alone.
Unlike in iOS 18 and earlier, the timer icon is no longer visible in the toolbar above the shutter button. Instead, Apple has moved the timer and other controls into a new sub-menu, making the Camera app look simpler but also slightly confusing at first.
Why Use the Camera Timer?
The camera timer on iPhone is great for hands-free photography and helps reduce shake for sharper shots. The self-timer feature is especially useful in:
- Group photos – Join a group picture using the 10-second delay.
- Long-exposure shots – Capture moving subjects like light trails or waterfalls without blur.
- Macro & low-light – Get clearer close-ups and dimly lit shots.
- High-quality selfies – Use the rear camera with the timer for better selfies.
How to Set a Timer on iPhone Camera in iOS 26
Want to take a timed photo on your iPhone running iOS 26? There are two ways to set a timer in the iOS 26 Camera app:
Using the Grid Icon
- Open the Camera app and switch to Photo or Portrait mode.
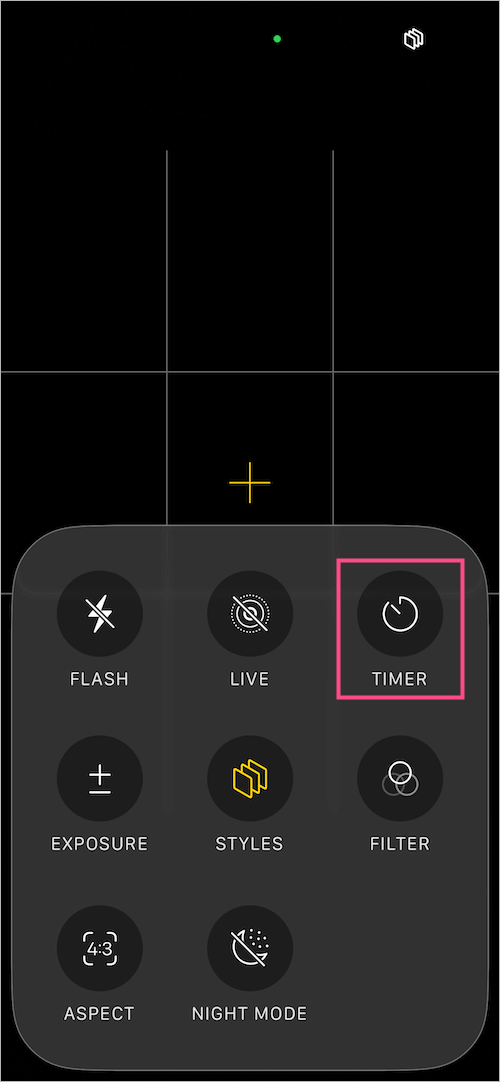
- Tap the grid icon at the top-right corner of the screen.

- From the expanded options, select the Timer icon.
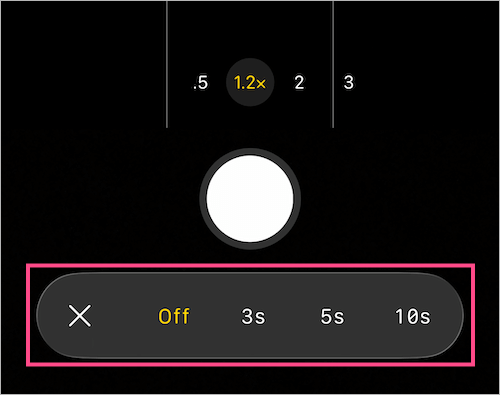
- To set a photo timer, choose either 3s (3 seconds), 5s (5 seconds), or 10s (10 seconds).
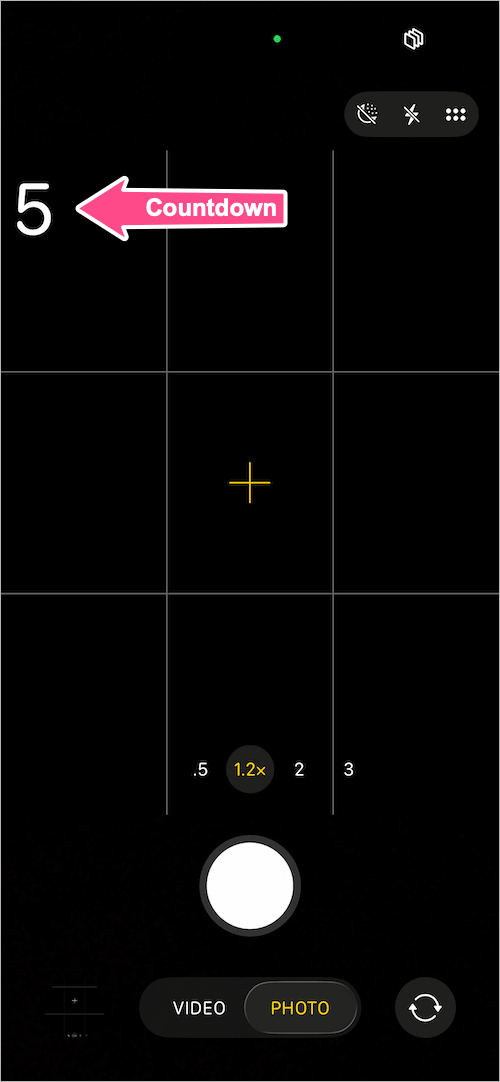
- When the timer is on, the chosen delay time will appear in the viewfinder.
- Tap the shutter or volume button to take a time delay photo on your iPhone.
By Swiping Up
- Open the Camera app.
- Swipe up from the bottom of the camera UI (or tap the Photo capture mode).
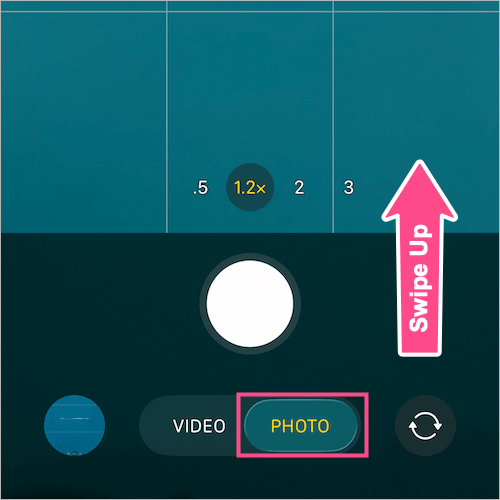
- Tap the Timer icon from the camera controls list.
- To take a delayed photo, select 3s, 5s, or 10s.
- Press the shutter, and the countdown timer will start.
Tip: Remember to turn on the camera timer the next time you want to take photos with a timer, since the setting is preserved only for a short time.
To turn off the Timer, go to the Timer setting in the Camera app and set it to Off.
How to Set a Selfie Timer on iPhone
The steps for setting a selfie timer are the same as above, except you need to switch to the front-facing camera first. After setting the timer, position your iPhone, strike a pose, and wait for the countdown to finish before your selfie is taken.
How the iPhone Camera Timer Works
When you set a 3s, 5s, or 10s timer and press the shutter, a countdown appears with the flash blinking each second. The iPhone then captures a burst of 10 photos, and you can use the timer with both the front and rear cameras.
How to Use the iPhone Timer Without Burst Mode
By default, the timer captures 10 burst shots instead of a single photo, letting you pick the best one later. The drawback is that you end up with multiple photos of the same subject when you may only want one.
iOS doesn’t provide a direct way to disable Burst mode when using the timer, but there’s a simple workaround.
To take a timed photo without Burst, switch to Live Photo or Portrait mode, or turn on the flash. With any of these enabled, the timer will capture just one photo instead of a burst.
Tip: If your iPhone is still on iOS 18, follow this guide instead: How to Set a Timer on iPhone 15 or iPhone 14 Camera.
ALSO READ: How to Turn Off Do Not Disturb on iPhone 17, 16, 15, or Air


