WebTrickz
TRENDING
  • How to Turn Off and Restart iPhone 15
No Result
View All Result
  • Reviews
  • Editorials
  • Social Media
    • Facebook
    • Twitter
    • YouTube
    • Messenger
    • Instagram
    • Snapchat
    • WhatsApp
    • TikTok
  • Apps
  • How To’s
  • Apple
  • iPhone
  • Google
  • Android
  • Mac
  • Security
  • About Us
    • About Us
    • Contact Us
    • Privacy Policy
No Result
View All Result
WebTrickz
No Result
View All Result
Home Windows 7

Take Ownership of a File or Folder in Windows 7 and Vista

Mayur Agarwal by Mayur Agarwal
March 11, 2024
in Windows 7

Have you ever encountered the frustrating “Permission Denied” message when trying to access or modify a file or folder in Windows? This issue often arises when you don’t have the necessary permissions to perform the action.

Windows 7 and Vista implement strict security measures to protect system files and prevent users from modifying them without appropriate permissions. While taking ownership manually is possible, it can be a cumbersome and confusing process. Thankfully, a small and portable utility called “TakeOwnership” makes this task very easy.

Take Ownership

TakeOwnership adds a “Take Ownership” context menu item to all files and folders. This menu option allows users to modify discretionary access control lists (DACLs) or grant permission to modify a file or folder with just a single click. This utility simplifies the process of taking ownership, letting users easily manage their files and folders.
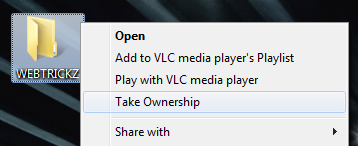
Take Ownership in context menu

To take ownership in Windows 7 and Vista, follow the steps below:

  1. Download TakeOwnership, and extract it to a folder.
  2. Open the Ownership.exe file and the TakeOwnership utility will launch.
  3. Right-click on the file or folder you want to take ownership of. From the context menu, select “Take Ownership.”
  4. A confirmation dialog will appear, click ‘Yes’ to confirm.
  5. That’s it. You can now modify the selected file or folder.

Supported OS: Windows 7, Vista, and Windows 8/10 (32-bit and 64-bit)

via [Addictive Tips]

Tags: Windows Vista
ShareTweetSend
Previous Post

Capture Quality screenshots without black corners & alpha transparency with 7capture

Next Post

Flitskikker InfoTool – Displays Full System Information & Compares your system with system requirements of Games

Mayur Agarwal

Mayur Agarwal

Mayur Agarwal, the founder and editor of WebTrickz, is a tech enthusiast with a Bachelor's degree in Computer Applications and over a decade of writing experience. His passion for technology and gadgets inspires him to create insightful How To's and troubleshooting guides.

Next Post

Flitskikker InfoTool – Displays Full System Information & Compares your system with system requirements of Games

Leave a Reply Cancel reply

Your email address will not be published. Required fields are marked *

Latest Stories

ios 18

iOS 18: How to Add Screen Record to Control Center on iPhone

March 30, 2025
ios photos logo

iOS 18: How to Clear Recently Viewed Photos on iPhone

December 27, 2024
ios photos logo

How to Find Your Favorite Photos in iOS 18 on iPhone

December 30, 2024
ios 18

How to Reset Control Center to Default in iOS 18.1 on iPhone

April 2, 2025
iphone 16 pro max always-on display

How to Turn Off Always-On Display on iPhone 16 Pro & 16 Pro Max

November 11, 2024
ios 18

How to Find Recently Deleted Photos in iOS 18 on iPhone

December 30, 2024
apple iphone 16 pro

How to Close Apps on iPhone 16, 16 Pro, and 16 Pro Max

October 22, 2024

Trending Stories

  • Apple iphone 16

    How to Turn Off and Restart iPhone 16, 16 Pro, and 16 Pro Max

  • How to Put Your iPhone 16 on Vibrate or Silent Mode

  • How to Turn Off & Restart iPhone 15, 15 Pro, and 15 Pro Max

  • How to Turn Off Most Relevant Comments on Facebook

  • 4 Ways to Remove the Floating Home Button on iPhone

  • About Us
  • Contact Us
  • Privacy Policy
  • Advertise

© 2025 WebTrickz. All Rights Reserved.

No Result
View All Result
  • Reviews
  • Apps
  • How To’s
  • Android
  • Google
  • iPhone
  • Mac
  • About Us
  • Contact Us
  • Privacy Policy

© 2025 WebTrickz. All Rights Reserved.