Recently, I got a Mini Display Port to HDMI Adapter Cable to connect my MacBook Pro 13 (2011 model) to a Sony Full HD TV. But after connecting both the devices using the cable, it wasn’t easy to get them working properly. The problems caused were – there was No Sound from the TV and the MacBook screen was not appearing in Fullscreen mode on the TV (there were black edges on the TV screen even at 1080p resolution).
Fix: MacBook won’t connect to the TV
Seriously, this was driving me crazy as my MacBook Pro with an Intel HD Graphics 3000 (supports up to 2560 by 1600 pixels on an external display) couldn’t display 1080p on HDTV (Full HD) correctly. Fortunately, I figured out a way and was able to get it working perfectly. So, this article is for all those people who are experiencing a similar problem.
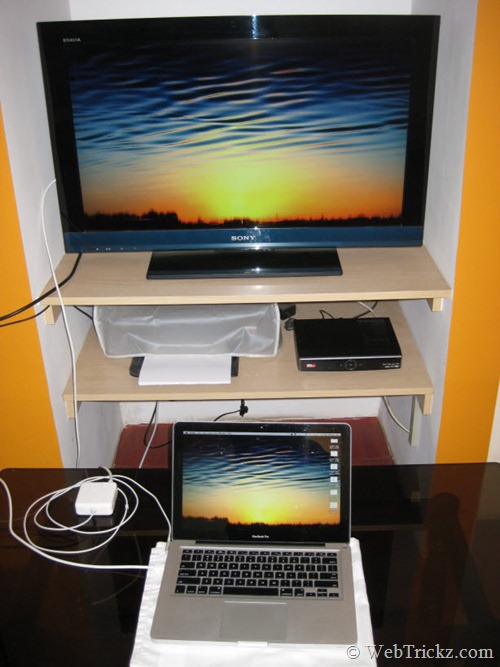
Requirements: To get all the things working, you must have a compatible cable. Your MacBook Pro should support Full HD (1080p or more) resolution on an external display and should support Audio Out via the Mini Display Port (MiniDP or mDP).
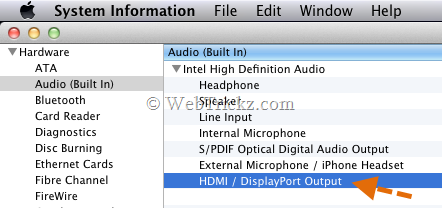
Note: Only MacBook Pros April 2010 and later support audio, but if you want to check to know for sure, click the Apple logo in the top left corner. Click “About This Mac” and then “More Info…”, and click System Report. Under Hardware, click “Audio (Built-In)”. If you see “HDMI/ DisplayPort Output”, then your MacBook Pro does support HDMI audio out.
How to connect MacBook Pro to TV with HDMI
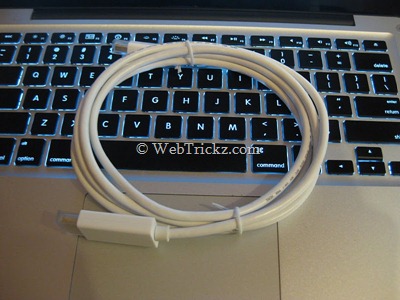
- Connect both devices using a quality Mini Display Port to HDMI Adapter Cable. We used the below one which is a single 6-foot cable that supports both audio and video, you can buy it from Amazon for $11.69 only.
- Use the TV remote to switch to the Input device. Select the HDMI port to which you’ve connected your MacBook Pro. For example HDMI 2 in our case.
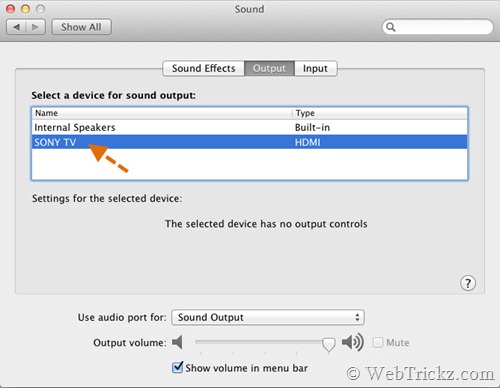
- To enable Audio from the TV’s speakers and NOT from MacBook Internal speakers – Open System Preferences > Sound, tap the Output tab, and select your TV as a device for sound output. Now sound would just come from your Television set.
- Displaying 1080p (1920×1080) resolution in full-screen mode when connecting MacBook Pro with HDTV using an HDMI cable –
- Open System Preferences > Display. You can enable ‘Show displays in menu bar’. The current resolution of your MacBook Pro will be listed. Do Not change it.
- In the ‘Color LCD’ window, open the Arrangement tab and uncheck the Mirror Displays option. (Full-screen mode on TV doesn’t seem to work when Mirror displays is enabled).
- Click on the ‘Gather Windows’ button.
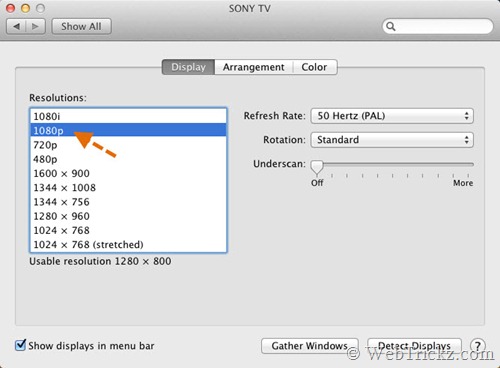
- TV window will show up (e.g. Sony TV). Select resolution as 1080p for your TV. You can select a higher resolution if it’s supported by your external device.
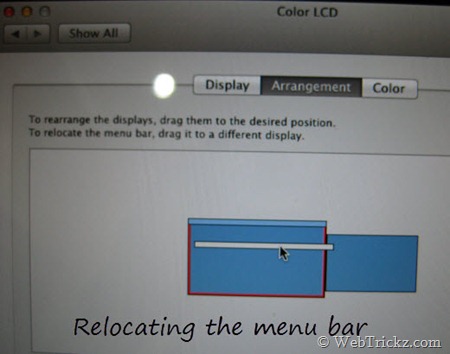
- Now open the Color LCD window and select the Arrangement tab. It will list two displays – the left screen is your MacBook display and the right screen is your HDTV display. (Refer to the image below.)
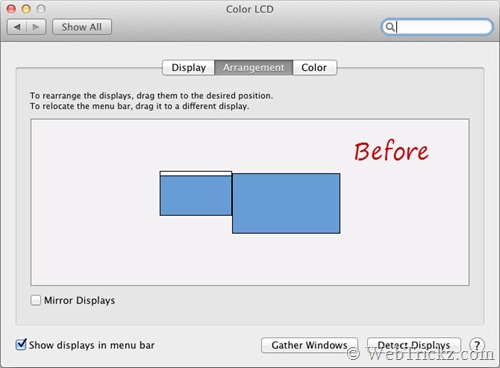
- Important – Rearrange the display and relocate the menu bar. To do so, Drag the right-side display to the left. Then drag the menu bar from the right display (MacBook) to the left display (HDTV). You will now see the entire MacBook desktop on your TV screen.
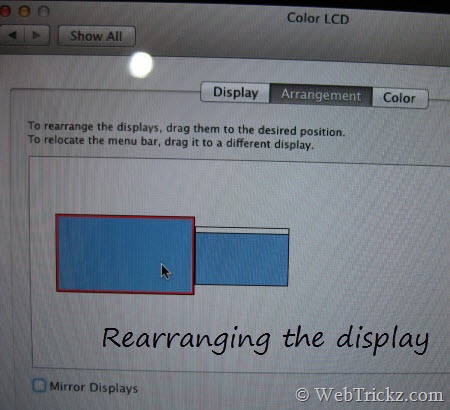
Rearranging the display on MacBook - The Displays Arrangement should now look like this.
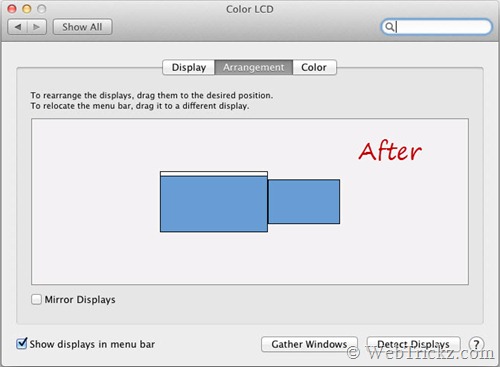
- Move the cursor to the left side of the MacBook Pro screen to move it onto your TV screen.
That’s it! Now you’re ready to use your HDTV as an external display to watch movies, photo slideshow, etc. For controls, you need to use a MacBook or you can attach a wireless keyboard and mouse for more comfort.
MacBook Pro display working in full-screen on HDTV
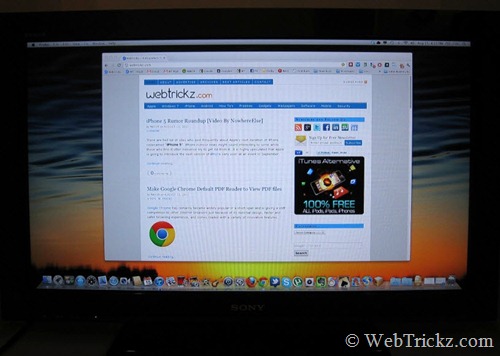
TIP: If you’re controlling the external display using a MacBook only, then it’s recommended to turn its screen brightness and backlit keyboard light down to 0% to save the battery. (At this time, MacBook just displays the desktop wallpaper).
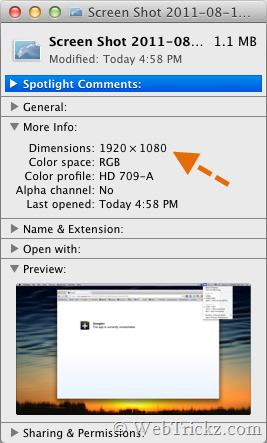
To confirm the screen resolution on the external display (HDTV), I just took a screenshot of the entire desktop (Shift+Command+3). See the dimensions: 1920 x 1080.
To Turn off the external display and get back to the MacBook Pro, just turn off your TV and remove the cable from the MacBook. You will see the complete desktop back on your MBP.
I’ve tried the above procedure on Mac OS X Lion. Do post your views below if you liked the article and don’t forget to share it with your friends.




Wow . . . . this appears to be the EXACT thing i’ve been looking for. Can’t wait to get home and see if it works for me.
If it does – thank you very, very much! If it doesn’t, then how DARE you waste my time and get my hopes up?!?!?!?!?
It worked! Thank you . . . .
Only problem is that the sound will no longer come through my tv!
@Shane The reason for sound not coming may be coz of an unsupported MacBook model. Read the Note to know which models support sound output via HDMI.
If we are working with an older MacBook model that doesn’t support sound output via HDMI is there anything different we can do to make it work? Thanks so much for the help thus far!
I need help. This article has been the best one i ever read in my journey to get this work together. It worked for a minute but i assume i did something wrong that now when my tv is connected to the mac, the tv is blue and green and the mac only shows the homescreen. anyone can help me wiht this situation?
Awesome can’t wait to try it when the lead finally comes. Just one question. Is there a way of saving the profile etc so u don’t have to go through the same routine each time u connect the cable to the tv etc?
Thanks
D
Thank you very much! I had the same problem and now, thanks to your article, everything works perfectly. But I’m still wondering, why it doesn’t work like it should, just simple through the possibility mirror displays, which could be much more easier and usefull. Especially when you’re controlling external display using MacBook only. What can we do… Once again, thank you very much!
Thank you so much! I was frustrated mirroring doesn’t allow fullscreen on the external monitor (TV) and also messes up with screen sharing. I have suffered for over a week with this issue but glad I didn’t give up and found this site. Switching mirroring off and moving the menu bar to the external monitor solves both problems.
My Vizio TV has a channel with video-only HDMI and an audio input so I do not have audio problems.
Thanks, help me a lot.
Thankyou, thankyou, thankyou!
My MBP 2011 running 10.6.7 wont recognise Samsung Smart TV via thunderbolt adaptor and HDMI cable. The external monitor is clearly ‘seen’ as when connected the MBP screen dims briefly, but the Samsung just says no signal detected or similar.
The problem is that there’s a major bug in OS X (as of Lion): No audio is sent to the TV unless “Mirror Displays” is on. This makes it impossible to watch movies full-screen, because you won’t get any audio.
Ridiculous.
i just bought a macbook pro w/ mountain lion. you’re instructions were great. i had to do one more step in sound. changed to internal sound, works great. thanks much for the excellent instructions.
Thank you so much for sharing this mate. Thanks Again!!
the arrangement tab doesnt show up on mine. it was just working now it doesnt work
My connection was working fine until one day it just stopped working. Now I get the infamous message: “Unsupported Signal. Please check the device output.” The laptop recognizes the other source and I can gather windows in my Display preferences but the TV is not supporting the signal. WTF?!?!?
thank you mayur for the tutorial. I tried the same with samsung smart tv and it worked like a charm.
Only issue i faced is the menu bar just moved away from the screen top which is not visible in my tv. Adjusting the “Undersan” under “Display” brought back the menu bar visible in the tv.
Hello. Thank you kindly for your help. I have an issue however, I can only use 720p or 1080i and the 1080i does not look good, there\’s a lot of like pixel noise. If I use the 1080p it will come on the TV for a second with some weird flashing pixelated noise then go away. Also, I my laptop Macbook Pro 2011 supports hdmi out for audio but only the internal speakers will work. I\’m using an adapter for thunderbolt to hdmi, could this be the problem?
OK…SO WEIRD. Out of the blue I was going over the steps from the beginning again while I was in 720p and decided to try the 1080p setting and hey presto it worked. I have NO idea why it worked that particular time and not the other 12 times I tried. I\’m confused. I\’m thinking maybe there\’s something about the order in which you do things? In any case, the audio still wont work from the hdmi. Also, I have an Apple TV and while I was writing this I was trying to see if I could use the Apple TV as the audio out and as soon as I plugged the power into it and the cord from my receiver the 1080p stopped working as it did in the previous post. WTF? Is the apple tv and my macbook communicating as soon as I plug the power in to the apple TV? Can I change this? I\’m not too concerned about the audio because I just used the headphone port to my receiver, but it would be nice if it would work with the HDMI cable. Strange things are afoot.
When i connect the cable, macbook detects the external display and seems Everything is working perfect on the macbook as mentioned however screen still shows \”No Signal\” all the time. I did check with input source as HDMI and tried tweaking with every possible thing but display not coming on the screen. what could be the possible reason for the same?
This was the ONLY article I found that actually helped solve the problem. Thank you for taking time to explain the steps and even add photos. Photos really make the difference.