Most of us save our memories on our Macbook since they offer abundant storage space to save our precious moments. It’s a great joy to take pictures and save them on a laptop to make them part of our memories. But what if these images and videos get accidentally deleted?
Sounds uneasy and disturbing too, right?
It shouldn’t be a surprise to know that your media files are not there anymore. Data loss can happen due to several reasons. Here, we’ve discussed a few of the most common situations in which your data can potentially get lost.
What causes photo loss scenarios?
There can be a lot of reasons for data loss but the most common ones include:
1. Entire Photo Album Deletion
If you’ve, somehow, deleted your entire photo album from Mac, you can easily find that in your Trash bin and restore it from there. If you can’t find that, try using Time Machine backup to restore your photos saved online.
2. Formatted Partition
Formatting your storage device’s partition destroys every single file on it. So, getting back your old photos, videos, or any other document, becomes quite a challenging task.
3. Emptied Trash bin after accidental deletion
This one is quite common. All the deleted files reside in the Trash bin from where you can easily restore them later. Most of the time, people accidentally delete their Trash bin as well and hence, lose the option to recover the file from the Trash bin.
In this case, you would need to install a powerful data recovery tool to get your photos back.
4. A Virus Attack
Most of the time, a virus can destroy some of your media files. In that case, you’d need to make sure that the virus is no longer there in the computer by installing anti-virus software. Then use Tenorshare 4DDiG, a data recovery software, to recover your deleted files.
How to recover permanently deleted photos on Mac without software
There are many data loss scenarios where you don’t need to install any kind of software.
1. Recover from the Recently Deleted folder
Most of the time, you can easily find your lost data in your Trash bin.

For instance, you accidentally deleted the wedding photo album that was very close to your heart. In order to restore the deleted items, simply go to the Trash bin, right-click the file and select ‘Put Back’.
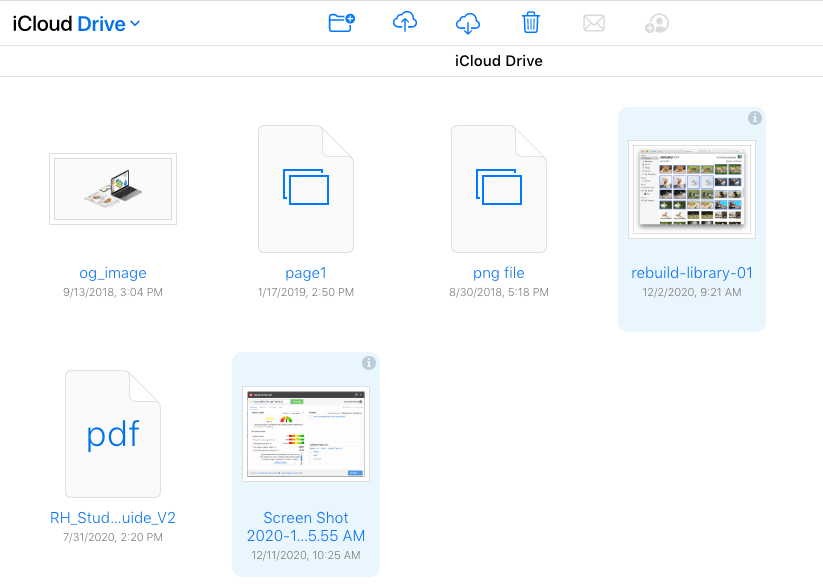
2. Restore deleted pictures from iCloud
If you can’t find your deleted stuff in Bin, try looking at your backed-up data on iCloud. Visit your iCloud settings and click on iCloud Drive.

Go to the permanently deleted photos option. Then select and download the photos you want to restore to your Mac.
3. Retrieve permanently deleted photos using Time Machine
You can also use Time Machine on Mac to recover lost files from your storage device. Make sure the device is connected.

Now open Time Machine by clicking the Time Machine icon in the top menu bar. You’ll be able to see a long list of files. You can simply restore any file from there.

How to retrieve permanently deleted photos on Mac with Tenorshare 4DDiG
Are you still looking to recover permanently deleted photos on Mac? In that case, you can try Tenorshare 4DDiG, an easy-to-use and one of the most effective recovery tools.
Some of the most salient features of Tenorshare 4DDiG includes the recovery of any type of file including:
- Deleted documents
- Deleted images and videos
- Audio files
- RAW files, and many more.
Installing Tenorshare 4DDiG is quite simple and convenient. Just visit their website and download the Mac version. Once downloaded, install the program on your device, and run it.
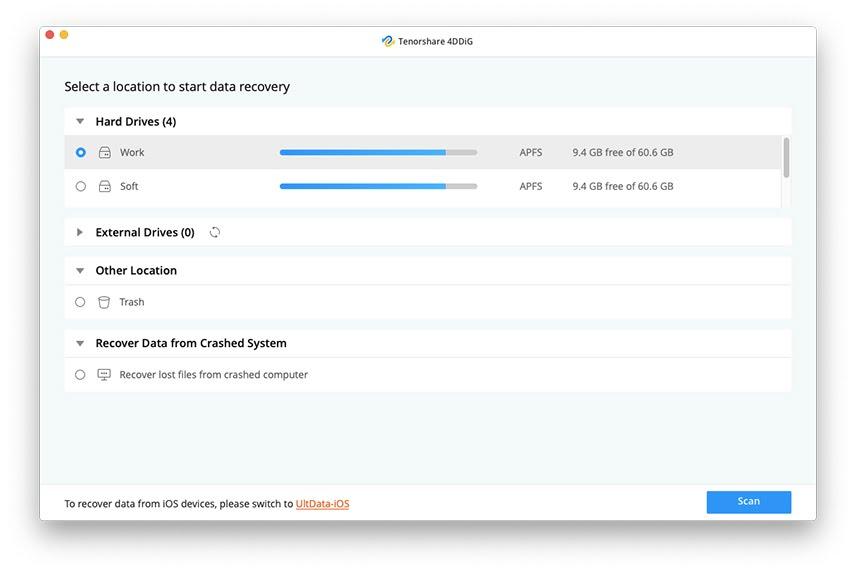
1. Choosing Drive/Disk
Choose the drive/disk from which you lost your files. Once selected, click the Scan button at the bottom of the user interface.
2. Scanning
The scanning process will take some time to finish depending upon the volume of data stored on the drive.
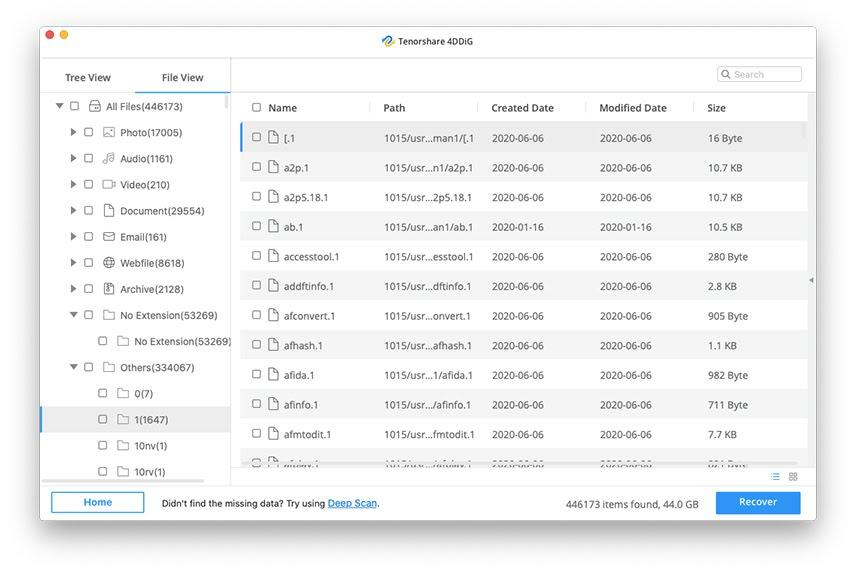
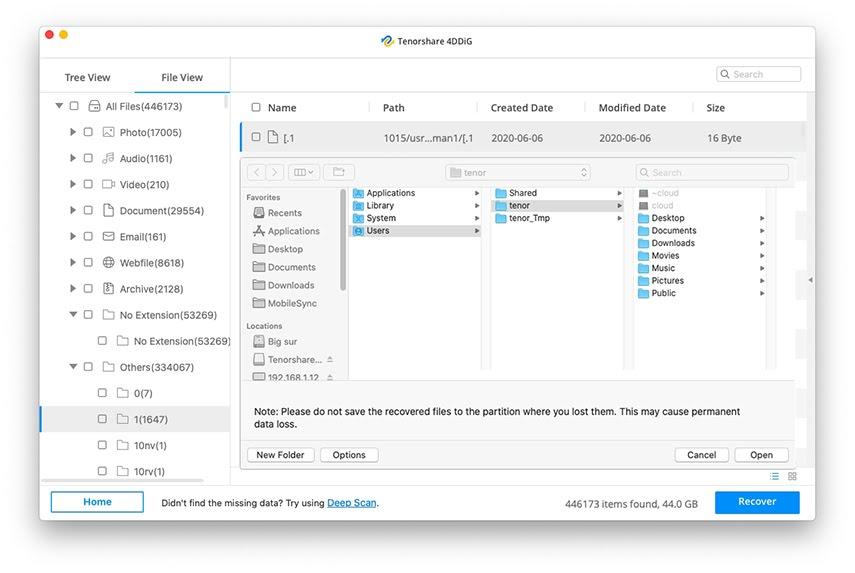
3. Preview and Recover
Once the scanning is completed, you’ll be shown a list of deleted items that you can preview prior to recovering them. This will allow you to only recover the desired files.
Conclusion
So, this was our brief guide on recovering deleted photos after deleting them permanently on Mac, with and without using the software.
No matter what file format you have lost, Tenorshare 4DDiG will dig deep down into your drives, and will definitely find it for you. However, we recommend you try the ‘Deep Scan’ feature to see the efficiency of this recovery tool.

For that purpose, Tenorshare has a New Year offer with up to 75% off! So, don’t waste this opportunity to grab the premium version of 4DDiG to get the maximum out of it.


