Newer iPhones with Face ID support come without a Home button. That means the old method of pressing the Home + Power button no longer works. If you’ve just switched from an older iPhone, you might feel stuck when trying to capture the screen on your iPhone 17 or iPhone Air.
Don’t worry. There are several ways to capture screenshots even without using the Power or Home button. This guide walks you through five easy methods to take a screenshot on iPhone 17, 17 Pro, 17 Pro Max, and iPhone Air.
How to Take a Screenshot on iPhone 17, 17 Pro, or iPhone Air
1. Using Buttons (Default Method)
- Open the screen or page you want to capture.
- Press the Side button (on the right) and the Volume Up button together.
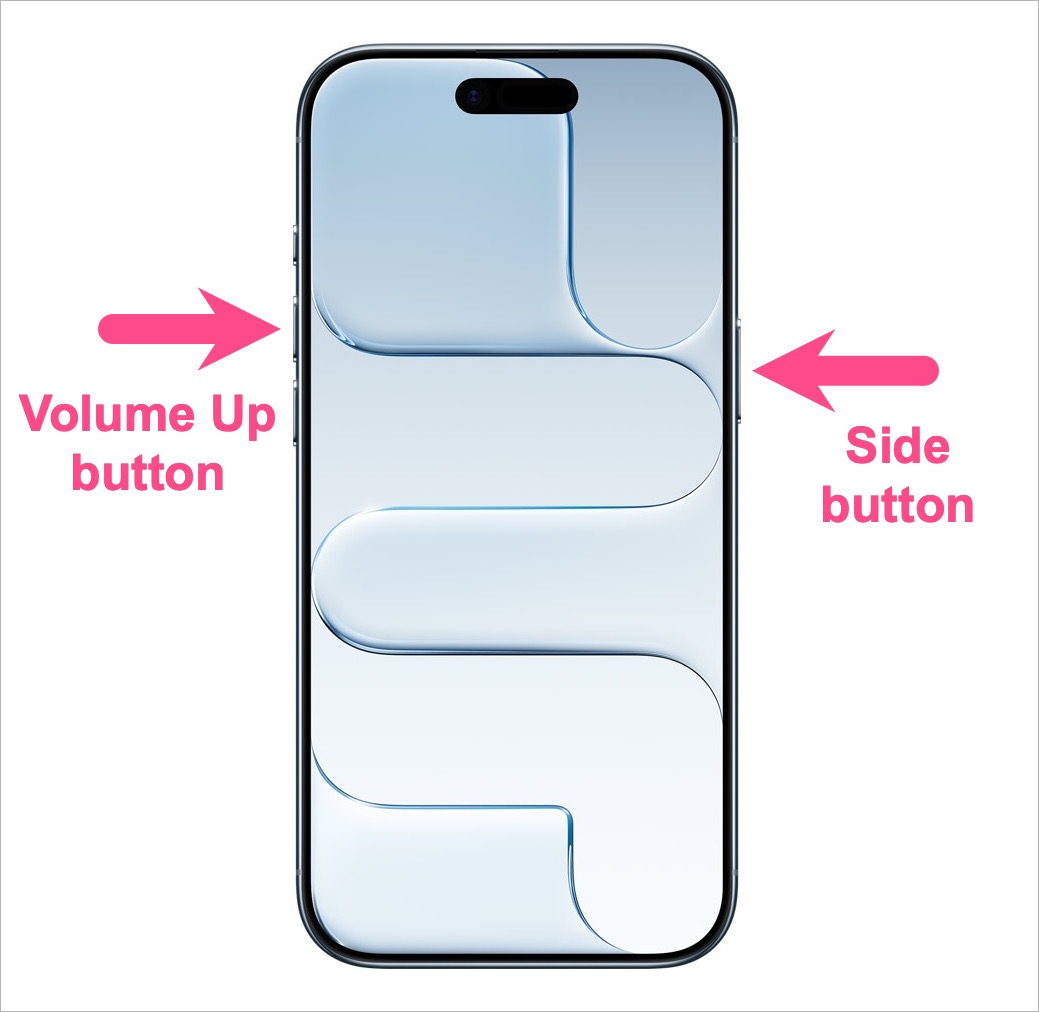
- The screen will flash (and you’ll hear a shutter sound if the iPhone is not on Silent).
- Your screenshot will now open in full-screen preview (instead of showing a temporary thumbnail in the corner).
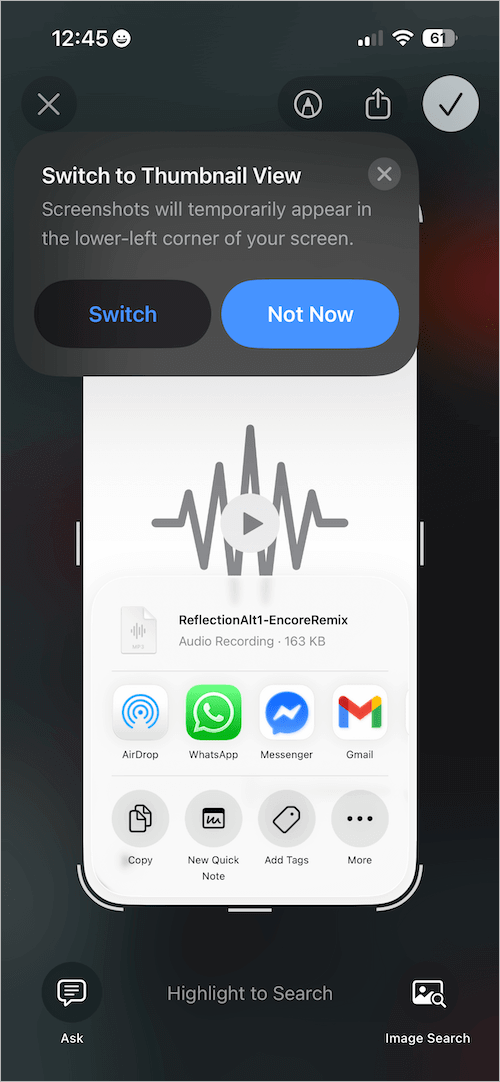
Full-Screen Screenshot Preview - Optional: Annotate the screenshot using markup tools or share it directly. You can also use Apple’s new Visual Intelligence features, like Highlight to Search or Lookup.
- To save the screen capture, tap the checkmark icon in the top-right corner and select Save to Photos.
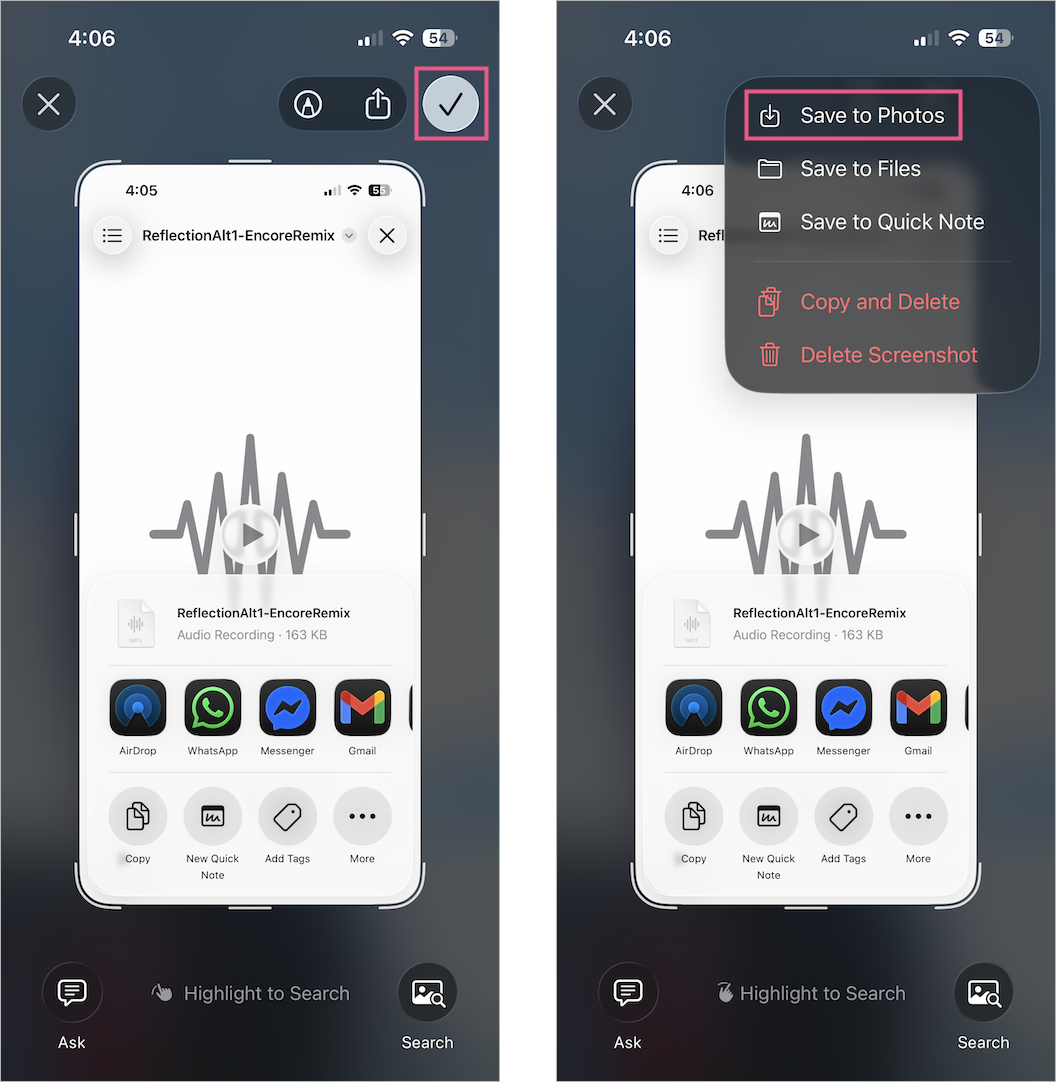
The screenshot will now be saved as an image in your iPhone’s gallery.
Tip: Prefer the old behavior? Switch to classic Thumbnail view (from full-screen previews) to instantly save screenshots to Photos without extra steps.
2. Using Back Tap
An accessibility feature, Back Tap lets you quickly take screenshots by simply tapping the back of your iPhone. The feature is handy, but you might end up taking accidental screenshots if you’re not careful when handling your iPhone.
To take a screenshot on iPhone 17, 17 Pro, or iPhone Air using Back Tap (Double Tap or Triple Tap):
- Go to Settings > Accessibility.
- Under Physical and Motor, tap on Touch.
- Scroll down to the bottom and select Back Tap.
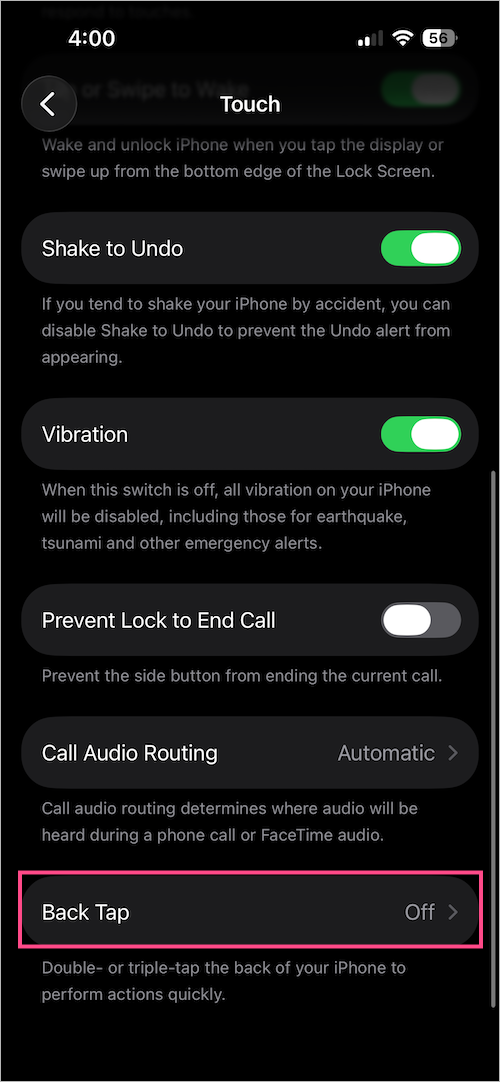
- Choose Double Tap and select Screenshot. You can also use the Triple Tap action.
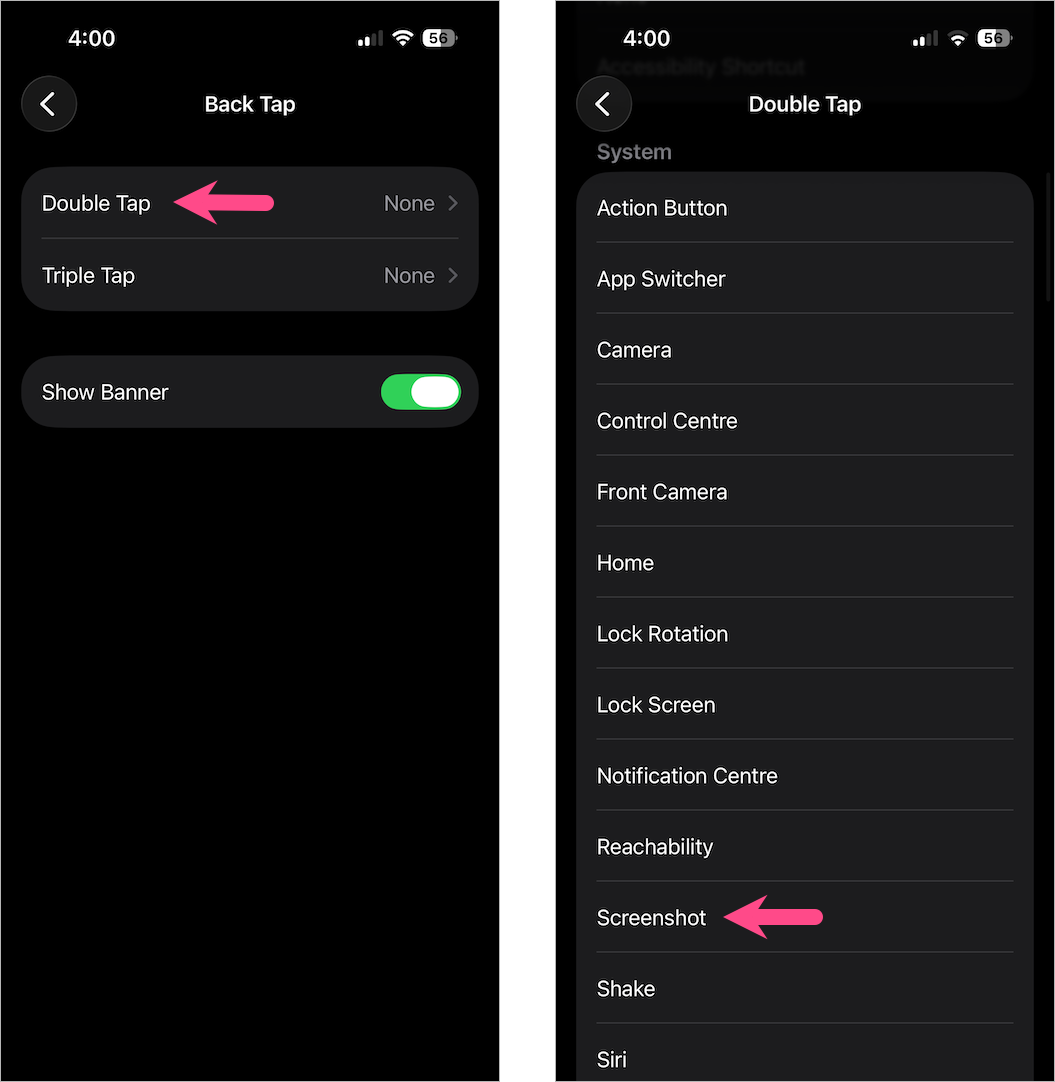
Now double-tap (or triple-tap) firmly on the back of your iPhone to take the screenshot.
3. Using AssistiveTouch
You can also take an iPhone 17 screenshot without buttons by using AssistiveTouch. This is a simple and convenient option for users who take frequent screenshots and prefer not to rely on the Side and Volume button combination.
For this, you’ll need to enable AssistiveTouch on your iPhone 17 or Air (if it isn’t already turned on). Here’s how you can do it:
- Open Settings > Accessibility > Touch.
- Tap AssistiveTouch at the top and turn it on.
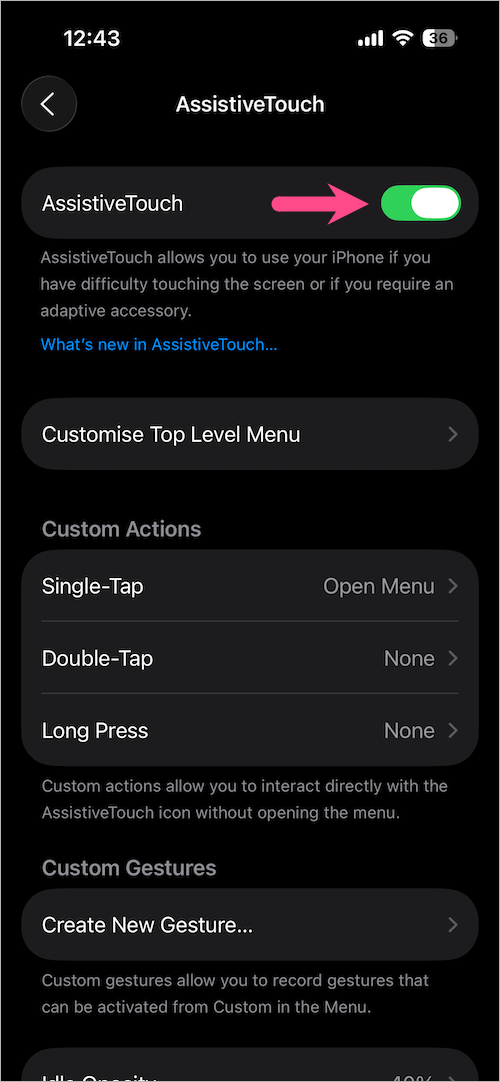
- Once it is enabled, you will see a floating home button on the screen.
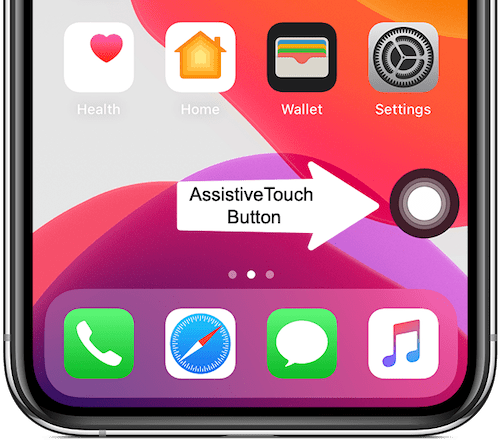
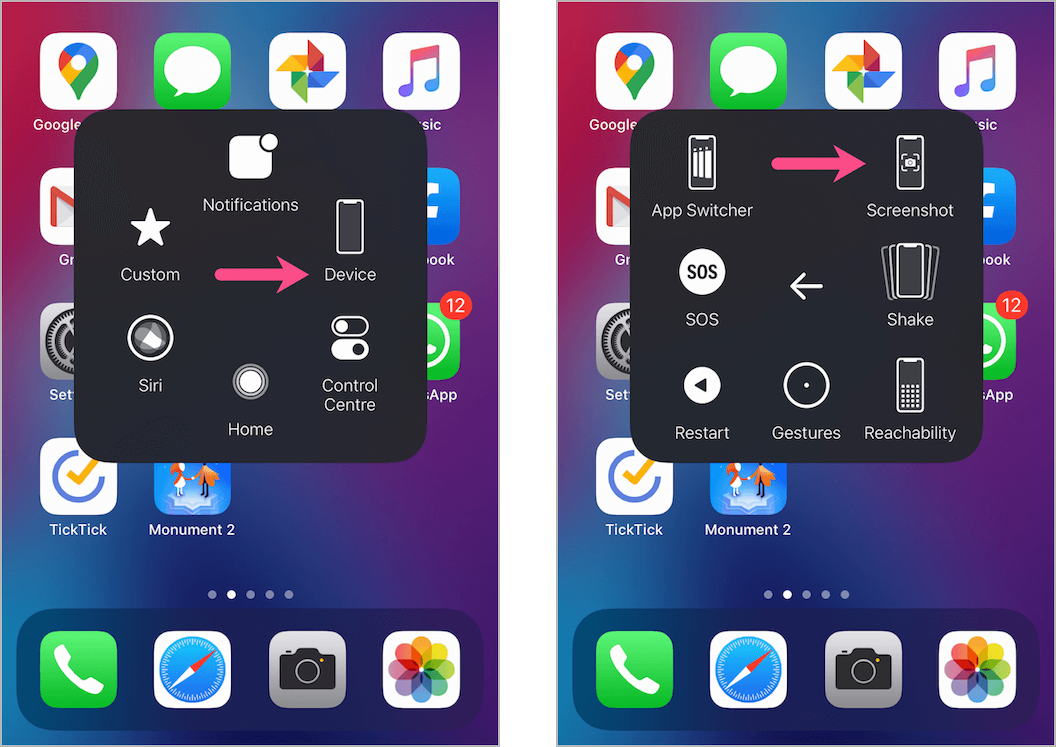
To screenshot on iPhone Air or iPhone 17 using Assistive Touch, tap the floating button. Then navigate to Device > More and tap Screenshot.
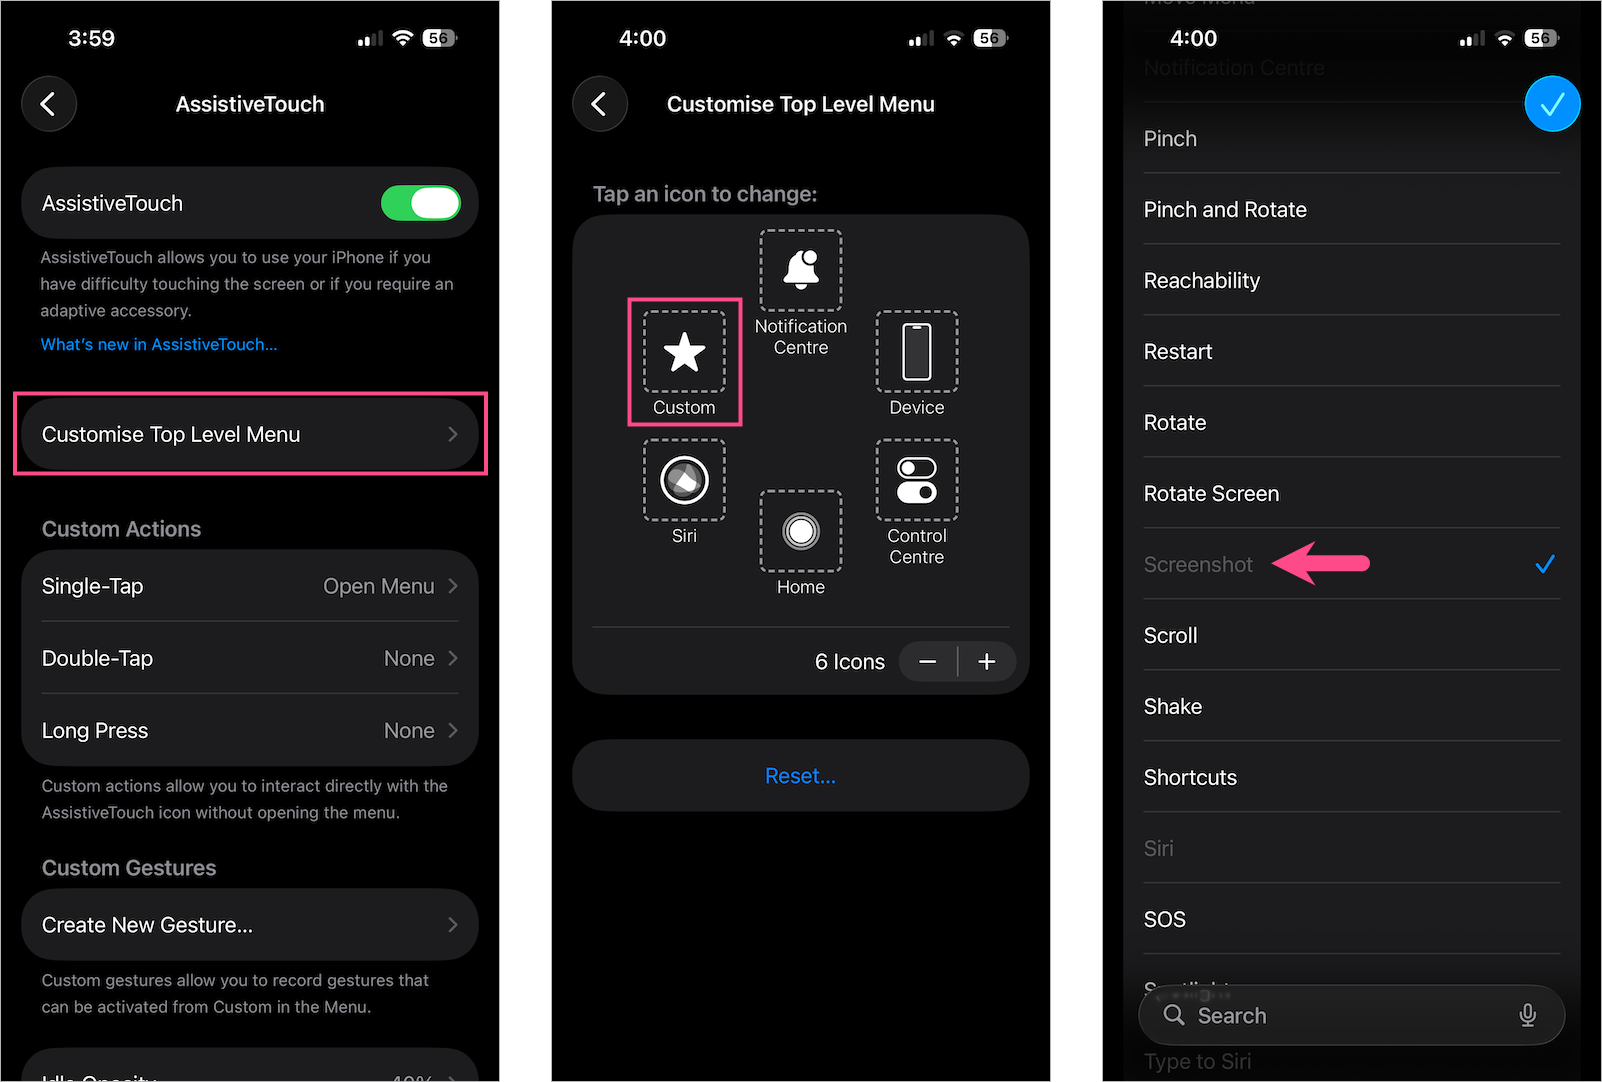
Tip: For quicker access, customise the top-level menu of AssistiveTouch and add the Screenshot option to the main menu.
To do so, go to AssistiveTouch settings and select Customise Top Level Menu. Tap the Custom icon (or add a new icon) and choose Screenshot from the list. Tap the tick mark icon to save the changes.
4. Ask Siri
You can also use Siri to capture a screenshot on iPhone 17 or iPhone Air without pressing any buttons.
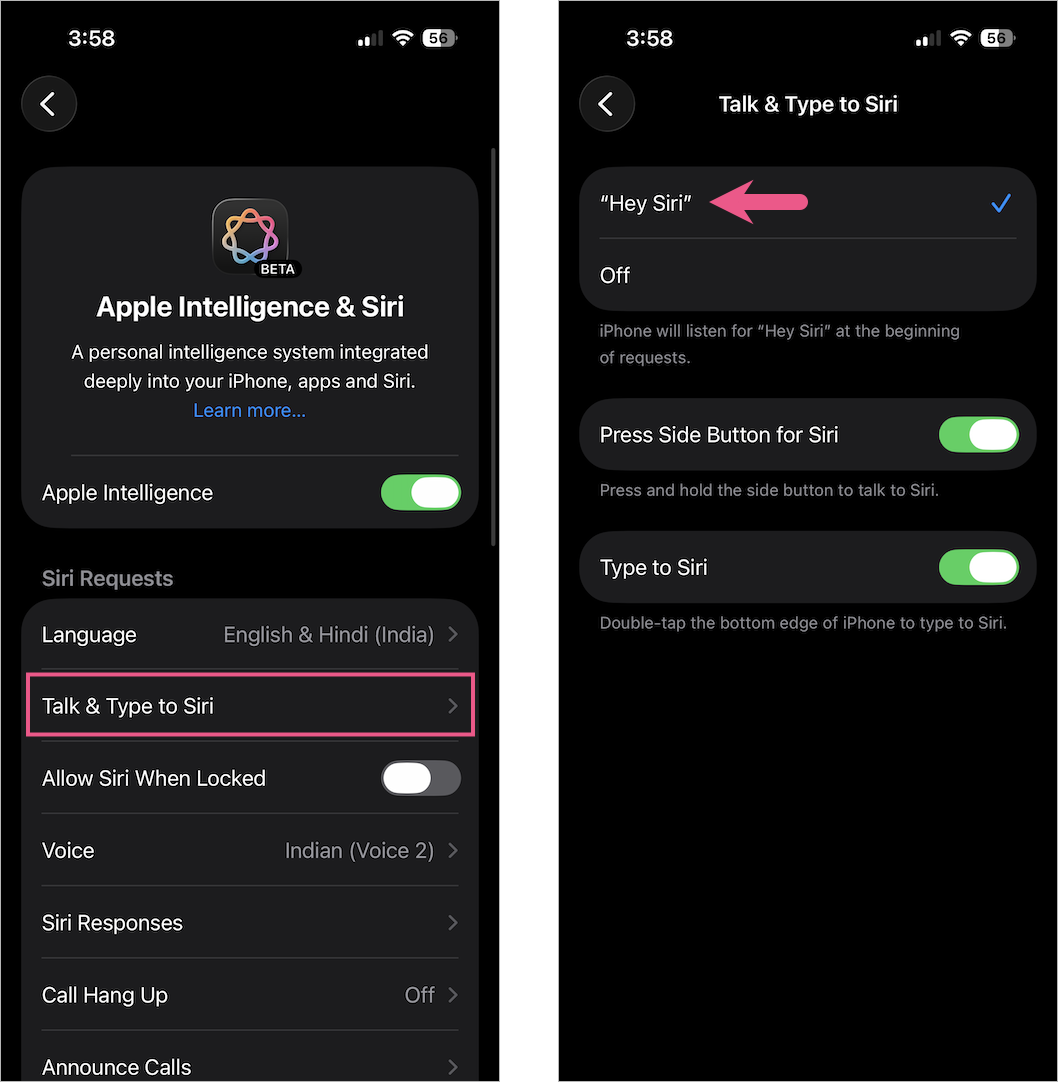
Make sure “Talk to Siri” is enabled in Settings. If it isn’t, then go to Settings > Apple Intelligence & Siri > Talk & Type to Siri and choose “Hey Siri“.
Next, say “Hey Siri, take a screenshot.” Or press and hold the Side button to trigger Siri, then say the command.
Siri will instantly capture your current screen and save it to Photos.
5. Using the Action Button
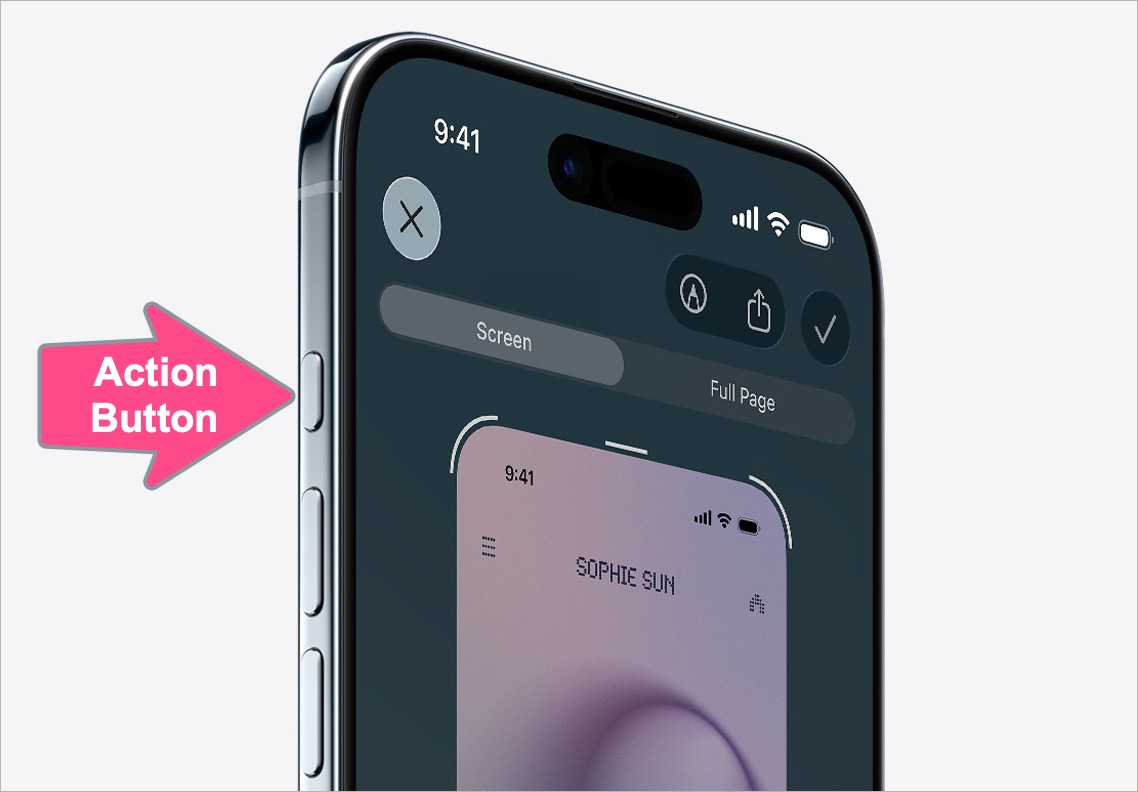
On the iPhone 17, 17 Pro, 17 Pro Max, and iPhone Air, you can quickly take a screenshot using the Action Button. Because Screenshot isn’t available by default in the Action Button functions, you’ll need to create a custom shortcut and assign it to the Action Button.
Follow these steps to screenshot with the Action button on an iPhone:
Create a Screenshot shortcut:
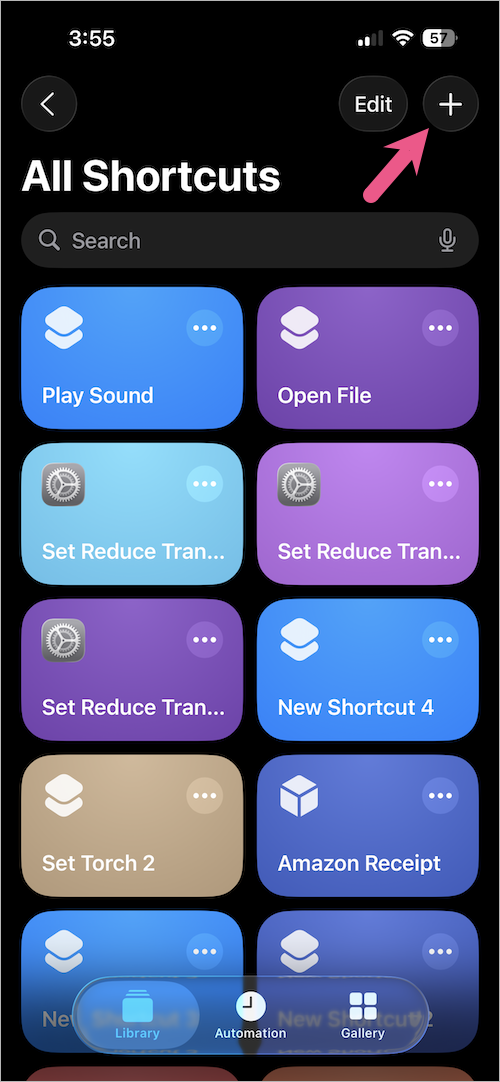
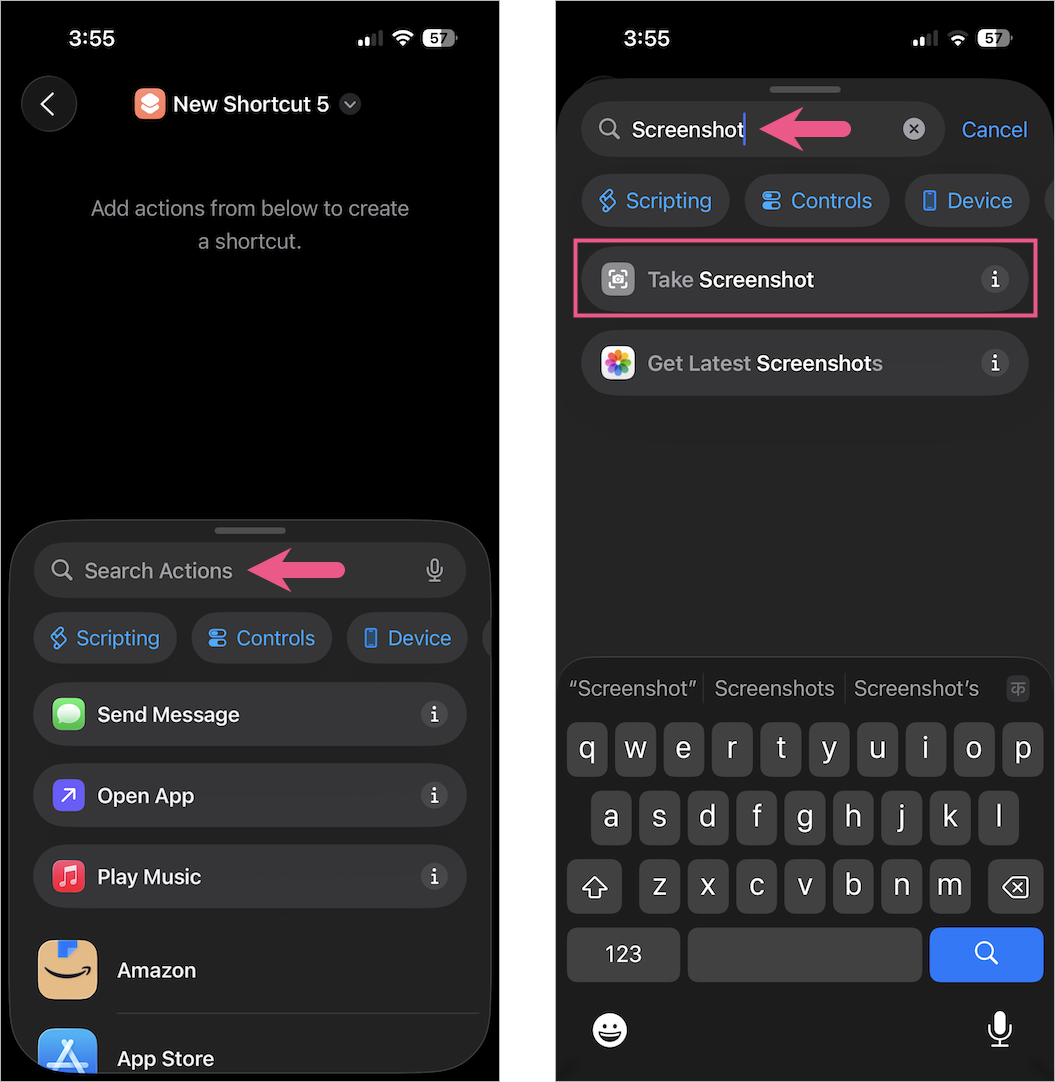
- Open the Shortcuts app.
- In the Library tab, tap the + icon at the top right corner.
- In the Search Actions field, type “screenshot”. Then select “Take Screenshot.”
- Open Search Actions again, search for “save to” and select “Save to Photos.” (Note: This action will save screenshots directly to the Photos app without showing a full-screen or thumbnail view.)
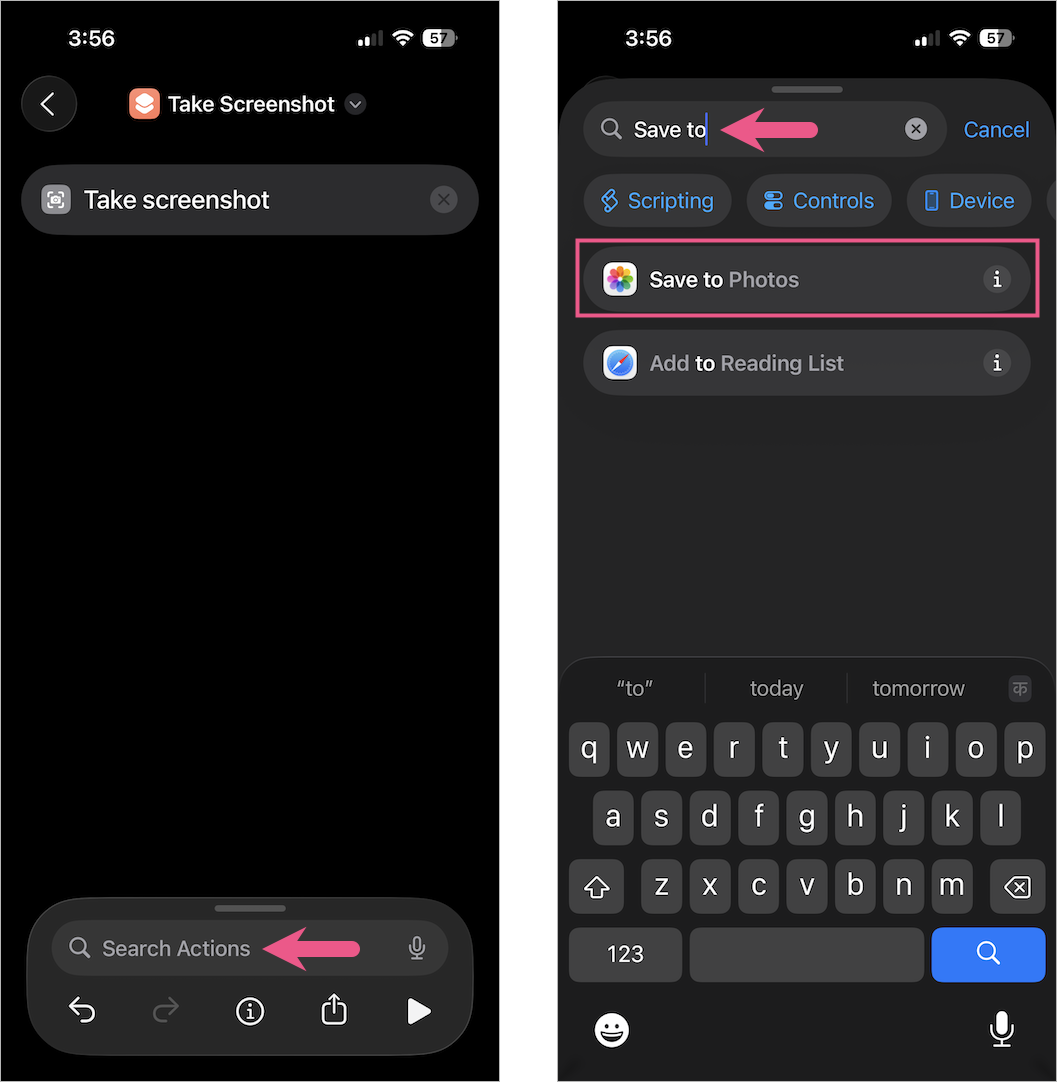
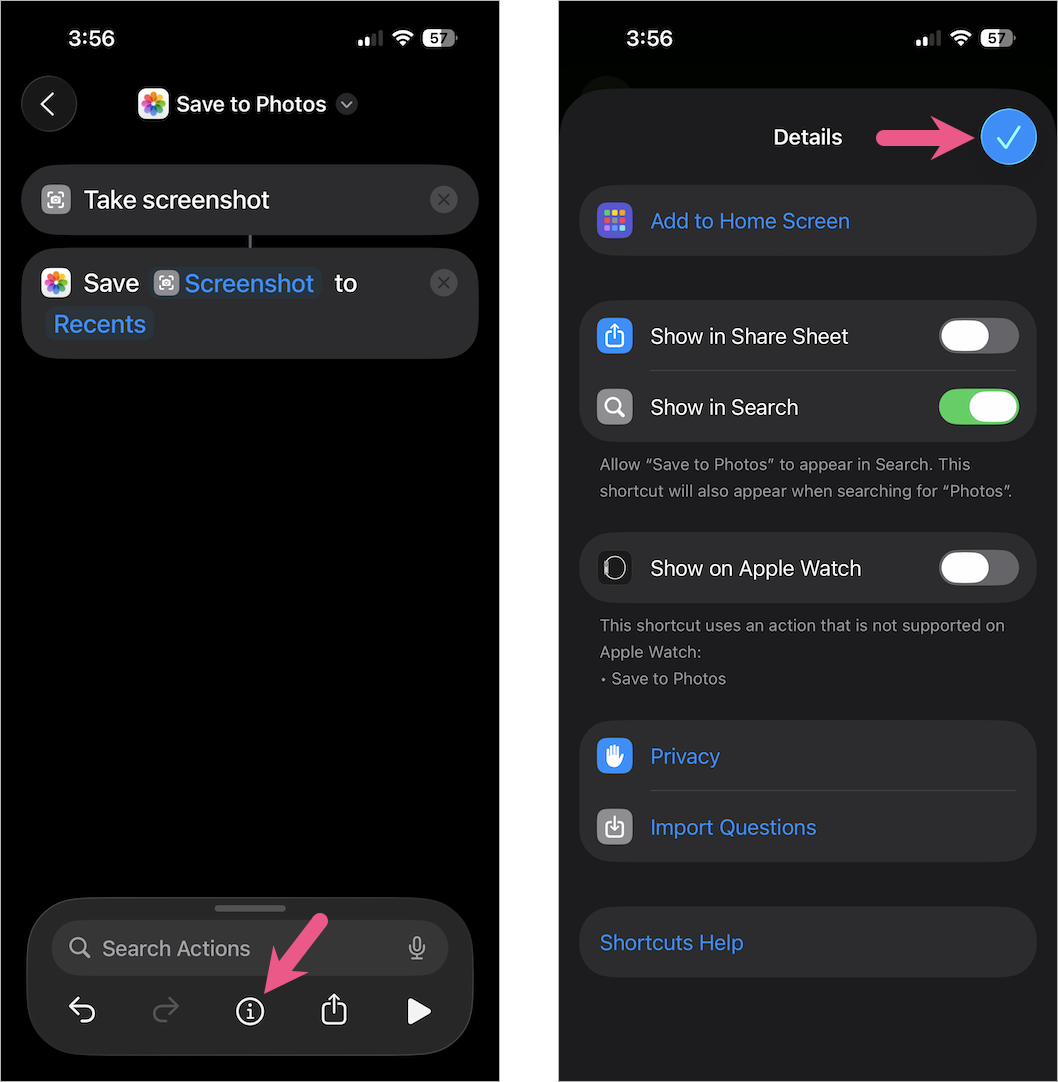
- Tap the i icon and tap the blue tick mark to save the shortcut.
Set Action Button to take screenshots:
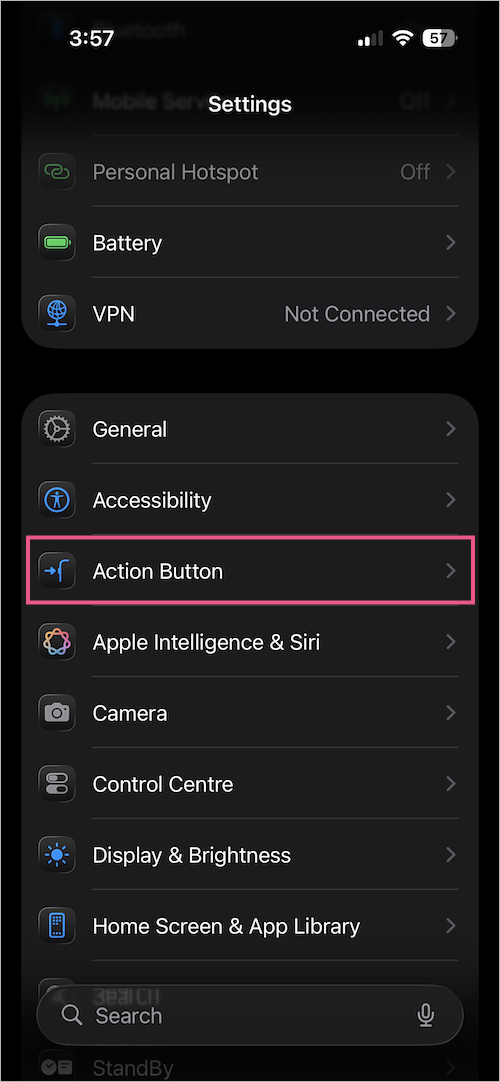
- Go to Settings > Action Button > Shortcut.
- Tap Choose a Shortcut and select the Save to Photos shortcut you just created.

- Now press and hold the Action Button whenever you want to capture the screen.
RELATED: How to Screen Record on iPhone 17, 17 Pro, or iPhone Air
Taking a Full Page Screenshot on iPhone 17 and Air
Instead of taking multiple screenshots, you can easily take a full-page screenshot of a web page, email, or document. Here’s how:
- Take a normal screenshot.
- Switch to Full Page preview.
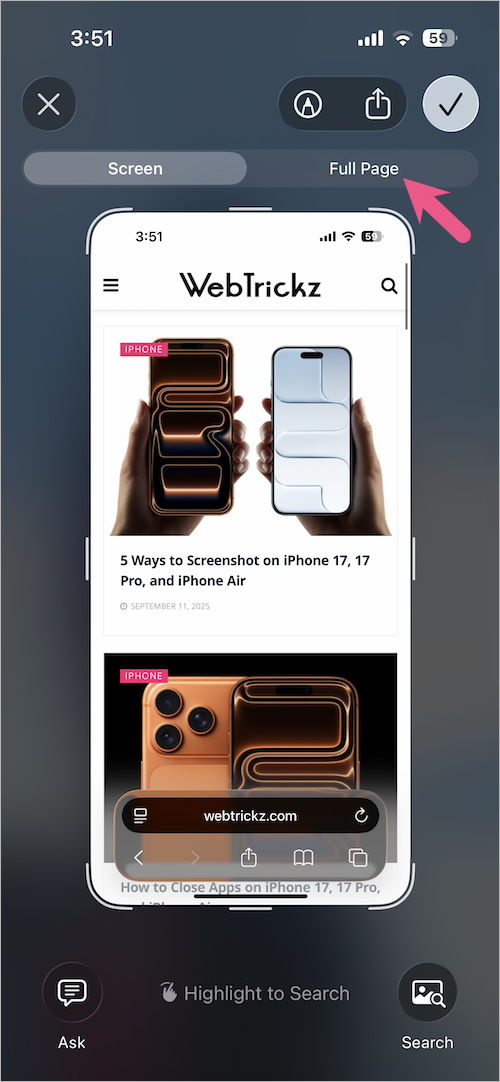
- If you’ve turned off Full-Screen Previews, tap the thumbnail preview in the lower-left corner. Then select Full Page at the top.
- Tap the checkmark icon and select Save to Photos.
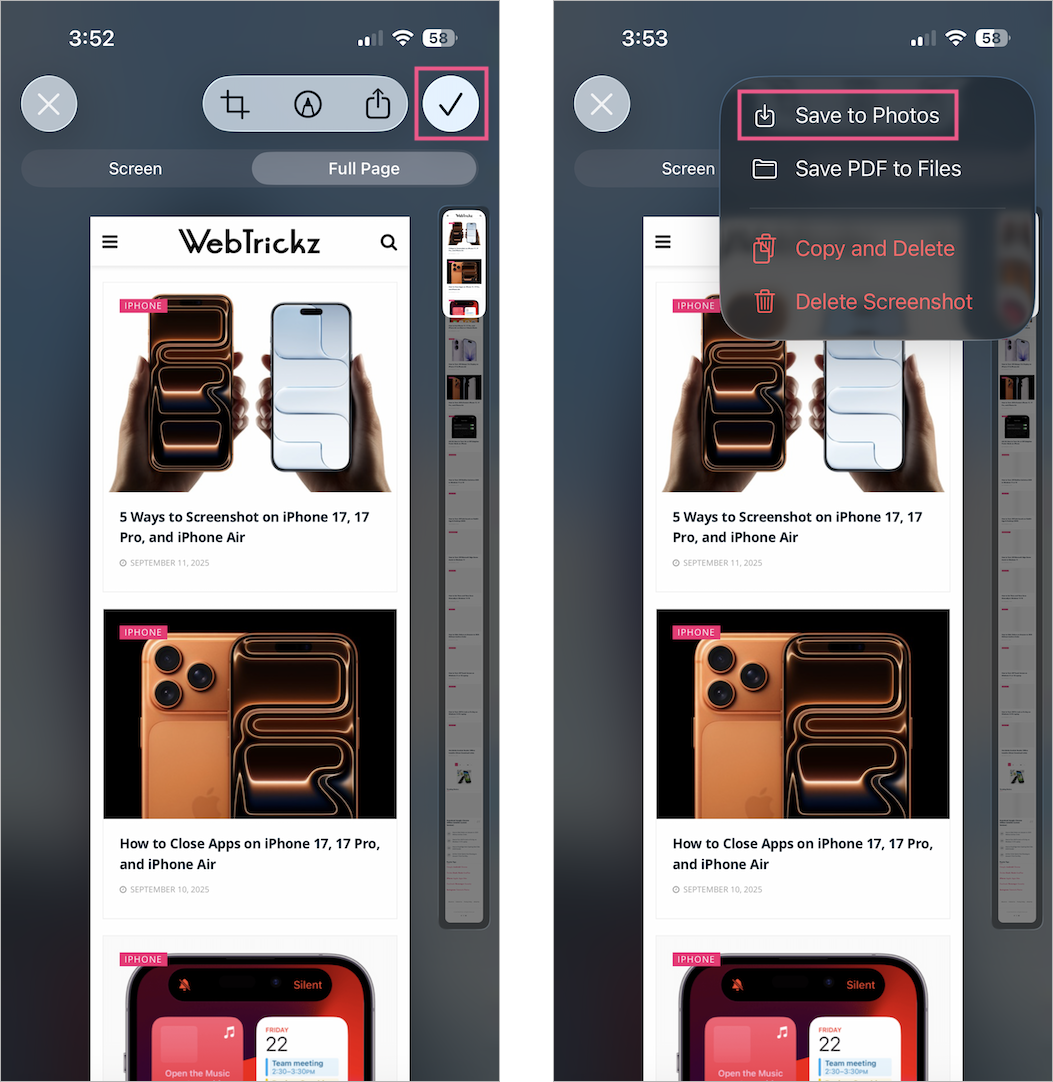
- Optional: Select Save PDF to Files to save the page as a PDF.
Tip: This works only in apps that support scrollable content like Safari, Mail, and Notes.
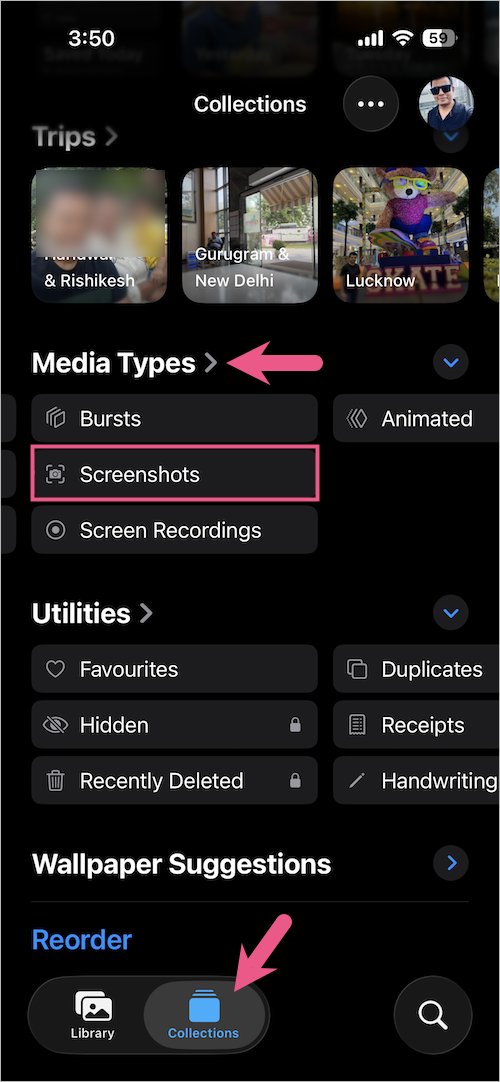
Where Are Screenshots Saved on iPhone 17 and Air?
All screenshots are automatically saved in the Photos app in PNG format.
To find them, open the Photos app and go to Collections. Then scroll down to Media Types and view the Screenshots album. Alternatively, you can quickly access them from the Library tab.
Tip: Turn Off Full-Screen Previews to Save Screenshots Directly
By default, iOS 26 displays screenshots in full-screen mode instead of showing a temporary thumbnail in the lower-left corner.
However, you can disable this behaviour and switch back to the old thumbnail view if you prefer to save screenshots directly to the Photos app.
To do so, go to Settings > General > Screen Capture. Then turn off Full-Screen Previews.

Here’s a full guide to automatically save screenshots in iOS 26 to Photos.
Tip: Save Screenshots in HDR Format
iOS 26 lets you capture HDR (High Dynamic Range) screenshots for improved quality with better contrast and colors. This ensures your screen captures look as sharp and vibrant as possible.
To capture HDR screenshots on iPhone 17, 17 Pro, or iPhone Air, head to Settings > General > Screen Capture. Select the HDR format.
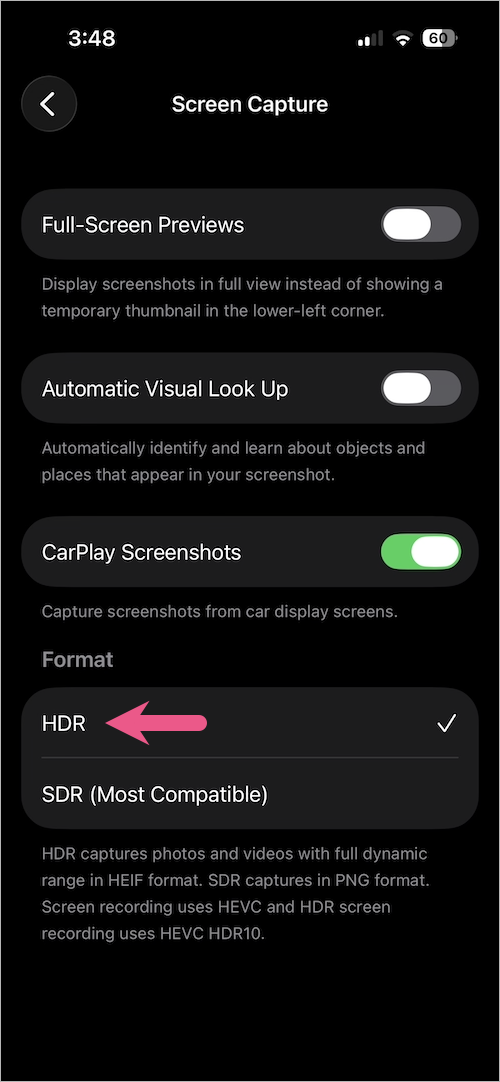
Note that HDR captures are saved in HEIF format instead of PNG.
RELATED TIPS:
- How to Turn Off CarPlay Screenshots in iOS 26 on iPhone
- Multiple Ways to Power Off or Restart iPhone Air


